1. Ifihan
Thank you for choosing the Waring Pro Professional Popcorn Maker. This appliance is designed to bring the classic movie theater popcorn experience to your home. With its vintage styling and efficient performance, you can enjoy up to 8 cups of delicious popcorn quickly. This manual provides essential information for the safe and effective operation, maintenance, and care of your new popcorn maker.
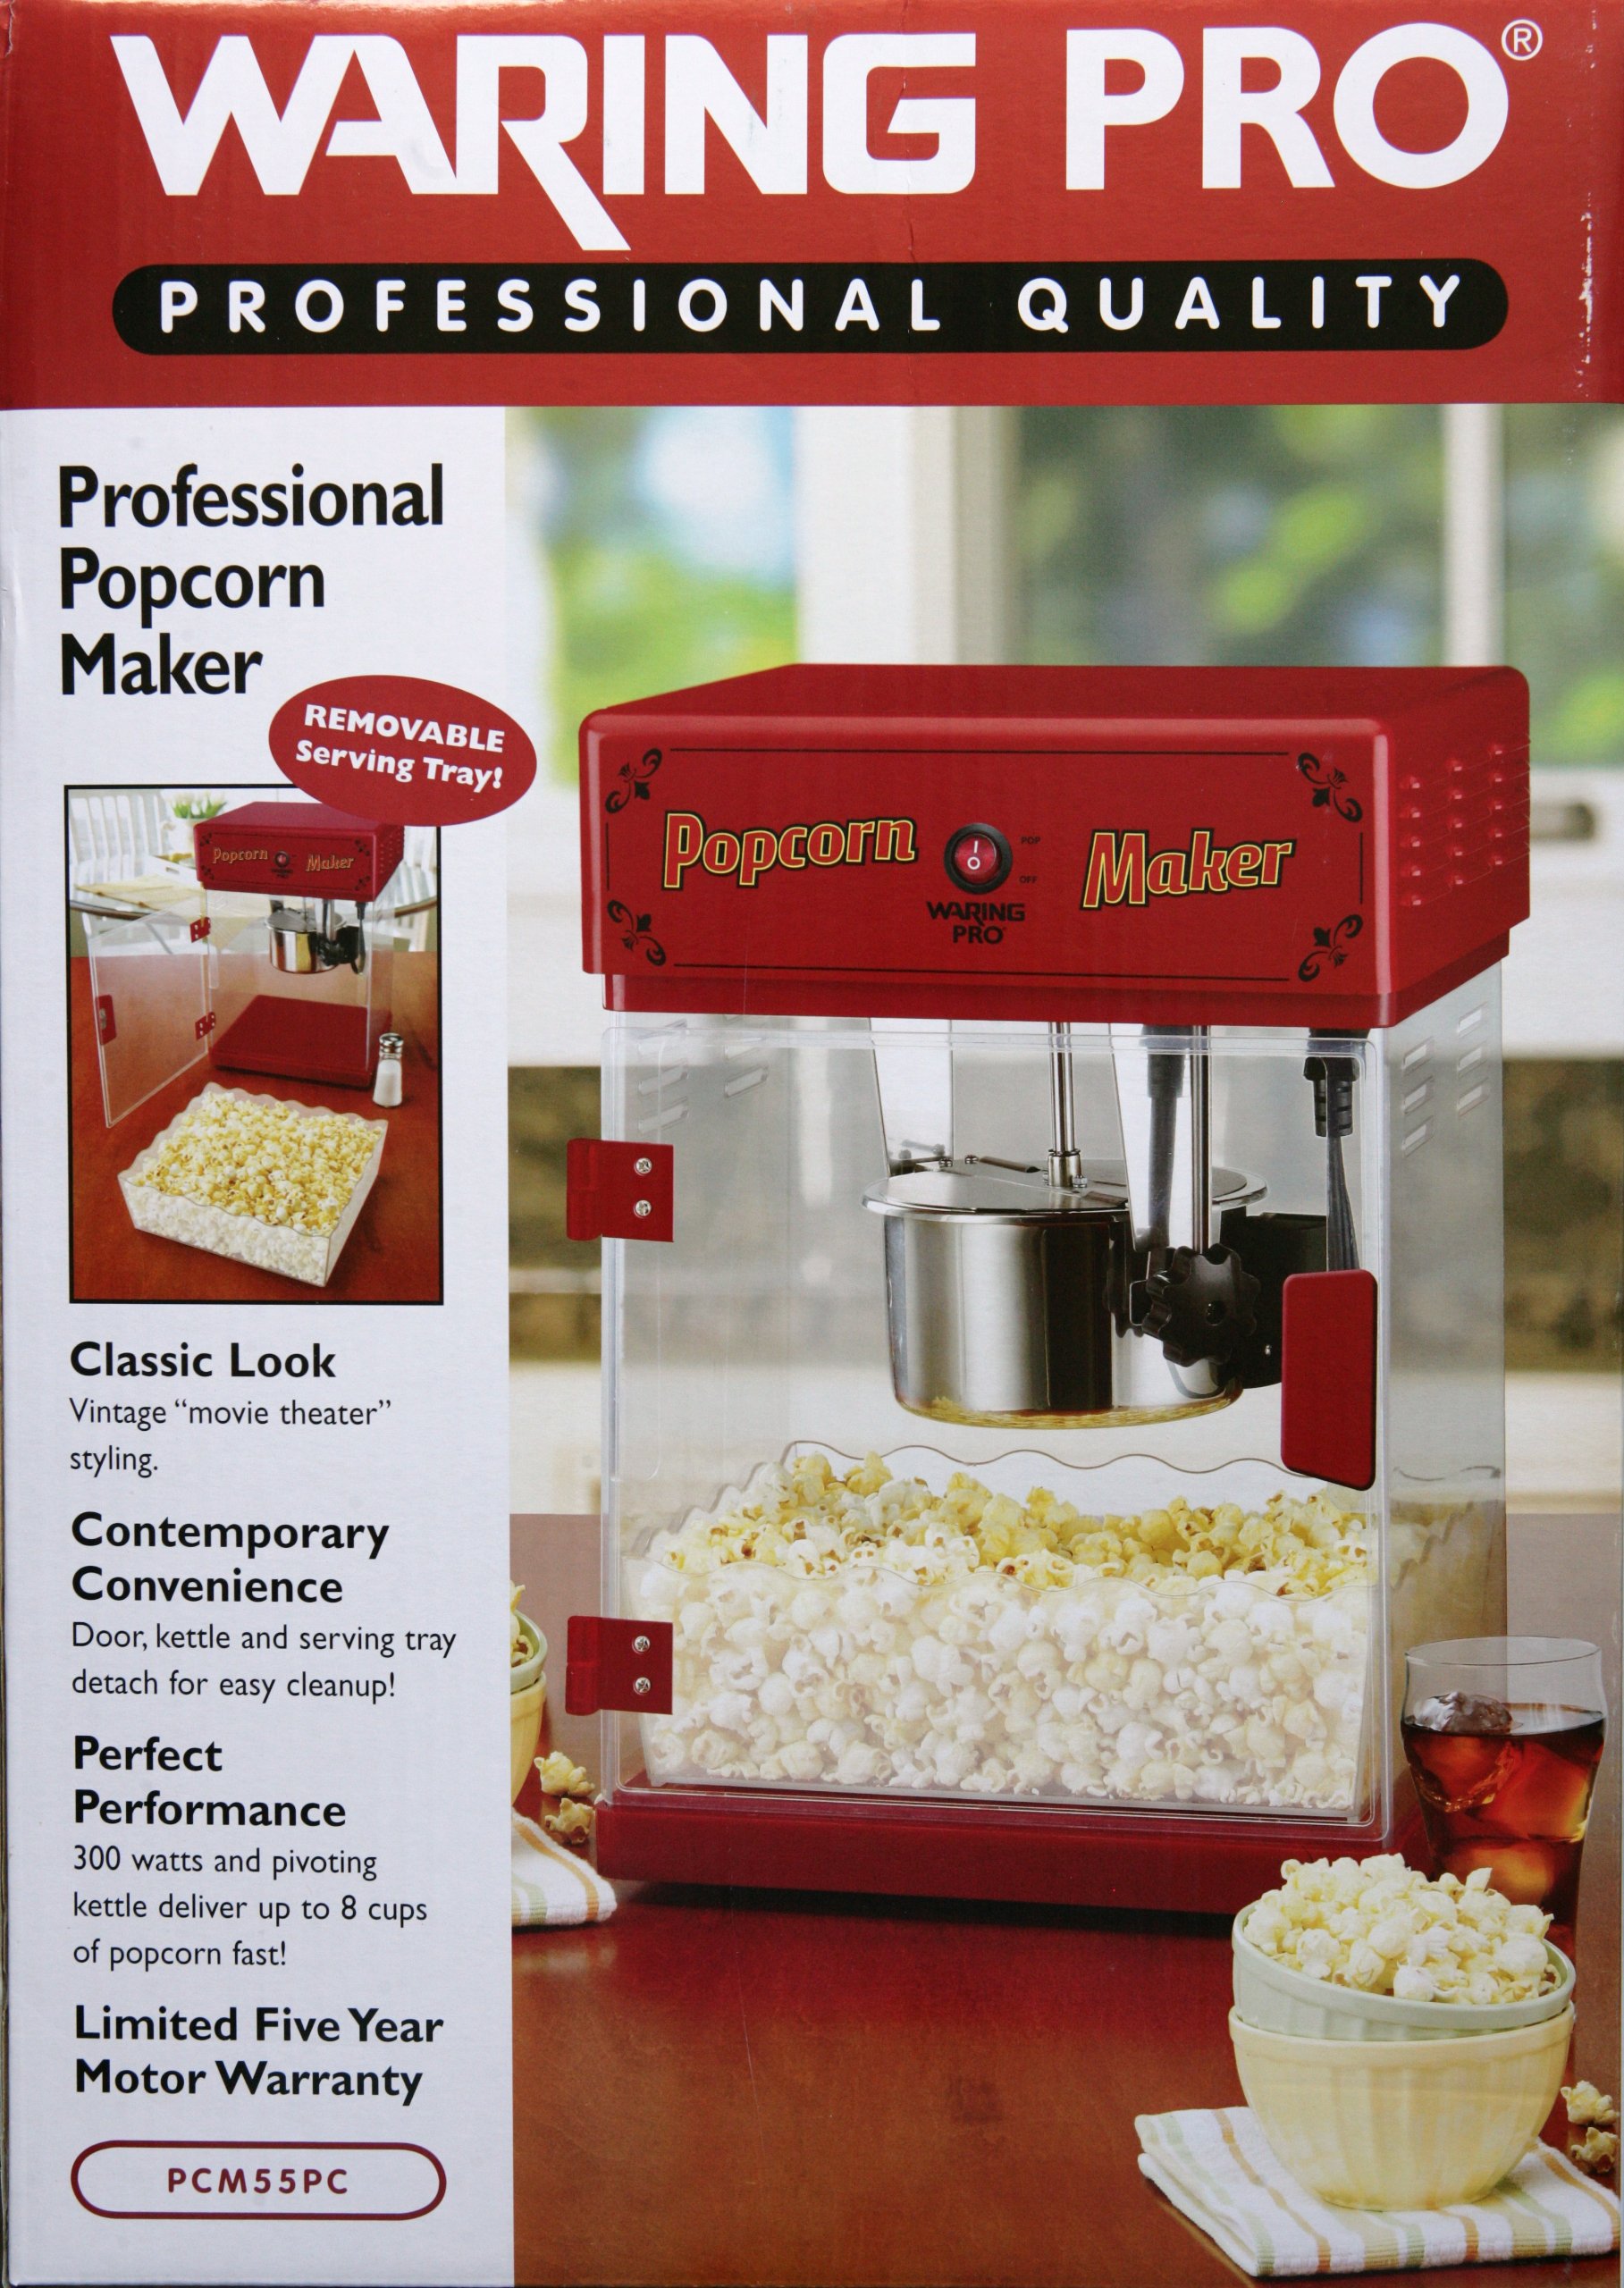
Figure 1: Waring Pro Professional Popcorn Maker (Model PCM55PC)
2. Alaye Aabo pataki
Please read all instructions carefully before using the appliance. Failure to follow these safety guidelines may result in fire, electric shock, or personal injury.
- Always ensure the appliance is placed on a stable, level, heat-resistant surface.
- Do not immerse the main unit or electrical components of the kettle in water or other liquids.
- Keep hands and utensils away from the heating element and stirring mechanism during operation.
- Yọọ ohun elo kuro ni iṣan nigbati ko ba lilo ati ṣaaju ṣiṣe afọmọ.
- Allow the appliance to cool completely before adding or removing parts, and before cleaning.
- Ma ṣe ṣiṣẹ ohun elo pẹlu okun tabi plug ti o bajẹ, tabi lẹhin aiṣe ohun elo tabi ti bajẹ ni eyikeyi ọna.
- Lo awọn ẹya ẹrọ nikan ati awọn asomọ ti olupese ṣe iṣeduro.
- Abojuto sunmọ jẹ pataki nigbati eyikeyi ohun elo ba lo nipasẹ tabi sunmọ awọn ọmọde.
- Never pop corn in a dry kettle. Always add oil and kernels as instructed.
3. Package Awọn akoonu
Upon unpacking, ensure all items listed below are present and in good condition:
- Popcorn Maker Main Unit (with red top and clear panels)
- Stainless Steel Kettle with Stirring Mechanism
- Removable Serving Tray
- guguru ofofo
- Measuring Spoons (for oil and kernels)
- Ilana itọnisọna
Note: Popcorn kernels and popping oil are not included and must be purchased separately.
4. Apejọ Awọn ilana
Your popcorn maker requires minimal assembly. All components are typically packaged inside the main unit for shipping. Carefully remove all packaging materials and components before beginning assembly.
- Attach the Front Door: The front door slides down onto the hinges located on the main unit. Ensure it is securely seated.
- Assemble the Kettle:
- Screw the lid onto the kettle using the provided wing nuts.
- Mount the assembled kettle into the device's holding brackets. Twist it to secure it in place.

Figure 2: Kettle assembly and controls.
- Attach the Serving Tray: Slide the removable serving tray into its designated slot at the bottom of the main unit. This tray can be pulled out for serving and pushed in for storage.
- Connect Kettle Power: The kettle has its own power plug. This must be plugged into the receptacle outlet located at the top of the main unit. Do not plug the kettle into any other power source, as its operation is controlled by the main unit's switches.
5. Awọn ilana Iṣiṣẹ
Follow these steps to make delicious popcorn:
- Mura Awọn eroja: Measure the appropriate amount of popcorn kernels and popping oil. The machine is designed to produce up to 8 cups of popcorn per batch.
- Add Ingredients to Kettle: Open the kettle lid and carefully add the measured popping oil, followed by the popcorn kernels.
- Close Kettle and Door: Securely close the kettle lid and the front door of the popcorn maker.
- Agbara Tan: Turn on the stirrer and kettle switches located on the top panel of the machine. The light switch can also be turned on to illuminate the interior.
- Popcorn Production: The popcorn will begin popping within a few minutes. The stirring mechanism will ensure even popping.
- Empty Kettle: Once popping is complete, turn off both the stirrer and kettle switches. Use the convenient tilt handle on the kettle to dump the freshly popped corn into the main chamber.
- Sin: Pull out the serving tray and use the included scoop to serve the popcorn.

Figure 3: Adding popcorn kernels to the kettle.
The popcorn maker has a large capacity, capable of producing up to 48 cups (384 ounces) of popcorn, making it suitable for gatherings or movie nights.
6. Itọju ati Cleaning
Regular cleaning will ensure the longevity and optimal performance of your popcorn maker.
- Ninu Kettle Cleaning: The kettle should be hand washed only. ṢE ṢE use a dishwasher. Avoid submerging the kettle in water as it contains electrical components. Remove the wing nuts to detach the lid for easier cleaning.
- Ìmọ́tótó Ẹyọ Àkọ́kọ́: Wipe down the interior and exterior surfaces of the main unit with a damp cloth. For stubborn grease, use a mild detergent.
- Kernel Collection Tray: The bottom of the unit features a removable kernel collection tray. Pull this tray out to dispose of unpopped kernels and small debris, then clean it as needed.
- Rii daju pe gbogbo awọn ẹya ti gbẹ patapata ṣaaju iṣakojọpọ ati titoju ohun elo naa.

Figure 4: Kernel collection tray for easy cleaning.
7. Laasigbotitusita
If you encounter issues with your popcorn maker, please refer to the following common solutions:
- Ohun elo ko tan:
- Ensure the main power cord is securely plugged into a working electrical outlet.
- Verify that the kettle's power plug is correctly inserted into the receptacle on the main unit.
- Check that all switches (light, stirrer, kettle) are in the "ON" position.
- Popcorn not popping or poor yield:
- Ensure sufficient oil and fresh kernels are used. Stale kernels may not pop effectively.
- Confirm the kettle is properly heated before adding kernels.
- Check that the stirrer mechanism is operating correctly.
- Èéfín tó pọ̀ jù:
- This may indicate too much oil or old oil. Reduce oil quantity or use fresh oil.
- Ensure the kettle is clean and free of burnt residue from previous uses.
Ti awọn iṣoro ba wa, jọwọ kan si atilẹyin alabara.
8. Awọn pato
| Brand: | Ikilọ |
| Nọmba awoṣe: | PCM55PC |
| Àwọ̀: | Pupa |
| Ohun elo: | Irin ti ko njepata |
| Ìwọ̀n Nkan: | 11.5 iwon |
| Awọn eroja to wa: | Kettle |
| Ẹya Pataki: | Gbigbe |
| Ṣe Itanna: | Bẹẹni |
| UPC: | 040072016028 |
| Awọn iwọn idii: | 19.9 x 14.1 x 14 inches |
| Olupese: | Waring Pro |
| Ọjọ Akọkọ Wa: | Oṣu Kẹwa Ọjọ 14, Ọdun 2010 |
9. Atilẹyin ọja ati Support
For warranty information or technical support, please refer to the documentation included with your purchase or contact Waring customer service directly. Keep your purchase receipt as proof of purchase for warranty claims.


