Ọrọ Iṣaaju
This manual provides comprehensive instructions for the installation, operation, and maintenance of your Audiovox VE927 9-inch LCD Drop-Down TV with Built-in DVD Player and Clock Radio. Please read this manual thoroughly before using the product to ensure proper function and safety.
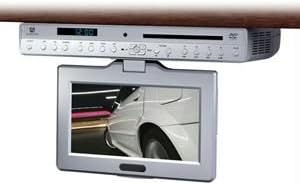
Nọmba 1: Audiovox VE927 unit with the 9-inch LCD screen in the extended, viewing position. The main unit is mounted under a cabinet, and the screen swivels down for use.
Package Awọn akoonu
Jẹrisi pe gbogbo awọn ohun kan wa ninu package:
- Audiovox VE927 9-inch LCD Drop-Down TV/DVD Player Unit
- Mounting Stand/Bracket
- Isakoṣo latọna jijin
- Adapter agbara
- Afowoyi Olumulo (iwe-ipamọ yii)
Eto ati fifi sori
1. Iṣagbesori Unit
The VE927 is designed for under-cabinet mounting. Ensure the mounting surface is sturdy and capable of supporting the unit's weight (approximately 6 pounds). Use appropriate screws and tools for secure installation.
- Identify a suitable location under a cabinet, ensuring sufficient clearance for the screen to swivel down (270° swivel capability).
- Attach the mounting stand/bracket to the underside of the cabinet using appropriate fasteners.
- Securely attach the VE927 unit to the installed mounting stand/bracket. Refer to the detailed mounting diagram in the separate installation guide for precise instructions.
2. Asopọ agbara
Connect the provided power adapter to the DC input port on the VE927 unit, then plug the adapter into a standard electrical outlet.
3. Agbara akọkọ Lori
Press the Power button on the unit or the remote control to turn on the device. The initial setup wizard may appear for language selection and time setting.
Awọn ilana Iṣiṣẹ
1. Ṣíṣe àtúnṣe ibojú
The 9-inch LCD screen can swivel up to 270 degrees. Gently adjust the screen to your desired viewing angle. Avoid excessive force.
2. Iṣẹ́ Ẹ̀rọ DVD
- Insert a DVD disc into the disc slot on the front of the unit. The unit will automatically detect the disc and begin playback.
- Use the remote control for playback functions such as Play, Pause, Stop, Fast Forward, Rewind, and Chapter Skip.
- Access the DVD menu for language, subtitle, and multi-angle selections.
3. TV Tuner Operation (ATSC/NTSC)
- Ensure an antenna is connected to the TV antenna input (if applicable).
- Press the "TV" button on the remote control to switch to TV mode.
- Perform a channel scan to find available digital (ATSC) and analog (NTSC) channels in your area. Refer to the on-screen menu for scanning options.
- Use the Channel Up/Down buttons to navigate between channels.
4. AM/FM Clock Radio
- Press the "Radio" button to switch to radio mode.
- Use the "Band" button to select between AM and FM frequencies.
- Tune to desired stations using the tuning buttons or by performing an auto-scan.
- Set the clock using the menu options.
5. Cooking Timer
The unit includes a cooking timer function. Access the timer settings through the main menu or a dedicated button on the remote control. Set the desired countdown time, and an alarm will sound upon completion.
6. USB Asopọmọra
The unit features USB connectivity. Insert a USB flash drive into the USB port to play compatible media files (e.g., photos, music, videos). Navigate files lilo awọn isakoṣo latọna jijin.
Itoju
Ninu Unit
- Nigbagbogbo ge asopọ ohun ti nmu badọgba agbara ṣaaju ṣiṣe mimọ.
- Lo asọ ti o rọ, ti o gbẹ lati nu ita ti ẹyọ naa.
- Fún ibojú LCD, lo aṣọ rírọ̀ tí kò ní àwọ̀ tí a ṣe pàtó fún àwọn ibojú ẹ̀rọ itanna. Má ṣe lo àwọn ohun ìfọmọ́ tàbí àwọn ohun èlò ìfọ́mọ́.
- Yago fun sokiri awọn olomi taara sori ẹyọ naa.
Itọju Disiki
- Mu awọn disiki mu nipasẹ awọn egbegbe wọn lati yago fun awọn ika ọwọ.
- Keep discs clean and free from scratches. Use a soft cloth to wipe discs from the center outwards.
Laasigbotitusita
| Isoro | Owun to le Fa | Ojutu |
|---|---|---|
| Ko si agbara | Power adapter not connected; outlet not functioning. | Ensure power adapter is securely connected to the unit and a working electrical outlet. |
| Ko si aworan/ohun lati DVD | Disc is dirty or scratched; disc inserted incorrectly; incorrect input selected. | Clean the disc; reinsert the disc correctly; ensure DVD mode is selected. |
| Ko dara gbigba TV | Antenna not connected or positioned incorrectly; weak signal. | Connect and adjust the antenna; perform a channel scan; consider a stronger antenna. |
| Isakoṣo latọna jijin ko ṣiṣẹ | Awọn batiri ti ku tabi fi sii lọna ti ko tọ; idiwo laarin latọna jijin ati kuro. | Replace batteries; ensure correct polarity; remove obstructions; point remote directly at the unit. |
Awọn pato
- Awoṣe: VE927
- Iwọn iboju: 9 inches
- Iru ifihan: LCD
- Ipin Ipin: 16:9
- Swivel Screen: 270°
- Media Iru: SD, DVD, USB
- Imọ-ẹrọ Asopọmọra: USB
- Tuner: ATSC/NTSC Digital Tuner
- Redio: Redio aago AM/FM
- Awọn ẹya pataki: Cooking Timer, Stereo Speakers, Language/Sub-Title/Multi-Angle Selection
- Ìwọ̀n Nkan: 6 iwon
- Olupese: Audiovox
- Akọkọ Wa: Oṣu Kẹrin Ọjọ 27, Ọdun 2011
Atilẹyin ọja ati Support
For warranty information, please refer to the warranty card included with your product or visit the official Audiovox website. For technical support or service inquiries, please contact Audiovox customer service directly. Keep your purchase receipt as proof of purchase.


