Awọn Itọsọna Aabo pataki
Please read these instructions carefully before operating your ONKYO A-912 Integrated Amplifier. Jeki iwe afọwọkọ yii fun itọkasi ọjọ iwaju.
- Orisun Agbara: Connect the unit only to an AC power source of the voltage itọkasi lori ru nronu.
- Afẹfẹ: Rí i dájú pé afẹ́fẹ́ ń tàn kálẹ̀ tó. Má ṣe dí àwọn ihò afẹ́fẹ́. Jẹ́ kí àyè tó wà ní àyíká ẹ̀rọ náà fún afẹ́fẹ́ tó yẹ.
- Omi ati Ọrinrin: Ma ṣe fi ẹrọ naa han si ojo, ọrinrin, ṣiṣan, tabi sisọ. Ma ṣe gbe awọn nkan ti o kun fun awọn olomi, gẹgẹbi awọn vases, sori ẹyọ.
- Ooru: Maṣe gbe ẹyọ naa si nitosi awọn orisun ooru gẹgẹbi awọn imooru, awọn iforukọsilẹ ooru, awọn adiro, tabi awọn ohun elo miiran (pẹlu ampliifiers) ti o gbe ooru jade.
- Ṣiṣẹ: Maṣe gbiyanju lati ṣiṣẹ ọja yi funrararẹ. Tọkasi gbogbo iṣẹ si oṣiṣẹ oṣiṣẹ ti o peye.
- Ninu: Yọọ kuro lati inu iṣan ogiri ṣaaju ṣiṣe mimọ. Lo asọ ti o gbẹ fun mimọ.
Package Awọn akoonu
Jẹrisi pe package rẹ ni awọn nkan wọnyi ninu:
- ONKYO A-912 Integrated Amplifier Unit
- AC Agbara okun
- Afowoyi Olumulo (iwe-ipamọ yii)
Iwaju Panel idari
The front panel provides access to essential controls for operating your amplifier.

Aworan: Iwaju view of the ONKYO A-912 Integrated Amplifier. This image displays the power button, input selector, volume control, tone adjustments, and headphone jack.
- Bọtini agbara: Yipada awọn amplifier tan tabi pa.
- Aṣayan Input: Allows you to choose the audio source (e.g., CD, Tuner, Line, Phono).
- Iṣakoso iwọn didun: Satunṣe awọn ìwò o wu iwọn didun.
- Awọn idari Bass/Table: Ṣe atunṣe esi igbohunsafẹfẹ kekere ati giga.
- Iṣakoso iwontunwonsi: Ṣe atunṣe iwọntunwọnsi ikanni osi/ọtun.
- Jack agbekari: Fun sisopọ olokun.
Ru Panel Awọn isopọ
The rear panel houses all input and output terminals for connecting your audio components.
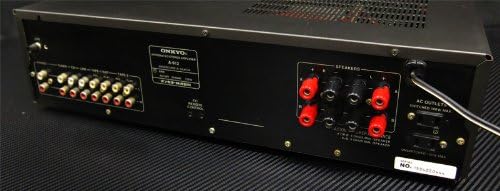
Aworan: Ẹyin view of the ONKYO A-912 Integrated Amplifier. This image shows the speaker terminals, various RCA input jacks (CD, Tuner, Line, Phono), and the AC power inlet.
- Awọn ebute Agbọrọsọ: Connect your passive speakers here. Ensure correct polarity (+ to + and - to -).
- Input Jacks (CD, Tuner, Line, Phono): Connect your audio source components using RCA cables. The Phono input is specifically for turntables.
- Ilẹ -ilẹ Ilẹ: For connecting the ground wire from a turntable, if applicable.
- Wiwọle AC: Connect the supplied AC power cord here.
Eto Itọsọna
1. Agbọrọsọ Asopọ
Connect your speakers to the speaker terminals on the rear panel. Ensure that the positive (+) terminal on the amplifier connects to the positive (+) terminal on the speaker, and the negative (-) terminal on the amplifier connects to the negative (-) terminal on the speaker. Use high-quality speaker wire for optimal sound.
2. Audio Component Connection
Connect your audio source components (e.g., CD player, tuner, turntable) to the corresponding input jacks on the rear panel using RCA audio cables. For a turntable, connect it to the 'Phono' input and ensure the ground wire (if present) is connected to the amplifier ká ilẹ ebute.
3. Asopọ agbara
Once all audio connections are made, connect the supplied AC power cord to the AC inlet on the amplifier's rear panel, then plug the other end into a wall outlet.
Awọn ilana Iṣiṣẹ
Titan / Pipa agbara
Press the Power button on the front panel to turn the amplifier lori tabi pa. Atọka agbara yoo tan imọlẹ nigbati ẹyọ ba wa ni titan.
Yiyan Orisun Iṣawọle
Rotate the Input Selector knob on the front panel to choose the desired audio source (e.g., CD, Tuner, Line, Phono) that you have connected.
Siṣàtúnṣe iwọn didun
Turn the large Volume control knob clockwise to increase the volume and counter-clockwise to decrease it.
Lilo Awọn iṣakoso ohun orin
Use the Bass and Treble knobs to fine-tune the low and high frequencies of the audio output to your preference. The Balance knob adjusts the relative volume between the left and right speakers.
Agbekọri Lo
Plug your headphones into the Headphone Jack on the front panel. This will typically mute the main speaker output.
Itoju ati Itọju
- Ninu: Mu ese kuro pẹlu asọ ti o gbẹ. Ma ṣe lo awọn afọmọ abrasive, waxes, tabi awọn nkanmimu.
- Afẹfẹ: Ensure that the ventilation openings are not blocked by dust or debris. Periodically clean them if necessary.
- Ibi ipamọ: Ti o ba tọju ẹyọ naa fun akoko ti o gbooro sii, yọọ kuro lati inu iṣan agbara ki o bo lati daabobo lodi si eruku.
Laasigbotitusita
Ti o ba ni iriri awọn iṣoro pẹlu rẹ amplifier, refer to the following table for possible causes and solutions.
| Isoro | Owun to le Fa | Ojutu |
|---|---|---|
| Ko si agbara | Okun agbara ko sopọ; Odi iṣan ko ṣiṣẹ | Ensure power cord is securely plugged in; Check wall outlet with another device. |
| Ko si ohun | Incorrect input selected; Speaker wires loose; Volume too low; Headphones connected | Select correct input source; Check speaker connections; Increase volume; Disconnect headphones. |
| Ohun ti o daru | Source component issue; Speaker impedance mismatch; Volume too high | Check source component; Ensure speakers match amplifier impedance; Reduce volume. |
| Ariwo humming | Ground loop; Loose connections; Nearby interference | Ensure proper grounding for turntable; Check all cable connections; Move unit away from other electronic devices. |
Awọn pato
- Brand: Onkyo
- Awoṣe: A-912
- Olupese: Onkyo
- Awọn iwọn idii: 45.5 x 35 x 14.9 cm
- Ìwọ̀n Nkan: 7.19 kg
- Awọn batiri ti a beere: Rara
- ASIN: B00FRBU74G
- Ọjọ akọkọ ti o wa: Oṣu Kẹwa Ọjọ 10, Ọdun 2013
Atilẹyin ọja ati Onibara Support
For warranty information or technical assistance, please refer to the warranty card included with your product or visit the official Onkyo webojula. Tọju iwe-ẹri rira rẹ bi ẹri rira fun awọn iṣeduro atilẹyin ọja.


