1. Ifihan
The Intel NUC DE3815TYKHE is a compact, fanless mini PC designed for various applications, including thin clients, digital signage, and embedded solutions. This kit provides a flexible platform with support for a 2.5-inch storage drive, offering a customizable computing experience in a small form factor.
2. Package Awọn akoonu
Daju pe gbogbo awọn nkan wa ninu apo rẹ:
- Intel NUC DE3815TYKHE Unit
- Adaparọ Agbara AC
- VESA Mounting Bracket (with screws)
- Itọsọna Ibẹrẹ kiakia (ti o ba wa)
3. Ti ara Loriview
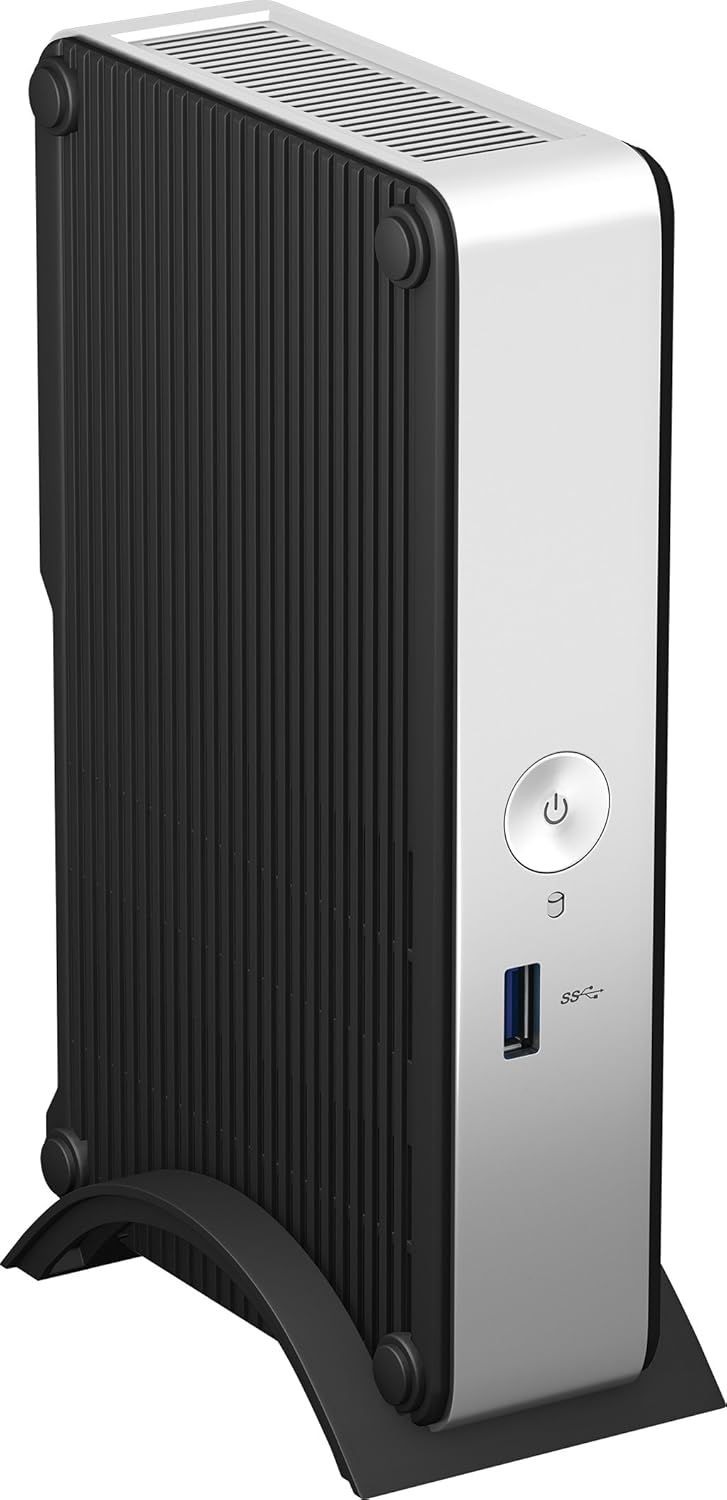
3.1 Igbimọ iwaju
The front panel provides essential connectivity and controls.

Aworan 1: Iwaju view of the Intel NUC DE3815TYKHE. This image displays the compact, fanless design of the unit, highlighting the power button and a single blue USB 3.0 port on the front for easy access.
- Bọtini agbara: Ti a lo lati tan-an tabi pa ẹrọ naa.
- Ibudo USB 3.0: Fun sisopọ awọn ẹrọ USB ti o ga julọ.
3.2 ru Panel
The rear panel houses various ports for display, network, and peripherals.

Aworan 2: Ẹyìn view of the Intel NUC DE3815TYKHE. This image details the available rear ports, including VGA, HDMI, two USB ports, an Ethernet port, and a headphone/microphone jack, along with the power input.
- Ibudo VGA: Fun sopọ si agbalagba diigi tabi pirojekito.
- Ibudo HDMI: For connecting to modern displays with audio support.
- Awọn ibudo USB 2.0 (x2): Fun pọ boṣewa USB awọn ẹrọ.
- Ibudo Ethernet (RJ-45): Fun asopọ nẹtiwọki ti firanṣẹ.
- Headphone/Microphone Jack: Fun titẹ ohun ati igbejade.
- Iṣawọle agbara DC: Fun sisopọ ohun ti nmu badọgba agbara AC.
3.3 ti abẹnu irinše
Accessing the internal components is necessary for memory and storage installation.
Aworan 3: Intel NUC DE3815TYKHE unit displayed alongside its internal motherboard. This view illustrates the compact size of the main unit and the layout of the internal components, including the processor, memory slot, and connectors for storage.
- DDR3L SODIMM Slot: For installing system memory.
- 2.5-inch Drive Bay: For installing a SATA HDD or SSD.
- Eriali Alailowaya: Built-in for wireless connectivity.
- Ibi ipamọ eMMC: 4GB embedded storage for operating system or data.
4. Eto
Follow these steps to prepare your Intel NUC for operation.
4.1 Fifi Iranti sii (RAM)
- Unscrew and remove the bottom cover of the NUC unit.
- Locate the DDR3L SODIMM slot on the motherboard.
- Align the notch on the SODIMM module with the notch in the slot.
- Insert the module at a 45-degree angle and press down until the retaining clips snap into place.
4.2 Installing a 2.5-inch Storage Drive
- With the bottom cover removed, locate the 2.5-inch drive bay.
- Connect the SATA data and power cables from the NUC to your 2.5-inch HDD or SSD.
- Secure the drive within the bay using the provided screws (if applicable).
- Replace the bottom cover and secure it with screws.
4.3 Nsopọ Peripherals
- Ifihan: Connect your monitor to the HDMI or VGA port.
- Keyboard ati Asin: Connect USB keyboard and mouse to any available USB ports.
- Nẹtiwọọki: For wired internet, connect an Ethernet cable to the RJ-45 port. For wireless, ensure antennas are clear.
- Ohun: Connect headphones or speakers to the audio jack if needed.
4.4 Agbara Lori
- Connect the AC power adapter to the DC power input on the rear panel.
- Pulọọgi ohun ti nmu badọgba agbara sinu iṣan ogiri kan.
- Press the power button on the front panel to turn on the NUC.
5. Fifi sori ẹrọ System
The Intel NUC DE3815TYKHE supports multiple operating systems. You will need to install your preferred OS onto the internal eMMC storage or the 2.5-inch drive you installed.
- Prepare a bootable USB drive with your chosen operating system (e.g., Windows, Linux).
- Connect the USB drive to a USB port on the NUC.
- Power on the NUC and enter the BIOS/UEFI setup (usually by pressing F2 during boot) to configure the boot order.
- Tẹle awọn itọnisọna loju iboju lati fi ẹrọ ṣiṣe ẹrọ sii.
6. Itọju
The fanless design of the Intel NUC DE3815TYKHE minimizes maintenance requirements.
- Ninu: Periodically wipe the exterior with a soft, dry cloth. Avoid using liquid cleaners directly on the unit.
- Afẹfẹ: Ensure the ventilation slots are not obstructed to allow for proper passive cooling.
- Awọn imudojuiwọn sọfitiwia: Jẹ́ kí ẹ̀rọ ìṣiṣẹ́ àti àwọn awakọ̀ rẹ máa ṣe àtúnṣe fún iṣẹ́ àti ààbò tó dára jùlọ.
7. Laasigbotitusita
Tí o bá ní ìṣòro, wo àwọn ìgbésẹ̀ tó wọ́pọ̀ láti yanjú ìṣòro náà.
- Ko si Agbara: Ensure the power adapter is securely connected to both the NUC and a working power outlet. Test the outlet with another device.
- Ko si Ifihan: Verify that the monitor is powered on and correctly connected to the NUC's HDMI or VGA port. Try a different cable or monitor if possible.
- Eto Iṣiṣẹ Ko Gbigbe: Check the boot order in the BIOS/UEFI settings. Ensure the installed storage drive is detected and contains a valid operating system.
- A ko rii Agbeegbe: Ensure USB devices are properly seated in the ports. Try a different USB port or device.
- Ko si Asopọmọra Nẹtiwọọki: For wired connections, check the Ethernet cable and router. For wireless, ensure Wi-Fi is enabled in the OS and the NUC is within range of a network.
8. Awọn pato
| Ẹya ara ẹrọ | Ẹ̀kúnrẹ́rẹ́ |
|---|---|
| Orukọ awoṣe | DE3815TYKHE |
| isise | Intel Atom Processor (e.g., E3815) |
| Àgbo | 4 GB DDR3L 1333 (SODIMM slot for expansion) |
| Ibi ipamọ inu | 4GB eMMC (embedded MultiMediaCard) |
| Imugboroosi ipamọ | Internal 2.5-inch SATA HDD/SSD bay |
| Awọn aworan | Ese Intel Graphics |
| Ijade fidio | hdmi, vga |
| Awọn ibudo USB | 1x USB 3.0 (iwaju), 2x USB 2.0 (ẹhin) |
| Ohun | agbekọri / Gbohungbo Konbo Jack |
| Nẹtiwọọki | Ethernet (RJ-45), Built-in Wireless Antennas |
| Apẹrẹ | Àìfẹ́fẹ́ |
| Awọn ọna System Support | Multiple OS options (e.g., Windows, Linux) |
| Àwọ̀ | Metallic gray plastic ring with black sides |
9. Atilẹyin ọja ati Support
For warranty information and technical support, please refer to the official Intel webaaye tabi kan si aaye rira rẹ. Jeki ẹri rira rẹ fun awọn iṣeduro atilẹyin ọja.
- Atilẹyin Ayelujara: Ṣabẹwo Intel Support for DE3815TYKHE for drivers, downloads, and troubleshooting resources.
- Olubasọrọ: Refer to the Intel support page for contact options.


