Ọja Pariview
The DBPOWER MJX X400W is an FPV (First Person View) drone equipped with a Wi-Fi camera, headless mode, and a 6-axis gyro for stable flight. This manual provides essential information for safe operation, assembly, and maintenance of your quadcopter.
Awọn ẹya pataki:
- Ipo Aini ori: Simplifies flight control by maintaining the drone's forward direction relative to the remote controller, regardless of the drone's orientation.
- 3D Split Screen Display: Compatible with 3D VR headsets (not included) via the MJX FPV app for an immersive viewiriri iriri.
- FPV Real-Time Transmission: Connect your smartphone to the drone via Wi-Fi to view live video feed directly on your device.
- Batiri Agbara giga: Offers approximately 8-9 minutes of flight time with a control range of up to 100 meters.
- One Key 3D Roll: Enables easy execution of 3D aerial stunts with a single button press, supported by the 6-axis gyro system for stability.
Package Awọn akoonu
Verify that all components are present before proceeding with assembly and operation.
- DBPOWER MJX X400W FPV Drone
- Remote Controller (Transmitter)
- Wi-Fi Camera Module
- Okun Ngba agbara USB
- Awọn ategun apoju (awọn ege mẹrin)
- Àwọn ẹ̀ṣọ́ Propeller (àwọn ẹ̀yà mẹ́rin)
- Landing Gear (4 pieces)
- Screwdriver
- Ilana itọnisọna

Image: DBPOWER MJX X400W FPV Drone and Remote Controller showing all main components.
Video: This video demonstrates the unboxing and initial setup process, including identifying the various components of the DBPOWER MJX X400W drone.
Ṣeto
1. Install Landing Gear
Attach the four pieces of landing gear to the underside of the drone. Secure each piece with the provided screws using the small screwdriver.
2. Attach Propeller Guards
For beginner pilots, it is highly recommended to install the propeller guards to protect the blades from damage during initial flights. Gently snap each guard onto the motor arms, ensuring they are securely fastened.

Image: Close-up of the propeller guards, designed to protect the drone's blades.
3. Install Wi-Fi Camera
Carefully slide the camera module into its designated slot on the drone's underside. Connect the camera cable to the drone's port. Ensure the connection is firm.

Image: The detachable Wi-Fi camera module for the drone.
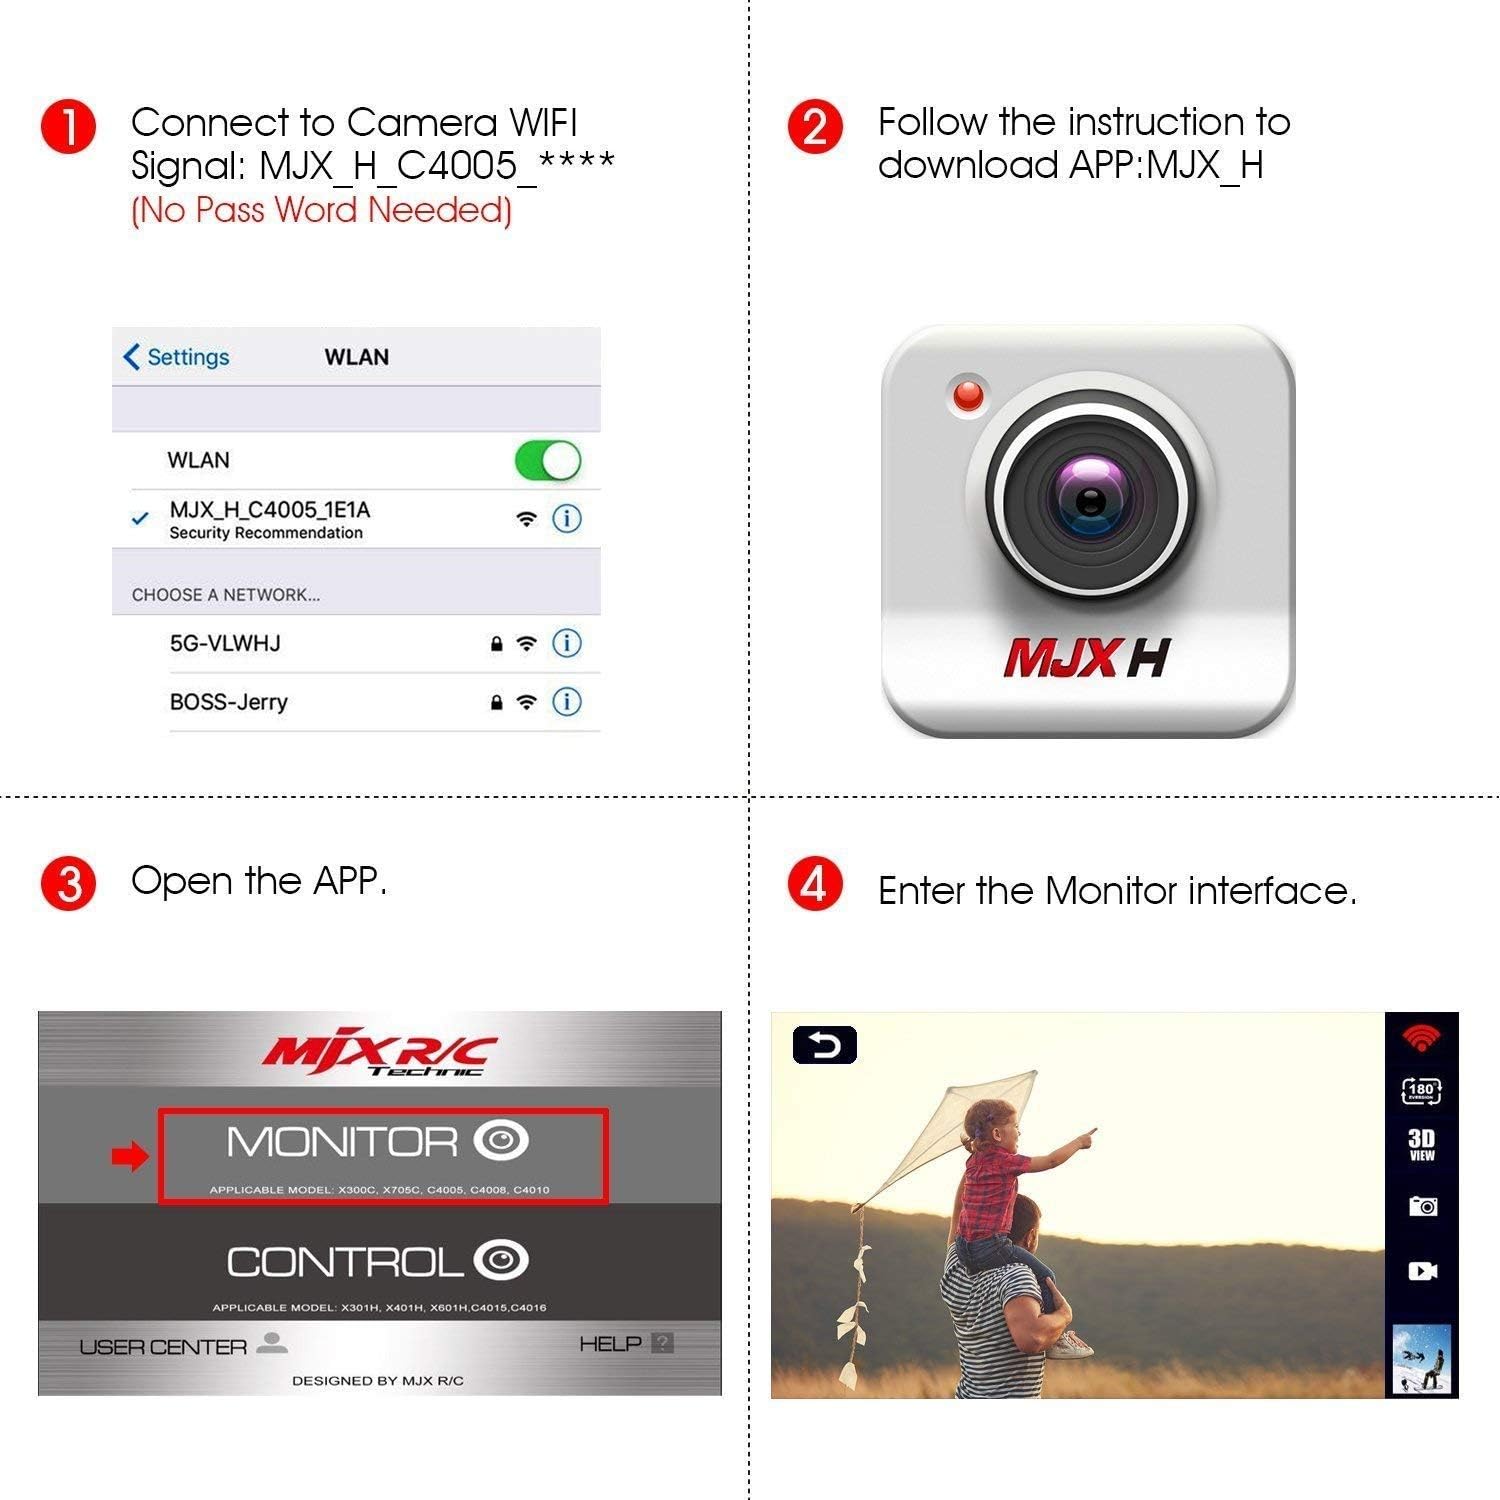
Image: The camera module securely attached to the drone's underside.
4. Gba agbara si Batiri Drone
Connect the drone's battery to the USB charging cable. Plug the USB cable into a compatible USB power source (e.g., computer, USB wall adapter). The indicator light on the charger will typically show red for charging and turn off or green when fully charged. Ensure the battery is fully charged before first use for optimal flight performance.

Image: The drone's high-capacity battery and its dedicated USB charging cable.
5. Install Remote Controller Batteries
The remote controller requires 4 AA batteries (not included). Open the battery compartment on the back of the remote and insert the batteries, observing correct polarity. Close the compartment securely.

Image: The remote controller (transmitter) for the DBPOWER MJX X400W drone.
6. Install Phone Holder (Optional)
If you plan to use the FPV feature, attach the phone holder to the top of the remote controller. Secure your smartphone in the holder, ensuring it is stable and does not obstruct any controls.
Isẹ ofurufu
1. Agbara Lori ati Sisopọ
Place the drone on a flat, level surface. Turn on the drone's power switch. The indicator lights on the drone will flash. Turn on the remote controller. Push the left joystick (throttle) all the way up, then all the way down. The remote will emit a beep, and the drone's lights will become solid, indicating successful pairing.
Video: This short video demonstrates how to initiate hovering and basic control of the drone using the transmitter.
2. App Connection for FPV
Download the "MJX FPV" app from your smartphone's app store (iOS/Android). Turn on the drone. On your phone, connect to the drone's Wi-Fi network (e.g., "MJX_H_C4005_XXXX"). Open the MJX FPV app and enter the monitor interface to view awọn ifiwe fidio kikọ sii lati drone ká kamẹra.

Image: Step-by-step guide for connecting your smartphone to the drone's FPV camera via the MJX FPV app.

Image: A demonstration of the FPV real-time video transmission from the drone to a smartphone.
3. Ipilẹ Flight idari
Bo kuro: Gently push the left joystick (throttle) up to lift off. To land, slowly pull the left joystick down.
Iṣakoso itọsọna: Use the right joystick to move the drone forward, backward, left, and right.
Ipo Aini ori: Activate Headless Mode by pressing the dedicated button on the remote. In this mode, the drone's forward direction aligns with the remote controller's forward direction, simplifying orientation. Press again to exit Headless Mode.

Image: Diagram explaining the concept and operation of Headless Mode for simplified drone control.
4. 3D Flips and Rolls
To perform a 3D flip, press the 3D roll button on the remote, then quickly push the right joystick in any desired direction (forward, backward, left, or right). The drone will execute a 360-degree flip in that direction.
Image: Visual representation of the drone executing 360-degree flips and rolls.
5. Speed Modes
The drone features two speed modes: low speed for beginners to practice control, and high speed for experienced pilots seeking more agile maneuvers. Use the speed switch on the remote to toggle between these modes.
Image: Diagram illustrating the two switchable speed modes for the drone.
6D View Mode (VR Headset Compatible)
For an immersive flight experience, activate 3D View Mode within the MJX FPV app. This mode is compatible with various VR headsets (not included), allowing you to see the drone's perspective in a split-screen format.
Image: A user experiencing the 3D View Mode with a VR headset, showing the drone in flight.
Itoju
Proper care and maintenance will extend the lifespan and ensure optimal performance of your DBPOWER MJX X400W drone.
- Ninu: Use a soft, dry cloth to clean the drone and remote controller. Avoid using solvents or harsh chemicals that could damage components.
- Ayewo Propeller: Regularly check all propellers for any signs of damage, such as cracks, bends, or chips. Replace any damaged propellers immediately using the provided spare parts and screwdriver to maintain flight stability and safety.
- Itọju Batiri: Do not overcharge or over-discharge the battery. Always use the original USB charging cable. Store batteries in a cool, dry place away from direct sunlight and extreme temperatures.
- Ibi ipamọ: When not in use for extended periods, remove batteries from both the drone and the remote controller. Store the drone in its original packaging or a protective case to prevent dust accumulation and physical damage.
Laasigbotitusita Itọsọna
Tọkasi itọsọna yii fun awọn ọran ti o wọpọ ati awọn ojutu wọn.
| Isoro | Owun to le Fa | Ojutu |
|---|---|---|
| Drone ko dahun si latọna jijin. | Not paired; low battery in remote or drone. | Ensure drone and remote are powered on and paired correctly. Charge drone battery; replace remote batteries. |
| Drone drifts nigba flight. | Not calibrated; uneven surface during take-off. | Perform gyroscope calibration on a flat surface. Adjust trim controls on the remote. |
| FPV feed is unstable or disconnected. | Weak Wi-Fi signal; interference. | Ensure phone is connected to drone's Wi-Fi. Fly within recommended range. Close other apps on phone. |
| Kukuru flight akoko. | Batiri naa ko gba agbara ni kikun; batiri atijọ. | Fully charge the battery before each flight. Consider purchasing new batteries if performance degrades significantly. |
| Propellers not spinning correctly. | Damaged propellers; debris in motors. | Inspect and replace damaged propellers. Clear any obstructions from motors. |
Imọ ni pato
| Ẹya ara ẹrọ | Ẹ̀kúnrẹ́rẹ́ |
|---|---|
| Brand | DBPOWER (MJX) |
| Orukọ awoṣe | MJX X400W |
| Igbohunsafẹfẹ Iṣakoso | 2.4GHz |
| Gyroscope | 6-Ipo |
| Pataki Awọn ẹya ara ẹrọ | FPV-capable, Headless Mode, 3D Roll, Wi-Fi Connectivity |
| Ipinnu Yaworan fidio | 1080p (Note: Some models may feature 480p camera) |
| Ibiti Iṣakoso to pọ julọ | O fẹrẹ to awọn mita 100 |
| Akoko ofurufu | O fẹrẹ to iṣẹju 8-9 |
| Batiri Iru | Litiumu polima (LiPo) |
| Agbara Batiri | 750 Milionuamp Awọn wakati |
| Awọn batiri Iṣakoso latọna jijin | 4 x AA batiri (ko si) |
| Awọn iwọn | 11.81"L x 11.81"W x 2.95"H |
| Iwọn Nkan | 1.65 iwon |
| Niyanju Ọjọ ori | 14+ ọdun |
Atilẹyin ọja ati Onibara Support
DBPOWER offers a 12-month warranty for this product. For warranty activation or customer service inquiries, please refer to the contact information provided in the product packaging or visit the official DBPOWER webojula.
Ibi iwifunni:
- Email: support@dbpower.co
- Phone: 1-855-888-9988 (Mon-Fri, 9:00 AM - 5:00 PM PST)


