1. Ifihan
This manual provides detailed instructions for the installation, operation, maintenance, and troubleshooting of your Gateway SX2865 SFF Desktop Motherboard H61 (Model DB.U7411.001). This motherboard is designed for Small Form Factor (SFF) desktop systems, featuring the Intel H61 Express chipset and supporting LGA 1155/1156 CPUs and DDR3 RAM. Please read this manual thoroughly before proceeding with any installation or configuration to ensure proper functionality and safety.
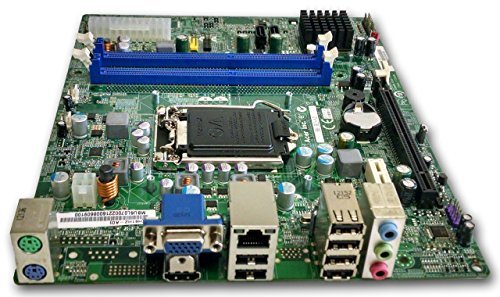
Nọmba 1: Pariview of the Gateway SX2865 SFF Desktop Motherboard H61. This image displays the main components and layout of the motherboard, including the CPU socket, RAM slots, and various connectors.
2. Alaye Aabo
Always observe the following safety precautions when handling and installing computer components:
- Ge asopọ okun agbara lati inu iṣan ogiri ṣaaju fifi sori ẹrọ tabi yiyọ awọn paati eyikeyi kuro.
- Wọ okun ọwọ-atako-aimi lati ṣe idiwọ isọjade elekitirotatiki (ESD) ibajẹ si awọn paati ifura.
- Mu modaboudu nipasẹ awọn egbegbe rẹ lati yago fun fifọwọkan awọn paati ifura tabi awọn iyika.
- Rii daju pe fentilesonu to dara laarin ọran kọnputa lati ṣe idiwọ igbona.
- Ma ṣe fi modaboudu han si ọrinrin tabi awọn iwọn otutu to gaju.
- If you are unsure about any installation step, consult a qualified technician.
3. Eto ati fifi sori
Follow these steps to properly install the Gateway SX2865 SFF Desktop Motherboard into your system:
3.1. Ṣíṣetásí náà
- Open your computer chassis and ensure it is clean and free of dust.
- Install the I/O shield provided with your chassis or motherboard into the rear panel opening.
- Verify that the standoffs in the chassis align with the mounting holes on the motherboard. Adjust if necessary.
3.2. Sipiyu fifi sori
- Locate the CPU socket (LGA 1155/1156) on the motherboard.
- Gently lift the load lever and open the CPU socket cover.
- Carefully align the CPU with the socket, matching the golden triangle on the CPU with the triangle mark on the socket. Do not force the CPU into the socket.
- Pa ideri iho ki o si tẹ mọlẹ fifuye lefa titi ti o tilekun sinu ibi.
- Apply a thin layer of thermal paste to the CPU surface (if not pre-applied on the cooler).
- Fi ẹ̀rọ itutu CPU sori ẹrọ gẹgẹbi ilana olupese rẹ, rii daju pe o wa ni asopọ daradara.
3.3. Ramu fifi sori
- Wa awọn iho DDR3 DIMM lori modaboudu.
- Ṣii awọn agekuru ni awọn mejeji opin ti DIMM Iho.
- Parapọ ogbontarigi lori Ramu module pẹlu awọn bọtini ni DIMM Iho.
- Tẹ mọlẹ ṣinṣin lori awọn opin mejeeji ti module Ramu titi ti awọn agekuru yoo fi di ibi.
3.4. Modaboudu iṣagbesori
- Carefully place the motherboard into the chassis, aligning the mounting holes with the standoffs.
- Ṣe aabo modaboudu pẹlu awọn skru, ni idaniloju kii ṣe overtighten.
3.5. Asopọmọra Peripherals ati Power
- So asopo agbara ATX 24-pin ati asopo agbara Sipiyu 4-pin lati ipese agbara rẹ si modaboudu.
- So awọn kebulu data SATA lati awọn ẹrọ ibi ipamọ rẹ (HDD/SSD) si awọn ebute oko oju omi SATA lori modaboudu.
- Connect front panel connectors (power button, reset button, USB, audio) to their respective headers on the motherboard. Refer to the motherboard's silkscreen labels for correct orientation.
- Install any expansion cards (e.g., graphics card) into the appropriate PCIe slots and secure them.
- Connect all necessary cables to your power supply.
4. Ṣiṣẹ ati iṣeto ni
4.1. Bẹ̀rẹ̀ Ìbẹ̀rẹ̀
- After all components are installed and connected, close the chassis.
- So atẹle rẹ pọ, keyboard, ati Asin.
- Connect the power cord to the power supply and a wall outlet.
- Tẹ bọtini agbara lori kọmputa rẹ.
4.2. Eto BIOS / UEFI
The BIOS (Basic Input/Output System) or UEFI (Unified Extensible Firmware Interface) is firmware that initializes hardware during the booting process. To enter the BIOS/UEFI setup utility:
- During the initial boot-up sequence, repeatedly press the designated key (commonly Del, F2, tabi F10). The exact key may vary; check the on-screen prompts.
- Within the BIOS/UEFI, you can configure settings such as:
- System Ọjọ ati Time
- Boot Order (to install an operating system from a USB drive or DVD)
- SATA Mode (AHCI, IDE)
- CPU and Memory settings (advanced users)
- Fipamọ awọn ayipada ki o jade kuro ni BIOS/UEFI lati tẹsiwaju booting.
4.3. Awọn ọna System ati Driver sori
After configuring the BIOS/UEFI, proceed with installing your preferred operating system (e.g., Windows, Linux). Once the OS is installed, install the necessary drivers for the motherboard's components (chipset, audio, LAN, etc.). These drivers are typically available on the manufacturer's website (Acer/Gateway) or can be found through the operating system's update features.
5. Itọju
Itọju deede ṣe iranlọwọ rii daju igbesi aye gigun ati iṣẹ iduroṣinṣin ti modaboudu rẹ:
- Yiyọ eruku kuro: Periodically clean the inside of your computer case, including the motherboard, CPU cooler, and fan vents, using compressed air. Ensure the system is powered off and unplugged before cleaning.
- Awọn imudojuiwọn BIOS: Ṣayẹwo awọn olupese ká website (Acer/Gateway) for BIOS/UEFI updates. Updates can improve stability, add support for new hardware, or fix bugs. Follow the update instructions carefully to avoid damaging the motherboard.
- Awọn imudojuiwọn Awakọ: Keep your system drivers updated to ensure optimal performance and compatibility.
- Ayewo ti ara: Lẹẹkọọkan ṣayẹwo awọn modaboudu fun eyikeyi ami ti ibaje, alaimuṣinṣin awọn isopọ, tabi bulging capacitors.
6. Laasigbotitusita
Ti o ba pade awọn ọran pẹlu modaboudu rẹ, tọka si awọn igbesẹ laasigbotitusita ti o wọpọ wọnyi:
- Ko si Agbara:
- Ensure the power supply is connected correctly to the motherboard (24-pin ATX and 4-pin CPU).
- Check that the power supply switch is in the 'ON' position.
- Verify the power cord is securely plugged into both the power supply and the wall outlet.
- Confirm the front panel power button connector is correctly attached to the motherboard.
- Ko si Ifihan:
- Ensure the monitor is powered on and connected to the correct video output (either integrated graphics or a dedicated graphics card).
- Reseat the RAM modules. Try booting with only one RAM module installed.
- Tun awọn eya kaadi (ti o ba wulo).
- Check if the CPU cooler is properly installed and the CPU power connector is secure.
- System Fails to Boot / POST Errors:
- Listen for beep codes from the motherboard's speaker (if installed). Consult the motherboard's documentation for beep code meanings.
- Clear the CMOS (Complementary Metal-Oxide-Semiconductor) by removing the CMOS battery for a few minutes or using the clear CMOS jumper (refer to motherboard layout).
- Ensure all essential components (CPU, RAM, GPU) are correctly installed.
- Awọn Iṣoro Eto Iṣiṣẹ:
- Verify that all necessary drivers are installed and up to date.
- Check SATA cable connections for storage devices.
- Run diagnostic tools for hard drives/SSDs and RAM.
7. Awọn pato
Key technical specifications for the Gateway SX2865 SFF Desktop Motherboard H61 (Model DB.U7411.001):
| Ẹya ara ẹrọ | Ẹ̀kúnrẹ́rẹ́ |
|---|---|
| Brand | Ẹnu-ọna |
| Orukọ awoṣe | SX2865 |
| Nọmba Awoṣe Nkan | DB.U7411.001 |
| Olupese | Acer |
| Chipset Iru | Intel H61 Express |
| Sipiyu Socket | LGA 1155 or LGA 1156 |
| Awọn isise ibaramu | Intel Xeon (and other compatible LGA 1155/1156 CPUs) |
| Ramu Memory Technology | DDR3 |
| Iyara aago iranti | 2133 MHz (Max supported, actual speed depends on CPU and RAM) |
| Agbara Ibi ipamọ Iranti | 16 GB (Maximum supported) |
| Awọn ẹrọ ibaramu | Kọmputa ti ara ẹni |
| Platform | Linux (and other compatible operating systems) |
| Fọọmù ifosiwewe | uATX (Micro-ATX) |
8. Atilẹyin ọja ati Support
For warranty information and technical support regarding your Gateway SX2865 SFF Desktop Motherboard H61 (Model DB.U7411.001), please refer to the documentation provided with your original system or contact the manufacturer directly.
- Olupese: Acer (as per product specifications)
- Brand: Ẹnu-ọna
- Ṣabẹwo si osise naa Atilẹyin ẹnu ọna webojula or Atilẹyin Acer webojula for drivers, FAQs, and contact information.
- Jeki ẹri rira rẹ fun awọn iṣeduro atilẹyin ọja.