1. Ifihan
The Noyafa NF-909C is a compact and easy-to-use 2-in-1 testing instrument designed for optical fiber networks. It integrates both an optical power meter and an optical light source, making it suitable for absolute optical power measurements and insertion loss tests. This device offers a wide range of power measurement, high accuracy, and stable output, providing a cost-effective solution for fiber optic testing.
2. Alaye Aabo
- Ka iwe afọwọkọ naa: Before operating the device, thoroughly read and understand this user manual.
- Aabo Batiri: Use only specified 1.5V batteries (3x AAA). Do not mix old and new batteries or different types of batteries. Remove batteries if the device will not be used for an extended period.
- Aabo lesa: The optical light source emits laser radiation. ṢE ṢE look directly into the optical output port or into a fiber connected to the light source. Direct exposure to laser light can cause severe eye damage.
- Awọn ipo Ayika: Operate the device within the specified operating temperature range (-10°C to +60°C). Avoid exposure to extreme temperatures, humidity, or dust.
- Ninu: Keep optical connectors clean. Use only approved cleaning methods and materials to avoid damaging the fiber end-faces.
- Itọju: Ma ṣe gbiyanju lati ṣii tabi tun ẹrọ naa ṣe. Tọkasi gbogbo iṣẹ si oṣiṣẹ oṣiṣẹ.
3. Package Awọn akoonu
Jẹrisi pe gbogbo awọn nkan wa ati ni ipo ti o dara nigbati ṣiṣi silẹ:
- Noyafa NF-909C Fiber Optic Tester Unit
- Itọsọna olumulo
- Protective Cap for Optical Ports
- (Batteries may or may not be included depending on the retailer)
4. Ọja Ipariview
The NF-909C features a clear LCD display, intuitive control buttons, and standard optical connectors for versatile use.
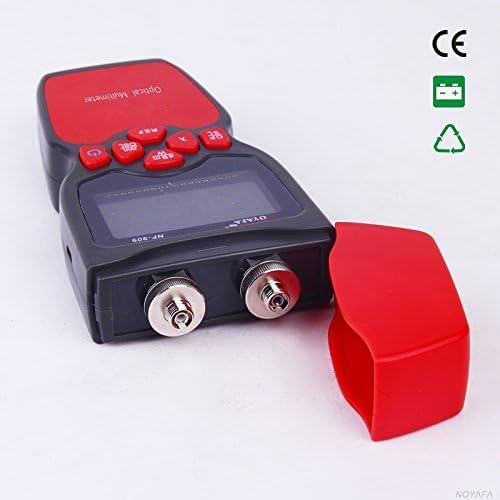
Nọmba 1: Iwaju view of the Noyafa NF-909C Fiber Optic Tester. This image shows the device's display screen, the red control buttons (Power, REF, dBm/W, λ, Hz), and the two optical input/output ports on the front, protected by a red cap. The device is black and red.
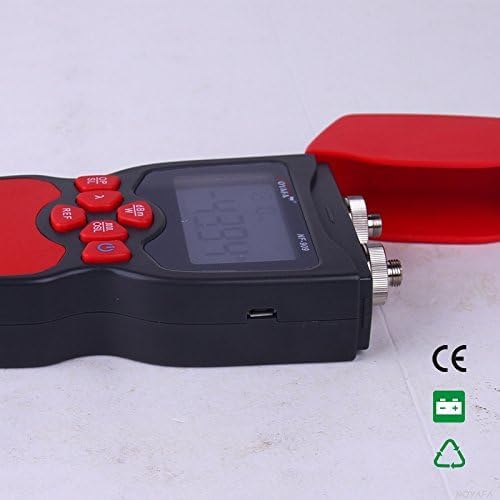
Nọmba 2: Apa view of the Noyafa NF-909C Fiber Optic Tester. This image highlights the micro USB port located on the side of the device, which may be used for power or data transfer, though its primary function is typically for charging or external power supply. The red protective cap is shown detached.
Awọn eroja pataki:
- Ifihan LCD: Shows measurement readings, selected wavelength, unit, and battery status.
- Awọn bọtini Iṣakoso: Power On/Off, Reference (REF), Unit (dBm/W), Wavelength (λ), Frequency (Hz).
- Optical Power Meter Input: Typically supports SC, ST, LC connectors (optional).
- Optical Light Source Output: Typically FC connector (SC, ST, LC optional).
- Abala Batiri: Located on the rear, for 3x 1.5V batteries.
- Ibudo USB Micro: For power supply or charging (refer to Figure 2).
5. Eto
5.1 Fifi sori batiri
- Wa ideri iyẹwu batiri ni ẹhin ẹrọ naa.
- Fi ideri náà sí i tàbí kí o tú u láti ṣí i.
- Insert three (3) 1.5V AAA batteries, ensuring correct polarity (+/-) as indicated inside the compartment.
- Rọpo ideri iyẹwu batiri ni aabo.
5.2 Ibẹrẹ Agbara Lori
Tẹ mọlẹ Agbara button to turn on the device. The LCD display will illuminate, showing the current mode and settings.
6. Awọn ilana Iṣiṣẹ
6.1 Optical Power Meter Mode
This mode measures the absolute optical power or relative loss in optical fiber networks.
- Connect Fiber: Connect the optical fiber to be tested to the Power Meter input port. Ensure the connector is clean.
- Yan Igigun: Tẹ awọn λ button to cycle through the available calibrated wavelengths: 850nm, 1300nm, 1310nm, 1490nm, 1550nm, 1625nm. Select the wavelength matching your light source.
- View Iwọn: The display will show the optical power in dBm.
- Change Unit: Tẹ awọn dBm/W button to switch between dBm and W (Watts) units.
- Set Reference (REF): For relative measurements (loss), connect a known good fiber to a stable light source and the power meter. Press the REF button to set the current power reading as the reference (0dB). Subsequent measurements will show the loss relative to this reference.
- Frequency Identification: The power meter can identify modulation frequencies from 10Hz to 60KHz. If the incoming signal is modulated, the frequency will be displayed.
6.2 Optical Light Source Mode
This mode provides a stable optical signal for testing fiber optic cables.
- Connect Fiber: Connect the optical fiber to be tested to the Light Source output port. Ensure the connector is clean.
- Yan Igigun: Tẹ awọn λ button to cycle through the available wavelengths: 1310nm and 1550nm. Select the desired wavelength.
- Select Modulation Frequency: Tẹ awọn Hz button to cycle through modulation frequencies: 270Hz, 1KHz, 2KHz, or continuous wave (CW).
- Ifihan agbara Ijade: The device will emit a stable optical signal at the selected wavelength and modulation.
6.3 Auto-Pa Išė
The device features an auto-off function to conserve battery life. If no operation is performed for approximately 15 minutes, the device will automatically power off. Press the Agbara bọtini lati tan-an pada.
7. Itọju
- Cleaning Optical Connectors: Always ensure optical connectors are clean before use. Use lint-free wipes and appropriate optical cleaning solutions. Dirty connectors can lead to inaccurate measurements and damage to the device or fiber.
- Rirọpo Batiri: When the battery indicator on the display shows low power, replace all three 1.5V AAA batteries promptly.
- Ibi ipamọ: When not in use, store the device in a dry, cool place, away from direct sunlight and extreme temperatures. Always replace the protective caps on the optical ports to prevent dust and damage.
- Isọsọtọ ita: Nu ode ti ẹrọ naa pẹlu asọ, damp asọ. Ma ṣe lo abrasive ose tabi epo.
8. Laasigbotitusita
- Ẹrọ ko ni agbara lori:
- Ṣayẹwo boya awọn batiri ti fi sori ẹrọ daradara pẹlu polarity to dara.
- Rọpo pẹlu awọn batiri tuntun.
- Inaccurate power meter readings:
- Ensure optical connectors are clean.
- Verify the selected wavelength on the power meter matches the light source wavelength.
- Check if the fiber under test is properly connected and not damaged.
- No light output from light source:
- Ensure the device is powered on and in light source mode.
- Ṣayẹwo ipele batiri.
- Verify the fiber is properly connected to the output port.
- Auto-off activates too quickly:
- The auto-off is fixed at 15 minutes of inactivity. This is normal operation.
9. Awọn pato
| Ẹya ara ẹrọ | Sipesifikesonu |
|---|---|
| Optical Power Meter Module | |
| Detector Measurement Range | -50 ~ +26 dBm |
| Àwọn Ìgbì Wíwọ́ tí a Ṣíṣe Àtúnṣe | 850, 1300, 1310, 1490, 1550, 1625 nm |
| Ipinnu | 0.01 dBm |
| Identification Frequency Range | 10 Hz ~ 60 kHz |
| Opitika Asopọmọra | SC, ST, LC (optional) |
| Optical Light Source Module | |
| Emitter Wavelengths | 1310 / 1550 nm (other wavelengths customizable) |
| Agbara Ijade | -7 dBm |
| Iduroṣinṣin ti o wu jade | 0.05 dB / 15 mins; 0.1 dB / 8 hours |
| Modulation Frequencies | 270 Hz, 1 KHz, 2 KHz |
| Opitika Asopọmọra | FC (SC, ST, LC optional) |
| Gbogbogbo Awọn alaye | |
| Ibi ti ina elekitiriki ti nwa | 3 x 1.5V AAA batiri |
| Aifọwọyi-pipa Aago | Awọn iṣẹju 15 (isunmọ) |
| Awọn iwọn otutu ti nṣiṣẹ | -10°C ~ +60°C |
| Awọn iwọn (L x W x H) | 160 x 75 x 32 mm |
| Iwọn | 400 g (unit only) / 150 g (item weight from specs) |
| Iwọn Išẹ ti o kere ju Voltage | 1.5 Volts |
| O pọju Ṣiṣẹ Voltage | 5 Volts |
| Pato sipesifikesonu | UL 61010-1, IEC 61010-2-030 |
| Olupese | Shenzhen Noyafa Electronic |
10. Atilẹyin ọja ati Support
For warranty information, technical support, or service inquiries, please refer to the warranty card included with your product or contact your authorized Noyafa dealer or the manufacturer directly. Keep your purchase receipt as proof of purchase.


