1. Ifihan
O ṣeun fun riraasing the COBY DTV-700 Digital to Analog TV Converter. This device allows you to receive digital broadcast television signals and convert them for display on older analog televisions. It also functions as a multimedia player, supporting various audio, video, and image formats via its USB port, and offers recording capabilities. Please read this manual thoroughly before operating the device to ensure proper use and to maximize your viewiriri iriri.
2. Package Awọn akoonu
Jọwọ ṣayẹwo apoti fun awọn nkan wọnyi:
- COBY DTV-700 Digital to Analog TV Converter
- Isakoṣo latọna jijin
- AC / DC Power Adapter
- Okùn AV (RCA)
- Afowoyi Olumulo (iwe-ipamọ yii)
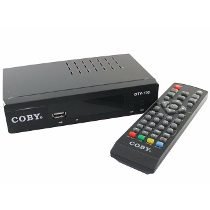
Image 2.1: The COBY DTV-700 Digital to Analog TV Converter. This image shows the compact design of the converter unit, typically black with various ports and indicators.
3. Alaye Aabo
Lati rii daju iṣẹ ailewu ati yago fun ibajẹ, jọwọ ṣe akiyesi awọn iṣọra wọnyi:
- Ma ṣe fi ẹrọ naa han si ojo, ọrinrin, tabi awọn iwọn otutu to gaju.
- Maṣe ṣii casing; tọka gbogbo iṣẹ si oṣiṣẹ ti o peye.
- Rii daju pe fentilesonu to dara ni ayika ẹyọ naa lati ṣe idiwọ igbona.
- Lo oluyipada agbara ti a pese nikan.
- Jeki ẹyọ kuro lati orun taara, awọn orisun ooru, ati awọn aaye oofa to lagbara.
- Dispose of batteries and electronic waste responsibly according to local regulations.
4. Ọja Ipariview
4.1 Igbimọ iwaju
The front panel typically includes:
- Atọka Agbara: Imọlẹ nigbati ẹrọ ba wa ni titan.
- Awọn bọtini Ikanni Soke/Isalẹ: For changing channels.
- Bọtini Akojọ: Wọle si akojọ aṣayan akọkọ.
- Ibudo USB: For connecting USB storage devices for media playback and recording.
4.2 ru Panel
Pẹpẹ ẹhin n pese gbogbo awọn ebute asopọ asopọ pataki:
- ANT IN: Connects to your antenna for receiving digital signals.
- HDMI Jade: Connects to an HDMI-compatible TV for high-definition output.
- AV OUT (RCA): Connects to older analog TVs using composite video (yellow) and stereo audio (red/white) cables.
- COAXIAL Jade: Digital audio output (if available).
- DC NINU: Connects to the provided AC/DC power adapter.
5. Eto
5.1 Connecting the Converter
- Asopọmọra Antenna: Connect your digital antenna to the ERAN INU port on the rear of the DTV-700.
- Sopọ si TV:
- For Analog TVs: Use the supplied AV cable. Connect the yellow plug to the video input of your TV, and the red/white plugs to the corresponding audio inputs. Connect the other end to the AV Jade ports on the DTV-700.
- For Digital/HDTVs: Use an HDMI cable (not included). Connect one end to the HDMI Jade port on the DTV-700 and the other end to an available HDMI input on your TV.
- So agbara: Plug the AC/DC power adapter into the DC IN port on the DTV-700, then plug the adapter into a wall outlet.
5.2 Initial Setup and Channel Scan
- Turn on your TV and select the correct input source (e.g., AV1, HDMI1) that corresponds to your connection.
- Power on the DTV-700 using the remote control or the power button on the front panel.
- The first time you power on, an initial setup wizard may appear. Follow the on-screen prompts to select your language and country.
- Initiate an automatic channel scan. This will search for all available digital channels in your area. This process may take several minutes. Do not interrupt the scan.
- Once the scan is complete, the converter will tune to the first available channel.
6. Awọn ilana Iṣiṣẹ
6.1 Latọna Iṣakoso Awọn iṣẹ
The remote control provides full functionality for your DTV-700. Ensure two AAA batteries are inserted correctly (batteries not included).
- AGBARA: Yipada ẹyọ naa tan tabi pa.
- CH +/-: Yipada awọn ikanni soke tabi isalẹ.
- VOL +/-: Ṣatunṣe iwọn didun.
- Akojọ: Wọle si akojọ aṣayan akọkọ.
- JADE: Jade ni ti isiyi akojọ aṣayan tabi iṣẹ.
- ALAYE: Ṣe afihan alaye ikanni lọwọlọwọ.
- OK / Navigation Buttons: Confirms selections and navigates menus.
- Gba: Starts recording the current program.
- PLAY/PAUSE, STOP, FF, REW: Àwọn ìṣàkóso ìṣiṣẹ́ orin media.
- USB: Switches to USB media playback mode.
6.2 Channel Navigation
Lo awọn + + buttons on the remote or front panel to browse channels. You can also directly enter a channel number using the numeric keypad on the remote.
6.3 Akojọ aṣyn akọkọ
Tẹ awọn Akojọ button to access settings for Program, Picture, Sound, Time, Option, and System. Use the navigation buttons to select options and OK lati jẹrisi.
7. Media Sisisẹsẹhin
The DTV-700 supports media playback from a USB storage device (e.g., USB flash drive, external hard drive). Insert your USB device into the USB port on the front panel.
7.1 Awọn ọna kika atilẹyin
- Orin: MP3, WMA
- Fọto: JPG, BMP, PNG
- Fidio: MKV, AVI, DIVX, XVID, MOV, VOB, FLV, DAT, MPEG, MP4, TS
7.2 Playing Media
- Fi ẹrọ ipamọ USB sinu ibudo USB.
- Tẹ awọn USB button on the remote control or navigate to the 'Multimedia' section in the main menu.
- Select the desired media type (Music, Photo, Video) and browse your files.
- Lo awọn bọtini lilọ kiri lati yan a file ki o si tẹ OK lati mu ṣiṣẹ.
8. Àwọn Ẹ̀yà Ìgbàsílẹ̀
The DTV-700 allows you to record live TV programs to a connected USB storage device.
8.1 Gbigbasilẹ lẹsẹkẹsẹ
Nígbà tí o bá ń wo ètò kan, tẹ REC button on the remote control to start recording. Press DURO lati pari igbasilẹ naa.
8.2 Scheduled Recording (PVR)
Access the PVR (Personal Video Recorder) or Schedule menu via the main menu to set up timed recordings. You will need to specify the channel, start time, end time, and date for the recording.
9. Laasigbotitusita
| Isoro | Owun to le Fa / Solusan |
|---|---|
| Ko si aworan tabi ohun |
|
| Poor picture quality / No channels |
|
| Isakoṣo latọna jijin ko ṣiṣẹ |
|
| USB media not playing |
|
10. Awọn pato
- Awoṣe: DTV-700
- Brand: Coby
- Iṣawọle: Digital TV Antenna (ATSC/DVB-T/T2 compatible, depending on region)
- Abajade: HDMI, AV (RCA Composite Video/Audio)
- Ibudo USB: Yes (for media playback and PVR)
- Supported Media Formats:
- Music: MP3, WMA
- Fọto: JPG, BMP, PNG
- Video: MKV, AVI, DIVX, XVID, MOV, VOB, FLV, DAT, MPEG, MP4, TS
- Agbara: AC/DC Adapter (Input: 100-240V ~ 50/60Hz, Output: typically 5V-12V DC)
- Awọn iwọn: Approximately 20 x 15.6 x 6.2 cm (Package dimensions)
- Ìwúwo: Approximately 490 g (Package weight)
- Awọn batiri Iṣakoso Latọna jijin: 2 x AAA (ko si)
11. Itọju
To ensure the longevity and optimal performance of your DTV-700 converter:
- Ninu: Lo aṣọ rírọrùn tí ó gbẹ láti nu ìta ẹ̀rọ náà. Má ṣe lo àwọn ohun ìfọmọ́ omi tàbí àwọn kẹ́míkà tí ó ń pa ara.
- Afẹfẹ: Rii daju pe awọn šiši fentilesonu ko ni idinamọ lati ṣe idiwọ igbona.
- Ibi ipamọ: Ti o ba tọju ẹyọ naa fun akoko ti o gbooro sii, ge asopọ kuro ni agbara ki o tọju rẹ si ibi ti o tutu, ti o gbẹ.
12. Atilẹyin ọja ati Support
Fun alaye atilẹyin ọja ati atilẹyin imọ-ẹrọ, jọwọ tọka si kaadi atilẹyin ọja ti o wa pẹlu ọja rẹ tabi ṣabẹwo si Coby osise webojula. Tọju iwe-ẹri rira rẹ bi ẹri rira fun eyikeyi awọn ibeere atilẹyin ọja.
Coby is committed to providing quality products and customer satisfaction. If you encounter any issues not covered in this manual, please contact Coby customer service for assistance.