1. Ifihan
This manual provides instructions for setting up, operating, maintaining, and troubleshooting your NETGEAR Nighthawk X4 AC2200 WiFi Mesh Range Extender (Model EX7300). This device is designed to extend your existing WiFi coverage, creating a seamless WiFi system throughout your home or office.
The EX7300 supports AC2200 dual-band wireless speeds up to 2200Mbps, ideal for HD streaming and online gaming. It features Mesh Smart Roaming and One WiFi Name, allowing your devices to automatically connect to the strongest WiFi signal as you move around your home, without needing to manually switch networks. The extender is compatible with any standard WiFi router, gateway, or ISP-provided gateway.
2. Package Awọn akoonu
Jẹrisi pe package rẹ ni awọn nkan wọnyi ninu:
- AC2200 Nighthawk X4 Range Extender (EX7300)
- Itọsọna ibere ni kiakia
If any items are missing or damaged, please contact NETGEAR support.
3. Awọn ẹya ara ẹrọ ti ara
Familiarize yourself with the buttons and indicators on your EX7300 extender.
Iwaju View pẹlu awọn LED

This image shows the front of the NETGEAR EX7300 WiFi Mesh Range Extender, highlighting its LED indicators for power, router link, and client link. These LEDs provide visual feedback on the device's status and connection quality.
- LED agbara: Ṣe afihan ipo agbara.
- LED ọna asopọ olulana: Shows connection strength to the router (Green: Best, Amber: Good, Red: Poor).
- Client Link LED: Shows connection strength to client devices.
- LED WPS: Tọkasi ipo asopọ WPS.
Apa View pẹlu Awọn bọtini
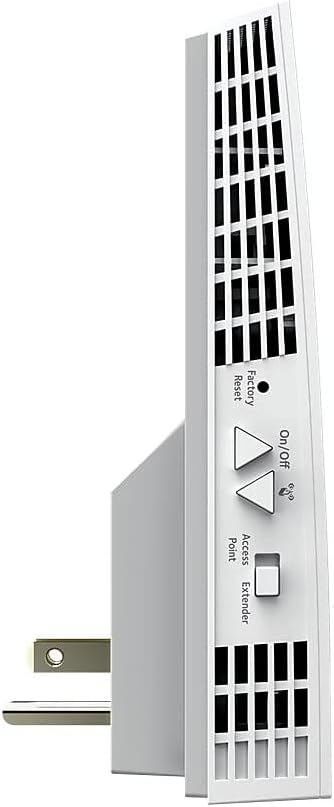
This image displays the side of the NETGEAR EX7300, featuring the Factory Reset button, On/Off switch, and a toggle for Access Point/Extender mode. These controls are essential for managing the device's functions.
- Bọtini Atunto ile-iṣẹ: Resets the extender to factory default settings.
- Tan/Pa Yipada: Fi agbara ẹrọ si tan tabi pa.
- Mode Switch (Access Point/Extender): Selects the operating mode.
Isalẹ View with Ethernet Port

This image shows the bottom of the NETGEAR EX7300, highlighting the Gigabit Ethernet port. This port allows for a wired connection to devices like gaming consoles or smart TVs, providing maximum speed and stability.
- Ibudo Ethernet Gigabit: For wired connections to devices.
Ẹyìn View with Product Label

This image displays the rear of the NETGEAR EX7300, showing the product information label. This label contains important details such as the model number, serial number, and regulatory compliance information.
- Aami ọja: Contains model, serial number, and other regulatory information.
4. Eto
The NETGEAR EX7300 can be set up using either the WPS (Wi-Fi Protected Setup) method or the NETGEAR Installation Assistant. For a seamless installation, it is recommended to complete the basic setup in the same room as your current router.
4.1. WPS Setup Method
- Pulọọgi sinu Extender: Plug the EX7300 extender into an electrical outlet in the same room as your WiFi router.
- Tẹ WPS lori Extender: Press the WPS button on the side of the extender. The WPS LED on the extender will start blinking.
- Tẹ WPS lori olulana: Within two minutes, press the WPS button on your WiFi router. Refer to your router's manual if you cannot locate the WPS button.
- Jẹrisi Asopọmọra: The WPS LED on the extender will light up solid green when a good connection is established between your WiFi router and the extender.
- Extend 5GHz Band (Optional): If your WiFi router supports the 5GHz band and you wish to extend it, repeat the WPS process.
- Gbe Atẹle naa pada: Unplug the extender and move it to a new location. Choose a spot that is about halfway between your router and the area where you experience a poor WiFi signal. The chosen location must be within range of your existing WiFi router network.
- Check Router Link LED: Plug the extender into an electrical outlet in the new location. Wait for the Power LED to light green. Use the Router Link LED to help you choose an optimal location.
- Green or Amber: Tọkasi asopọ ti o dara si olulana.
- Pupa: The extender is too far from the router. Move it closer to the router and try again.
- Awọn ẹrọ Sopọ: Connect your client devices (laptops, smartphones, etc.) to the new extended WiFi network. The extender uses your existing WiFi name with "_EXT" appended (e.g., "YourWiFiName_EXT"). Use the same WiFi password as your router.
- Verify Client Link LED: Once your devices are connected and placed in the desired area, check the Client Link LED on the extender. If it is solid amber or green, your WiFi network has been properly extended.
4.2. NETGEAR Installation Assistant Setup
If your router does not support WPS, or if you prefer a browser-based setup, follow these steps:
- Pulọọgi sinu Extender: Plug the EX7300 extender into an electrical outlet in the same room as your WiFi router.
- Connect to Extender's WiFi: On your computer or mobile device, connect to the extender's default WiFi network (e.g., "NETGEAR_EXT"). No password is required initially.
- Launch Browser: Ṣii a web kiri ati ki o lọ si www.mywifiext.net.
- Tẹle Awọn itọnisọna loju-iboju: The NETGEAR Installation Assistant will guide you through the setup process, including selecting your existing WiFi network(s) and entering your WiFi password(s).
- Relocate and Verify: After initial setup, follow the relocation and LED verification steps as described in the WPS setup method (Step 6 onwards).
4.3. Oṣo Video Itọsọna
How to Setup NETGEAR Wall Plug WiFi Range Extenders
This video provides a visual guide on how to set up NETGEAR Wall Plug WiFi Range Extenders, including the EX7300 model. It demonstrates the WPS setup process and general placement recommendations for optimal performance.
5. Ṣiṣẹ rẹ Extender
Once set up, your EX7300 extender operates to provide extended WiFi coverage. Here are key operational aspects:
- One WiFi Name (Mesh Smart Roaming): The EX7300 supports Mesh Smart Roaming, which means it uses the same WiFi network name (SSID) as your main router. This allows your devices to automatically connect to the strongest WiFi signal as you move around your home, without needing to manually switch networks.
- Asopọmọra-Band Meji: The extender operates on both 2.4GHz and 5GHz WiFi bands, providing flexibility and optimal performance for various devices. The 5GHz band offers higher speeds for demanding tasks like streaming and gaming, while the 2.4GHz band provides broader coverage.
- Ibudo Ethernet Gigabit: Use the Gigabit Ethernet port on the bottom of the extender to connect wired devices such as smart TVs, gaming consoles, or desktop computers for a stable and high-speed internet connection.
- Ipo Ojuami Wiwọle: The EX7300 can also function as an Access Point. If you have an Ethernet cable running to an area with no WiFi, you can connect the extender to the Ethernet cable and switch it to Access Point mode to create a new WiFi hotspot.
5.1. FastLane ọna ẹrọ
The EX7300 features NETGEAR's patented FastLane™ Technology, which uses both WiFi bands to create a super-fast connection. This is particularly beneficial for high-bandwidth applications like HD streaming and online gaming, ensuring minimal lag and buffering.
FastLane Technology | Ensuring Faster Downloads with your WiFi Range Extender
This video explains NETGEAR's FastLane Technology and how it enhances download speeds and overall performance when using a WiFi Range Extender like the EX7300.
NETGEAR Nighthawk X4 AC2200 WiFi Range Extender (EX7300) Overview
Yi fidio pese kan finifini loriview of the NETGEAR Nighthawk X4 AC2200 WiFi Range Extender (EX7300), showcasing Awọn ẹya ara ẹrọ ati awọn anfani rẹ.
6. Itọju
To ensure optimal performance and longevity of your NETGEAR EX7300 extender, follow these maintenance guidelines:
- Awọn imudojuiwọn famuwia: Regularly check for and install firmware updates. Firmware updates often include performance improvements, bug fixes, and security enhancements. You can check for updates via the NETGEAR Installation Assistant or the NETGEAR Nighthawk app.
- Ninu: Keep the extender clean and free from dust. Use a soft, dry cloth to wipe the exterior. Do not use liquid cleaners or aerosols. Ensure ventilation slots are not blocked.
- Ibi to dara julọ: Periodically check the Router Link LED to ensure the extender is still in an optimal location. Environmental changes (e.g., new furniture, appliances) can affect WiFi signal strength.
- Yiyipo Agbara: If you experience intermittent connectivity issues, try power cycling the extender by unplugging it from the outlet, waiting 10-15 seconds, and then plugging it back in.
- Idapada si Bose wa tele: In case of persistent issues or if you wish to reconfigure the extender from scratch, perform a factory reset using the Factory Reset button on the side of the device. Note that this will erase all custom settings.
7. Laasigbotitusita
Abala yii n ṣalaye awọn ọran ti o wọpọ ti o le ba pade pẹlu olutayo EX7300 rẹ.
7.1. Ko si Ayelujara Asopọ
- Check Router Link LED: If the Router Link LED is red, the extender is too far from your router. Relocate the extender closer to your router.
- Ṣe àyẹ̀wò ìsopọ̀ Rútà: Ensure your main WiFi router has an active internet connection.
- Tun-ṣiṣẹ Eto: If the issue persists, try re-running the setup process using either WPS or the Installation Assistant.
7.2. Ifihan agbara WiFi ti ko dara tabi Awọn iyara ti o lọra
- Ibi to dara julọ: Ensure the extender is placed optimally, as indicated by a green or amber Router Link LED. Avoid placing it near large metal objects, concrete walls, or other electronic devices that might cause interference.
- Check Client Link LED: If the Client Link LED is red, your client device is too far from the extender. Move your device closer to the extender.
- Ìjánu: Other wireless devices (cordless phones, microwaves, Bluetooth devices) can interfere with WiFi signals. Try changing the WiFi channel on your router or extender.
- Imudojuiwọn famuwia: Rí i dájú pé firmware extender rẹ ti ṣe àtúnṣe.
7.3. Cannot Access mywifiext.net
- Isopọ taara: Ensure your device is connected to the extender's WiFi network (e.g., "NETGEAR_EXT") or directly via an Ethernet cable during setup.
- Pa Kaṣe Aṣàwárí Rẹ rẹ́: Gbiyanju imukuro rẹ web kaṣe aṣawakiri ati awọn kuki, tabi lo ẹrọ aṣawakiri miiran.
- Alternative IP Address: If www.mywifiext.net doesn't work, try accessing the extender's IP address directly. You can find this in your router's connected devices list.
8. Awọn pato
| Ẹya ara ẹrọ | Ẹ̀kúnrẹ́rẹ́ |
|---|---|
| Awoṣe | EX7300 |
| Alailowaya Technology | 802.11ac Dual-Band |
| Data Gbigbe Oṣuwọn | Titi di 2200 Mbps (AC2200) |
| Ibora | Titi di 2300 sq.ft. |
| Awọn ẹrọ ti a ti sopọ | Titi di awọn ẹrọ 40 |
| Àjọlò Ports | 1 x Gigabit àjọlò Port |
| Pataki Awọn ẹya ara ẹrọ | Mesh Smart Roaming, One WiFi Name, FastLane™ Technology |
| Awọn iwọn (LxWxH) | 6.3 x 3.2 x 1.7 inches |
| Iwọn | 1.05 iwon |
| Voltage | 100-240 Awọn folti |
9. Atilẹyin ọja ati Support
NETGEAR products are designed for reliability and performance. For detailed warranty information, please refer to the warranty card included with your product or visit the official NETGEAR webojula.
For technical support, product registration, and access to user forums, visit the NETGEAR support page:
You may also find helpful resources and FAQs on the NETGEAR webojula.


