1. Ifihan
This manual provides comprehensive instructions for the installation, operation, and maintenance of your FIBARO FGT-001 Z-Wave Plus Smart Heating Radiator Thermostat. The FIBARO Heat Controller is designed to provide precise temperature management for your home, integrating seamlessly with Z-Wave smart home systems. Please read this manual thoroughly before using the device to ensure proper functionality and safety.

Image 1.1: The FIBARO FGT-001 Z-Wave Plus Smart Heating Radiator Thermostat and its retail packaging.
2. Alaye Aabo
- Ka gbogbo awọn ilana ni pẹkipẹki ṣaaju lilo.
- Ma ṣe gbiyanju lati tun tabi yi ẹrọ naa pada funrararẹ. Tọkasi gbogbo iṣẹ si oṣiṣẹ oṣiṣẹ.
- Jeki ẹrọ naa kuro ni omi ati ọriniinitutu giga.
- Ma ṣe fi ẹrọ naa han si awọn iwọn otutu to gaju tabi imọlẹ orun taara.
- Ensure the device is securely installed on the radiator valve.
- Sọ awọn batiri sọnu ni ibamu si awọn ilana agbegbe.
3. Package Awọn akoonu
The FIBARO FGT-001 package typically includes:
- FIBARO Heat Controller Head (FGT-001)
- Afowoyi Olumulo (iwe-ipamọ yii)
- Adapters for various radiator valves (M30 x 1.5, Danfoss RTD-N, Danfoss RA-N) - Note: Specific adapters may vary by region or package.
4. Ọja Ipariview
The FIBARO Heat Controller is a smart radiator thermostat designed to regulate the temperature in rooms by controlling the flow of hot water through the radiator. It features Z-Wave Plus connectivity for integration into smart home systems, allowing for remote control and automation. The device is powered by a built-in rechargeable battery.
Awọn ẹya pataki:
- Z-Wave Plus Compatibility: Works with any Z-Wave or Z-Wave+ Controller.
- Awọn ọna aabo: Supports S0 with AES-128 encryption and S2 with PRNG-based encryption.
- Batiri gbigba agbara: Built-in battery recharged via a standard micro-USB port.
- Ibamu Valve: Designed for M30 x 1.5, Danfoss RTD-N, and Danfoss RA-N valves.
- Atọka LED: Features an LED ring that changes color to indicate temperature settings.

Image 4.1: A hand manually adjusting the FIBARO Heat Controller on a radiator valve.

Image 4.2: The FIBARO Heat Controller displaying a target temperature of 18°C.
5. Eto & Fifi sori
5.1. Ngba agbara ẹrọ
Before installation, ensure the device's built-in battery is fully charged. Connect a standard micro-USB cable to the charging port on the device. The LED indicator will show charging status.
5.2. Fífi sori Ẹ̀rọ Rídíà
The FIBARO Heat Controller is designed for easy, tool-free installation.
- Ṣe àfihàn Irú Ààbò: Determine if your radiator valve is M30 x 1.5, Danfoss RTD-N, or Danfoss RA-N. Select the appropriate adapter if necessary.
- Remove Existing Thermostat: Unscrew and remove any existing thermostat head from your radiator valve.
- So Adapta pọ mọ (ti o ba nilo): If your valve is not M30 x 1.5, attach the correct adapter to the valve.
- Mount Heat Controller: Screw the FIBARO Heat Controller onto the radiator valve or adapter. Ensure it is hand-tightened securely.
- Iṣatunṣe: The device will automatically begin a calibration process after installation. This may involve the valve opening and closing to learn its range.

Image 5.1: The FIBARO Heat Controller installed on a radiator in a residential setting.
5.3. Z-Wave Network Inclusion
To integrate the Heat Controller into your Z-Wave network:
- Place the Heat Controller within direct range of your Z-Wave controller.
- Set your Z-Wave controller into inclusion (add) mode. Refer to your Z-Wave controller's manual for specific instructions.
- Press the button on the Heat Controller three times quickly.
- The device will be detected and added to your Z-Wave network. The LED ring may indicate successful inclusion.
6. Awọn ilana Iṣiṣẹ
6.1. Manual Temperature Adjustment
You can manually adjust the desired temperature by rotating the outer ring of the Heat Controller. The LED ring will change color to indicate the set temperature:
- Buluu: Lower temperatures
- Alawọ ewe: Awọn iwọn otutu iwọntunwọnsi
- Pupa: Higher temperatures
- eleyi ti: Boost/Maximum heating
6.2. Z-Wave Control and Automation
Once included in your Z-Wave network, the FIBARO Heat Controller can be controlled remotely via your Z-Wave gateway's interface or mobile application. This allows for:
- Setting precise temperature schedules.
- Creating scenes and automations (e.g., turn off heating when a window is open).
- Monitoring current room temperature (if an external sensor is paired).
- Voice control integration with compatible smart assistants (e.g., Google Assistant).

Image 6.1: Remote control of the heating system via a smartphone application.
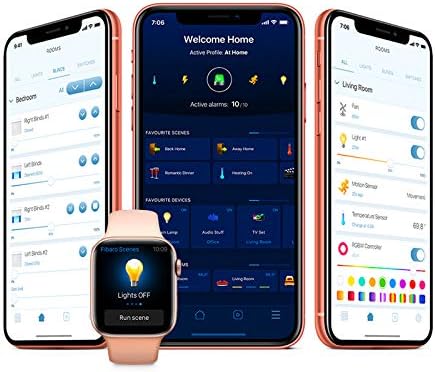
Aworan 6.2: Example of the FIBARO smart home application interface for managing devices and settings.
7. Itọju
7.1. Batiri Ngba agbara
The built-in battery should be recharged when the low battery indicator appears (usually a flashing LED). Connect the device to a micro-USB power source. A full charge typically takes several hours.
7.2. Ninu
Clean the device with a soft, dry cloth. Do not use abrasive cleaners or solvents, as these can damage the surface.
8. Laasigbotitusita
8.1. Device Ko Fesi
- Ṣayẹwo Batiri: Ensure the battery is charged. Connect to a micro-USB charger.
- Z-Wave Network: Verify the device is properly included in your Z-Wave network and within range of the controller.
- Atunṣe: If the valve movement seems incorrect, try re-calibrating the device by detaching and reattaching it, or through your Z-Wave controller's interface if supported.
8.2. Incorrect Temperature Readings
- The Heat Controller measures temperature near the radiator, which can be warmer than the room's ambient temperature. Consider pairing with an external FIBARO temperature sensor for more accurate room temperature readings.
- Ensure the device is not obstructed or exposed to direct heat sources (e.g., direct sunlight, other appliances).
8.3. Difficulty with Z-Wave Inclusion/Exclusion
- Ensure the device is close to the Z-Wave controller during the inclusion/exclusion process.
- Perform a factory reset on the Heat Controller if it fails to include or exclude. Refer to the FIBARO support website for specific reset procedures.
9. Awọn pato
| Ẹya ara ẹrọ | Ẹ̀kúnrẹ́rẹ́ |
|---|---|
| Brand | FIBARO |
| Orukọ awoṣe | Head (FGT-001) |
| Asopọmọra Technology | Z-igbi Plus |
| Orisun agbara | Built-in rechargeable Lithium Polymer battery (charged via Micro-USB) |
| Adarí Iru | Z-Wave Gateway, Google Assistant (via compatible gateway) |
| Pataki Ẹya | Integration pẹlu Smart Home Systems |
| Àwọ̀ | Funfun |
| Ohun elo | Ṣiṣu |
| Iwọn Nkan | 3.53 iwon (100 Giramu) |
| Ọja Mefa | 2.28 x 3.43 x 2.56 inches |
| Ifihan Iru | Digital (LED ring) |
| Ọna Iṣakoso | App, Voice, Manual Rotation |
| Iṣagbesori Iru | Radiator Valve Mount |
| Àtọwọdá Ibamu | M30 x 1.5, Danfoss RTD-N, Danfoss RA-N |
10. Atilẹyin ọja ati Support
FIBARO products are covered by a manufacturer's warranty. For detailed warranty terms and conditions, please refer to the warranty card included with your product or visit the official FIBARO webojula.
For technical support, troubleshooting assistance, or further information, please visit the FIBARO support portal or contact their customer service.
- FIBARO Webojula: www.fibaro.com
- Atilẹyin: Tọka si apakan atilẹyin lori osise naa website for FAQs, guides, and contact information.