1. Ifihan
This manual provides essential instructions for the safe and efficient operation of your Automatic Mini Double Station Mug Heat Press Transfer Machine. Please read this manual thoroughly before use to ensure proper setup, operation, and maintenance.
This machine is designed for sublimation printing on various mug sizes, featuring a double station design for increased efficiency.
2. Awọn ilana aabo
- Ṣiṣẹ ẹrọ naa nigbagbogbo lori iduro, dada sooro ooru.
- Keep hands clear of heating elements during operation to prevent burns.
- Rii daju pe fentilesonu to dara ni agbegbe iṣẹ.
- Ma ṣe fi ẹrọ naa han si omi tabi ọrinrin pupọ.
- Yọọ ẹrọ kuro ni iṣan agbara nigbati ko si ni lilo tabi ṣaaju ṣiṣe mimọ / itọju.
- Má ṣe gbìyànjú láti ṣe àtúnṣe tàbí tún ẹ̀rọ náà ṣe fúnra rẹ. Pe àwọn òṣìṣẹ́ tó mọ̀ nípa rẹ̀ fún iṣẹ́ náà.
- Pa awọn ọmọde ati awọn ẹranko mọ kuro ninu ẹrọ iṣiṣẹ.
3. Package Awọn akoonu
Jẹrisi pe gbogbo awọn ohun kan wa ninu package:
- 1x Double Mug Heat Press Machine
- 1x English User Manual (this document)
- 2x 11oz Heating Pads (pre-installed or included separately)
Ti awọn ohun kan ba nsọnu tabi bajẹ, jọwọ kan si atilẹyin alabara.
4. Eto
- Ṣii silẹ: Carefully remove the heat press machine from its packaging. Retain packaging for future storage or transport.
- Ibi: Gbé ẹ̀rọ náà sí orí ilẹ̀ tí ó tẹ́jú, tí ó dúró ṣinṣin, tí ó sì lè má gba ooru. Rí i dájú pé àyè tó wà ní àyíká ẹ̀rọ náà fún afẹ́fẹ́ àti ìṣiṣẹ́ tí ó ní ààbò.
- Asopọ agbara: Ensure the machine's power switch is in the OFF position. Plug the machine into a standard 110V AC power outlet.
- Ayẹwo akọkọ: Before first use, inspect the heating pads and control panel for any visible damage.

olusin 1: Iwaju view of the Double Mug Heat Press Machine. This image shows the overall design with two mug stations and the central control panel.
5. Awọn ilana Iṣiṣẹ
5.1 Iṣakoso igbimo Loriview

Figure 2: Close-up of the LCD control panel. The panel features an LCD display for temperature and time, along with buttons for timing, temperature adjustment, and mode selection for left and right stations.
The machine features an LCD control panel for setting temperature and time. It allows for independent control of each mug station.
5.2 Ipilẹ isẹ Igbesẹ
- Agbara Tan: Turn on the main power switch. The LCD display will illuminate.
- Ṣeto iwọn otutu: Use the temperature adjustment buttons (often indicated by '+' and '-' or specific temperature setting buttons) to set the desired transfer temperature. The recommended transfer temperature is 180°C (356°F).
- Ṣeto Akoko: Use the timing adjustment buttons to set the desired transfer time. The recommended transfer time is 90 seconds.
- Gbona: Allow the machine to preheat until it reaches the set temperature. The display will show the current temperature.
- Prepare Mug: Wrap your sublimation print around the mug, securing it with heat-resistant tape. Ensure the print is flat against the mug surface.
- Insert Mug: Carefully place the prepared mug into the heating pad of one or both stations. Ensure the mug is centered and the heating pad fully encompasses the printed area.
- Waye Ipa: Pa clamp handle to apply even pressure to the mug. The machine is designed to accommodate various mug sizes (6OZ, 9OZ, 11OZ, 12OZ, 17OZ) with appropriate heating pads.
- Bẹrẹ Gbigbe: Press the start button (often labeled 'Timing' or 'Start') for the respective station. The timer will begin counting down.
- Remove Mug: Once the timer reaches zero, carefully open the clamp handle and remove the hot mug using heat-resistant gloves.
- Fara bale: Place the mug on a heat-resistant surface to cool. Once cool, carefully remove the sublimation paper.

Figure 3: A mug correctly positioned within the heating element of the heat press machine, ready for the sublimation process.
5.3 Workflow Diagram
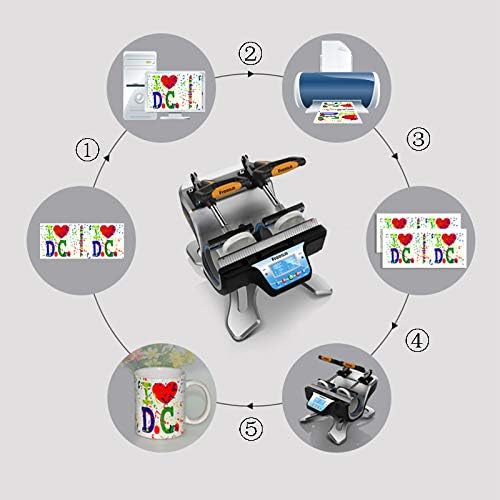
Figure 4: A visual representation of the sublimation printing process, from designing and printing the image to pressing it onto the mug and the final result.
5.4 Replacing Heating Pads
The heating pads are replaceable to accommodate different mug sizes. The machine includes two 11oz heating pads. For other sizes, contact customer support.

olusin 5: A alaye view of the heating element, showing its construction and how it secures the mug for heat transfer.
- Paa ati Yọọ: Ensure the machine is turned off and unplugged from the power source. Allow the heating pads to cool completely.
- Àwọn ohun tí a fi ń fa àwọn nǹkan mọ́ra: Locate the fasteners securing the heating pad to the machine frame. Loosen or remove them as required.
- Disconnect Pad: Carefully disconnect the electrical connector for the heating pad.
- Remove Old Pad: Slide out the old heating pad.
- Install New Pad: Insert the new heating pad, ensuring it is correctly aligned.
- Sopọ ki o si ni aabo: Reconnect the electrical connector and secure the heating pad with the fasteners.
- Idanwo: Plug in the machine and perform a test run to ensure the new heating pad functions correctly.
6. Itọju
- Ninu: After each use, ensure the machine is cool and unplugged. Wipe down the exterior surfaces with a soft, dry cloth. Do not use abrasive cleaners or solvents.
- Heating Pad Care: Inspect heating pads regularly for wear or damage. Replace if necessary to ensure consistent heat transfer.
- Ibi ipamọ: Tọju ẹrọ naa ni agbegbe gbigbẹ, ti ko ni eruku nigbati ko si ni lilo.
7. Laasigbotitusita
| Isoro | Owun to le Fa | Ojutu |
|---|---|---|
| Ẹrọ ko ni agbara lori. | Not plugged in; power switch off; faulty power outlet. | Check power cord connection; ensure power switch is ON; test outlet with another device. |
| Iwọn otutu ko de iye ṣeto. | Incorrect temperature setting; faulty heating element. | Verify temperature setting; allow more time for preheating; contact support if issue persists. |
| Uneven transfer results. | Uneven pressure; worn heating pad; incorrect mug placement. | Ensure mug is centered and clamp is fully engaged; inspect heating pad for wear; ensure print is flat on mug. |
| Aago ko ṣiṣẹ. | Incorrect operation; control panel issue. | Review operating instructions for timer activation; contact support. |
8. Awọn pato
| Awoṣe | Automatic Mini Double Station Mug Heat Press Transfer Machine |
| Compatible Mug Sizes | 6OZ, 9OZ, 11OZ, 12OZ, 17OZ |
| Voltage | 110V |
| Agbara | 280W + 280W (Àròpọ̀ 560W) |
| Transfer Temperature | 180°C (356°F) |
| Akoko Gbigbe | 90 Seconds (Adjustable) |
| Awoṣe Iṣakoso | Iṣakoso LCD |
| Iwọn | 14.6 lbs (7.2 KG) |
| Ìwò Mefa | 14.5" x 12" x 13.38" (37 x 30.6 x 34 cm) |
| Pulọọgi Iru | US Plug |
9. Atilẹyin ọja ati Support
No specific warranty information is provided with this product. For technical support, replacement parts (such as different sized heating pads), or any operational questions, please refer to the seller or manufacturer's contact information provided at the point of purchase.


