Ọrọ Iṣaaju
This manual provides detailed instructions for the safe installation, operation, and maintenance of your Project Source 6-Pack 10-inch Brushed Nickel Flush Mount Lights. These fixtures feature a brushed nickel finish and frosted glass shades, designed for indoor use. Please read all instructions carefully before beginning installation and retain this manual for future reference.
Alaye Aabo pataki
Always follow basic safety precautions when installing and operating electrical fixtures to reduce the risk of fire, electric shock, and personal injury.
- IKILO: Risk of electric shock. Disconnect power at the main circuit breaker or fuse box before installation, servicing, or changing bulbs.
- Kan si onimọ-ẹrọ ina ti o peye ti o ba ni idaniloju nipa ilana fifi sori ẹrọ tabi o ni awọn ibeere nipa awọn okun ina.
- Maṣe kọja wat ti o pọjutage specified for the bulbs (60 watts per bulb).
- Rii daju pe gbogbo awọn asopọ itanna wa ni aabo ati idabobo daradara.
- This fixture is designed for indoor use only and is not water resistant. Do not install in wet locations.
- Wọ awọn gilaasi ailewu lakoko fifi sori ẹrọ.
Package Awọn akoonu
Verify that all components are present and undamaged before beginning installation. If any parts are missing or damaged, do not proceed with installation and contact customer service.
- 6 x Flush Mount Light Fixtures (Brushed Nickel)
- Àwọn Àwọ̀ Gíláàsì Tí A Fi Frost Mẹ́ta
- Mounting Hardware (e.g., screws, wire nuts, mounting bracket)
Note: Six (6) A19 60-watt maximum bulbs are required per fixture and are ko si.
Eto ati fifi sori
Follow these steps carefully to install your flush mount light fixture. Repeat for each of the six fixtures.
- Step 1: Prepare for Installation. Turn off the power to the junction box at the circuit breaker or fuse box. Ensure the power is off by testing the existing light switch.
- Step 2: Attach Mounting Bracket. Secure the fixture's mounting bracket to the ceiling junction box using the screws provided. Ensure it is firmly attached.
- Step 3: Make Electrical Connections. Carefully connect the wires from the fixture to the corresponding wires from the junction box using the provided wire nuts. Typically, black (hot) to black, white (neutral) to white, and bare copper or green (ground) to bare copper or green. Ensure all connections are tight and secure.
- Step 4: Mount Fixture to Ceiling. Carefully push the wired fixture base up to the ceiling, aligning the screw holes on the fixture with the mounting bracket. Secure the fixture to the bracket using the decorative nuts or screws provided.
- Step 5: Install Bulbs. Screw in six (6) A19 60-watt maximum bulbs (not included) into the sockets of the fixture.
- Step 6: Attach Glass Shade. Carefully place the frosted glass shade onto the fixture. Secure it by screwing the finial onto the threaded rod at the bottom of the fixture until the shade is snug. Do not overtighten.
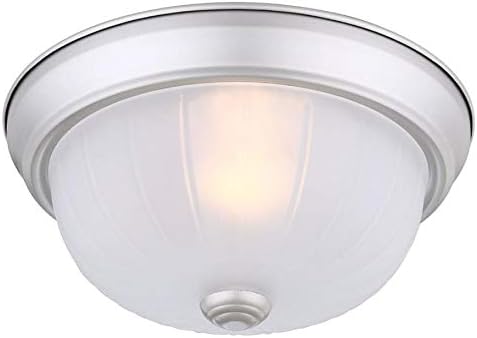
Figure 1: Assembled Flush Mount Light Fixture. This image shows a single 10-inch flush mount light fixture with its brushed nickel base and frosted glass shade, ready for installation.

Figure 2: Fixture Base and Mounting Area. A detailed view of the brushed nickel base of the light fixture, highlighting the rim where the glass shade rests and the mounting points.

Figure 3: Finial for Securing Glass Shade. A close-up of the decorative finial, which is used to secure the frosted glass shade to the light fixture's base.
Awọn ilana Iṣiṣẹ
Once all fixtures are securely installed and bulbs are in place, restore power at the main circuit breaker. The flush mount lights are operated by a standard wall switch (not included) connected to the circuit. Simply toggle the wall switch to the 'ON' position for illumination and 'OFF' to turn the lights off.
Itoju
Proper maintenance ensures the longevity and optimal performance of your light fixtures.
- Ninu: To clean the fixture, ensure the power is turned off at the circuit breaker. Wipe the brushed nickel finish and glass shade with a soft, dry, or slightly damp Aṣọ. Má ṣe lo àwọn ohun ìfọṣọ, àwọn ohun tí a fi ń pa á lára, tàbí àwọn ohun ìfọṣọ nítorí wọ́n lè ba ìparí rẹ̀ jẹ́.
- Rirọpo Boolubu: Before replacing bulbs, turn off the power to the fixture at the circuit breaker and allow the bulbs to cool completely. Unscrew the finial and carefully remove the glass shade. Unscrew the old bulbs and replace them with new A19 60-watt maximum bulbs. Reattach the glass shade and secure it with the finial. Restore power.
Laasigbotitusita
Tí o bá ní ìṣòro pẹ̀lú ohun èlò ìmọ́lẹ̀ rẹ, wo àwọn ìṣòro àti ìdáhùn tó wọ́pọ̀ wọ̀nyí:
- Imọlẹ ko tan:
- Ṣàyẹ̀wò pé agbára náà wà ní ẹ̀rọ ìdènà ẹ̀rọ náà.
- Rí i dájú pé ìyípadà ògiri wà ní ipò 'ON'.
- Verify that all wire connections are secure and properly made.
- Confirm that the bulbs are screwed in tightly and are not burnt out.
- Imọlẹ flickers:
- Check for any loose wire connections within the fixture or junction box.
- Ensure the bulbs are fully screwed in and are not faulty.
- Verify that the bulbs are compatible with the fixture's specifications.
Awọn pato
| Brand | Orisun Project |
| Nọmba awoṣe | FJ13-012-1 |
| UPC | 848507002376 |
| Àwọ̀ | ti ha nickel |
| Ohun elo | Gilasi |
| Ara | Ibile |
| Fọọmu imuduro | Aja |
| Yara Iru | Indoor (Bathroom, Kitchen, Living Room, Bedroom, Dining Room, Office) |
| Orisun agbara | Okun Itanna |
| Iru fifi sori ẹrọ | Ẹke Fula |
| Imọlẹ Orisun Orisun | Incandescent (compatible with LED) |
| Ohun elo iboji | Gilasi |
| Nọmba Awọn orisun Imọlẹ | 6 (per fixture) |
| Voltage | 120 Volts |
| Wattage | 60 watts (maximum per bulb) |
| Bulb Base | E26 |
| Ọna Iṣakoso | External Wall Switch |
| Iwọn Ẹka | 6 Iṣiro |
| Omi Resistance Ipele | Ko Omi Resistant |
| Ọja Mefa | 10 x 10 x 4.45 inches |
| Iwọn Nkan | 13.02 poun (lapapọ fun 6-pack) |
| Awọn iwe-ẹri | Akojọ ETL |
Atilẹyin ọja ati Support
For technical assistance, warranty claims, or to inquire about replacement parts, please contact Project Source customer service. Refer to your purchase documentation or the retailer's website for specific warranty terms and contact information. Keep your proof of purchase for any warranty claims.


