1. Ifihan
This user manual provides comprehensive instructions for the installation, operation, and maintenance of your Audio System CO-600.5 High-Performance 5-Channel Class A/B Amplifier. Láti rí i dájú pé iṣẹ́ àti ààbò tó dára jùlọ wà, jọ̀wọ́ ka ìwé ìtọ́ni yìí dáadáa kí o tó lo ọjà náà kí o sì tọ́jú rẹ̀ fún ìtọ́kasí ọjọ́ iwájú.
2. Alaye Aabo
General Product Safety according to EU Regulation 2023/2028:
- Observe the manufacturer's instructions and operating instructions for switching off the power supply to the vehicle and in the retrofit products.
- The supply line to the retrofit product must not be longer than 30cm from the operating battery.
- Fasten retrofit devices and accessories properly.
- It is recommended that the retrofit devices/accessories be installed by a specialist workshop. Otherwise, product or vehicle damage and fire can occur.
Always disconnect the vehicle's battery before performing any installation or maintenance work to prevent electrical shock or damage.
3. Ọja Ipariview
The Audio System CO-600.5 is a high-performance 5-channel Class A/B amplifier designed for car audio systems. It features switchable High-Pass (HP) and Low-Pass (LP) filters, a full active mode, and includes a wired RTC remote control for convenient adjustments. The amplifier supports an input sensitivity range of 0.2V to 6V and includes a high-level RCA input with automatic turn-on capability.
Awọn ẹya pataki:
- 5-ikanni Kilasi A / B Ampitanna
- Switchable High-Pass (HP) and Low-Pass (LP) Filters
- Full Active Mode
- Wired RTC Remote Control Included
- Input Sensitivity: 0.2V - 6V
- High-Level RCA Input with Auto-On
- Power Output: 4 x 60W RMS (4 Ohm) / 4 x 85W RMS (2 Ohm) and 1 x 250W RMS (4 Ohm mono) / 1 x 350W RMS (2 Ohm mono)
Ọja Views

olusin 3.1: Top view of the CO-600.5 amplifier, tó ń ṣe àfihàn àwòrán àti àmì ìdánimọ̀ rẹ̀ tó dára.

olusin 3.2: Iwaju view ti awọn amplifier, displaying the cooling fins.
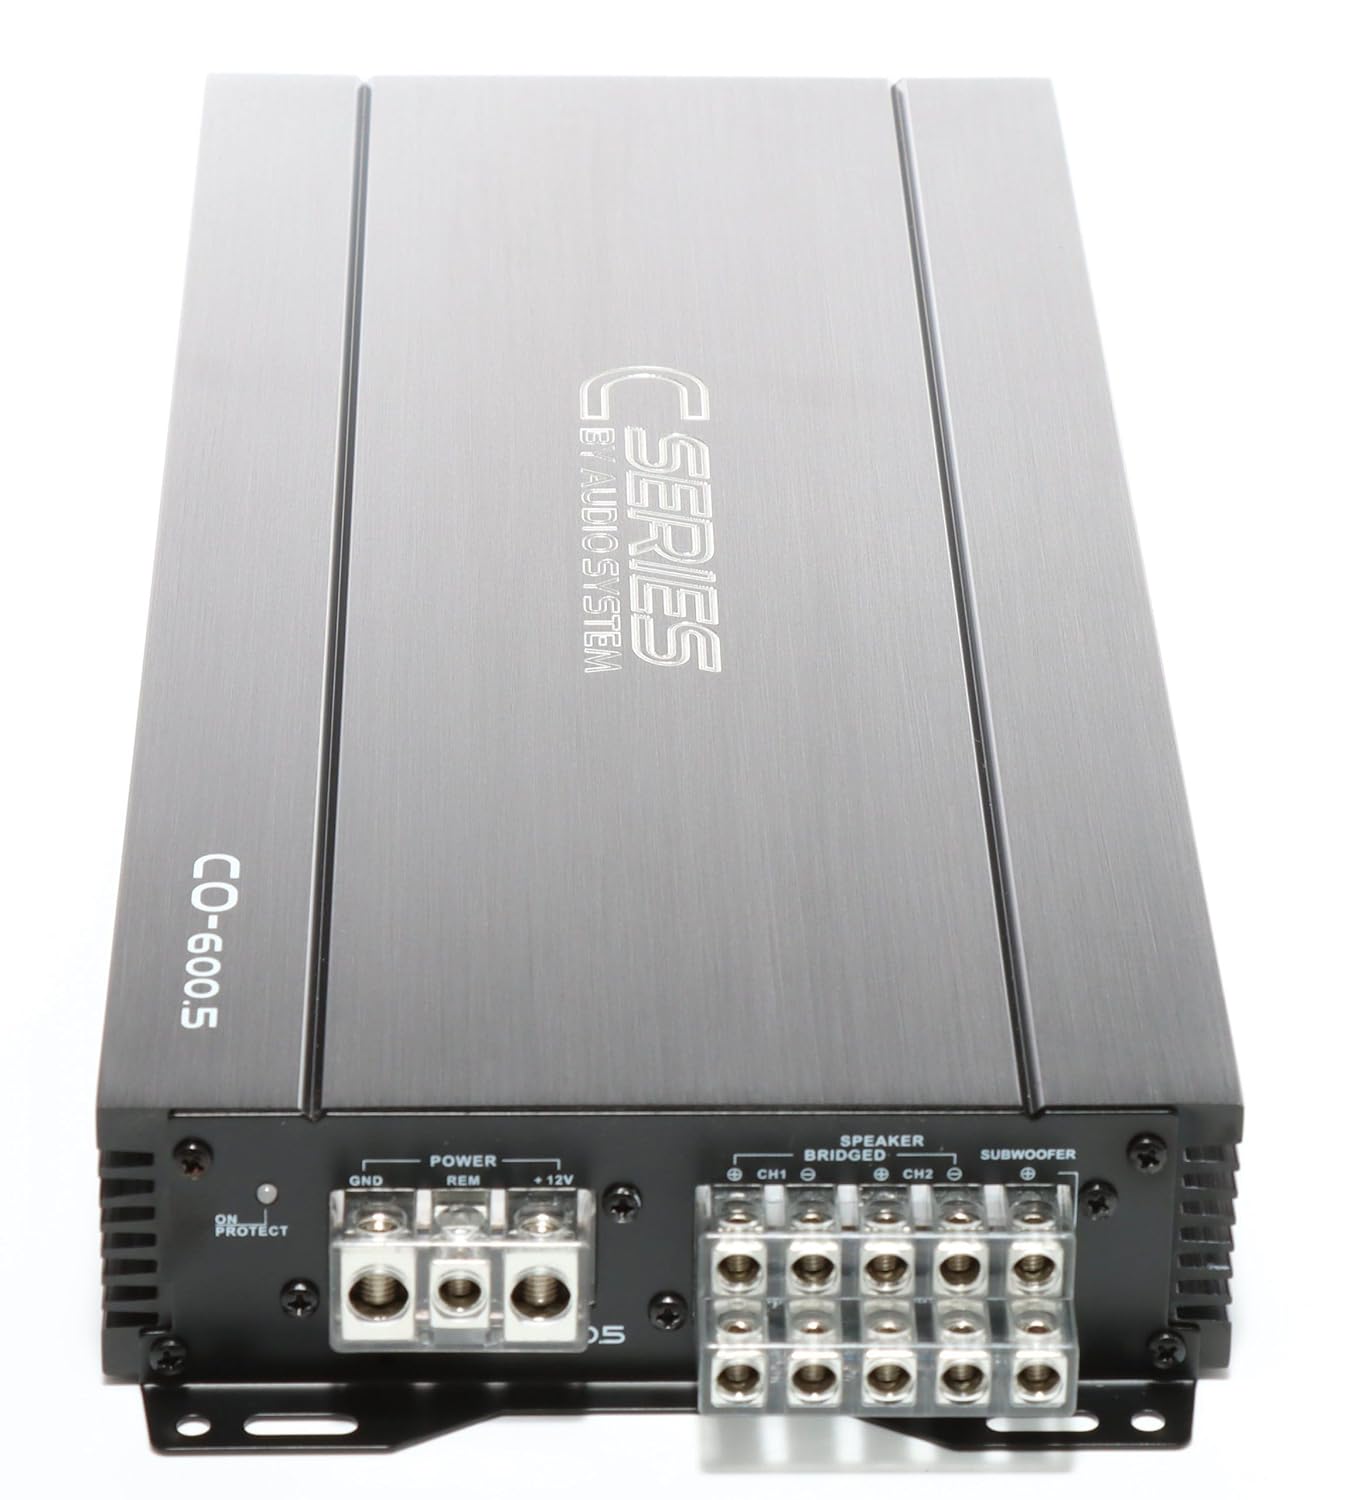
olusin 3.3: Ẹyìn view ti awọn amplifier, detailing the power input (GND, REM, +12V) and speaker output terminals.

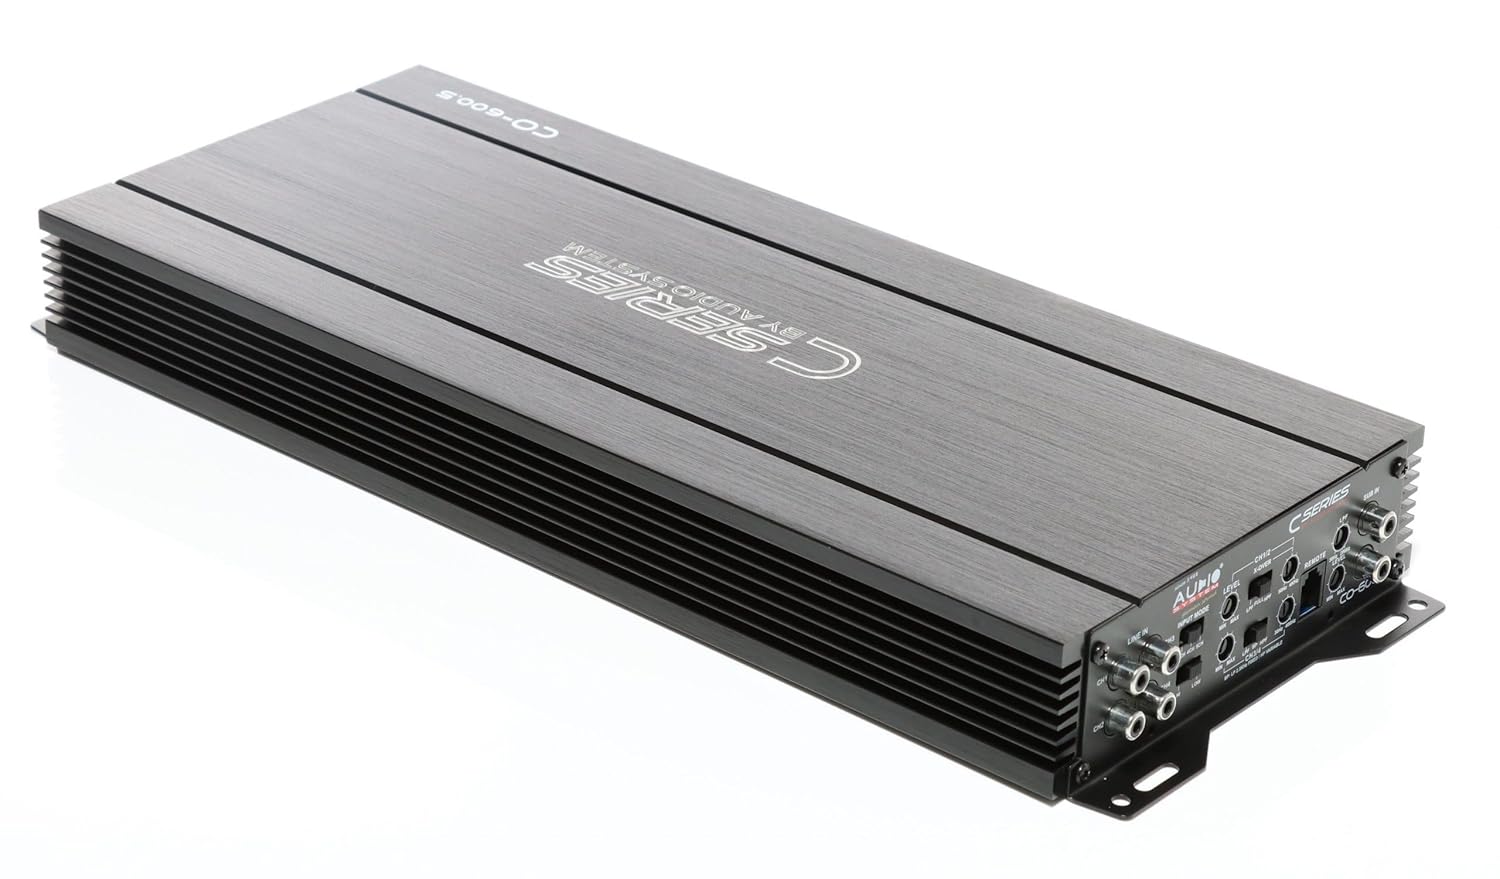
Figure 3.4: Input and control panel, featuring RCA inputs, gain level adjustments, and crossover frequency controls.
olusin 3.5: Angled view providing a comprehensive look at both connection sides of the amplifier.
4. Eto ati fifi sori
Dara fifi sori jẹ pataki fun awọn iṣẹ ati longevity ti rẹ ampA gbani niyanju gidigidi pe ki o jẹ ki oṣiṣẹ ti o peye ṣe fifi sori ẹrọ naa.
4.1 Iṣagbesori Location
- Yan ibi gbigbẹ, ti afẹfẹ si dara, kuro ni oorun taara ati awọn orisun ooru.
- Rí i dájú pé afẹ́fẹ́ tó pọ̀ tó ní àyíká ampìtútù tó yẹ.
- Gbe awọn amplifier securely to a solid surface using appropriate hardware to prevent movement during vehicle operation.
4.2 Awọn isopọ onirin
Ṣaaju ṣiṣe eyikeyi awọn asopọ, ge asopọ ebute batiri odi ti ọkọ naa.
- Agbára (BATT+): Connect a fused power cable directly from the vehicle's positive battery terminal to the +12V terminal on the amplifier. Ensure the fuse is located within 30cm of the battery.
- Ilẹ (GND): Connect a ground cable of the same gauge as the power cable to a clean, unpainted metal surface on the vehicle chassis. The connection point must be free of rust and paint.
- Latọna jijin (REM): So okun waya isakoṣo latọna jijin pọ lati iṣẹjade isakoṣo latọna jijin ori rẹ si ebute REM lori ampolùgbé. Èyí yóò yí ìyípadà padà amplifier lori ati pa pẹlu rẹ ori kuro.
- Awọn igbewọle RCA: Connect your head unit's RCA outputs to the amplifier's RCA inputs (CH1/2, CH3/4, SUB IN).
- Awọn igbejade Agbọrọsọ: Connect your speakers to the corresponding speaker output terminals (CH1, CH2, CH3, CH4, SUBWOOFER). Observe correct polarity (+ to + and - to -).
5. Awọn ilana Iṣiṣẹ
Ni kete ti awọn amplifier is correctly installed and wired, you can proceed with initial setup and operation.
5.1 Ibẹrẹ Agbara Lori
- Tun ebute batiri odi ti ọkọ naa so.
- Tan ẹyọ ori rẹ. Awọn amplifier should power on automatically via the remote wire. The power indicator LED on the amplifier yẹ ki o tan imọlẹ.
5.2 Gain Level Adjustment
Ìṣàkóso èrè (LEVEL) báramu amplifier's input sensitivity to the output of your head unit. This is not a volume control.
- Ṣeto awọn amplifier's gain control to minimum (fully counter-clockwise).
- Ṣeto iwọn didun ti ẹrọ ori rẹ si nipa 75-80% ti o pọju rẹ.
- Laiyara mu awọn ampIṣakoso ere lifier titi iwọ o fi gbọ ipalọlọ diẹ, lẹhinna da pada sẹhin diẹ titi ti ohun yoo fi han.
5.3 Crossover Settings (X-OVER)
The CO-600.5 features switchable HP (High-Pass) and LP (Low-Pass) filters for precise sound tuning.
- HPF (Àlẹmọ-Pass giga): Allows frequencies above the set point to pass through. Use for full-range speakers to prevent low frequencies that can cause distortion.
- LPF (Àlẹmọ-Pass Kekere): Allows frequencies below the set point to pass through. Use for subwoofers to prevent high frequencies.
- Adjust the crossover frequencies (e.g., 50Hz-250Hz for HPF, 30Hz-250Hz for LPF) according to your speaker specifications and listening preferences.
5.4 RTC Remote Control
The included wired RTC remote control allows for convenient adjustment of the subwoofer level from the driver's seat.
6. Itọju
The Audio System CO-600.5 amplifier nilo itọju kekere.
- Pa awọn amplifier mọ ki o si free ti eruku. Lo asọ asọ ti o gbẹ fun mimọ.
- Ensure all connections remain secure. Periodically check wiring for any signs of wear or corrosion.
- Ma ṣe lo awọn kẹmika lile tabi awọn olutọpa abrasive lori awọn amplifier.
7. Laasigbotitusita
Ti o ba ni iriri awọn iṣoro pẹlu rẹ amplifier, tọka si awọn iṣoro ti o wọpọ ati awọn ojutu wọnyi:
| Isoro | Owun to le Fa | Ojutu |
|---|---|---|
| Ko si agbara / Amplifier ko ni tan |
|
|
| Ko si Ijade ohun |
|
|
| Ohun Daru |
|
|
If the problem persists after attempting these solutions, please contact Audio System customer support or a qualified car audio technician.
8. Awọn pato
| Ẹya ara ẹrọ | Ẹ̀kúnrẹ́rẹ́ |
|---|---|
| Nọmba awoṣe | 02002CO6005 |
| Awọn ikanni | 5 (4 full-range + 1 mono/subwoofer) |
| Igbara agbara (RMS) |
|
| Input Sensitivity | 0.2V - 6V |
| Ajọ | Switchable High-Pass (HP) and Low-Pass (LP) |
| Iwọn (Ọja) | Isunmọ 420 x 47 x 171 mm |
| Package Mefa | 59.99 x 19.99 x 15.01 cm |
| Package iwuwo | kilo 1 |
| Voltage (Ṣiṣẹ) | 6 Volts (Note: Typically car audio operates at 12V. Please refer to product labeling for exact operating voltage.) |
| O pọju Ipese Voltage | 6 Volts |
| Iṣagbesori Iru | Oke Oke |
9. Atilẹyin ọja ati Support
For warranty information, please refer to the documentation provided with your purchase or contact your authorized Audio System dealer. Warranty terms and conditions may vary by region and retailer.
For technical support, service, or inquiries regarding spare parts, please contact Audio System customer service directly or visit their official website. Contact information is typically available on the product packaging or the manufacturer's webojula.
Olupese: Ohun System
Adirẹsi olupese: JRS Labs - The Art of Sound, Heinrich-Heine-Straße 13A, 63329 Rödermark


