Ọrọ Iṣaaju
This manual provides essential instructions for the safe and efficient use of your Smart Kingfisher Rechargeable Lithium Battery and USB Charger. Please read this manual thoroughly before use and retain it for future reference.
Alaye Aabo
- Ikilọ: Ma ṣe gbiyanju lati gba agbara si awọn batiri ti kii ṣe gbigba agbara.
- Ikilọ: Do not charge batteries from other suppliers unless explicitly stated as compatible.
- Keep the charger and batteries away from water and moisture.
- Do not disassemble, crush, or puncture the batteries or charger.
- Yẹra fún fífi àwọn bátìrì sí ojú ọjọ́ tí ó le koko tàbí oòrùn tààrà.
- Sọ awọn batiri sọnu ni ifojusọna ni ibamu si awọn ilana agbegbe.
Package Awọn akoonu
Daju pe gbogbo awọn nkan wa ninu apo rẹ:
- 2 x 425 Rechargeable Lithium Batteries
- 1 x Dual-Port USB Charger
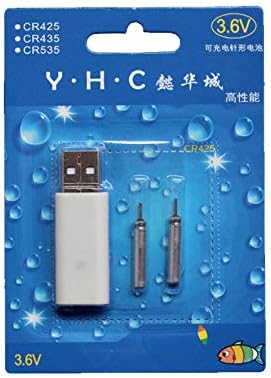
Image: Retail packaging showing the USB charger and two 425 rechargeable batteries.

Image: A pair of Smart Kingfisher 425 rechargeable lithium batteries.
Ṣeto
The Smart Kingfisher USB charger is designed for ease of use. No complex setup is required.
- Identify the USB charger and the 425 rechargeable batteries.
- Connect the USB charger to a compatible power source (see "Operating Instructions" for options).

Image: The USB charger unit with its two charging pins visible.
Awọn ilana Iṣiṣẹ
Ngba agbara si awọn batiri
The charger features two ports, allowing for simultaneous charging of two batteries.
- Insert the 425 rechargeable batteries into the charging ports of the USB charger. Ensure a secure connection.
- Connect the USB charger to a power source. Compatible power sources include:
- USB power adapter (wall charger)
- Bank agbara
- Ṣaja ọkọ ayọkẹlẹ
- Laptop or PC USB port
- Observe the LED indicator on the charger:
- A alawọ ewe LED fihàn pé àwọn bátìrì ń gba agbára lọ́wọ́lọ́wọ́.
- A LED pupa indicates that the batteries are fully charged.
- Gbigba agbara maa n gba to wakati meji fun gbigba agbara ni kikun.
- Once fully charged, disconnect the charger from the power source and remove the batteries.

Image: Visual guide for charging status: green light for charging, red light for fully charged. Indicates a 3-hour charging time.

Image: Diagram illustrating multiple methods for charging the device, including car chargers, wall adapters, power banks, and laptops.
Itoju
- Clean the charger and batteries with a dry, soft cloth. Do not use liquids or abrasive cleaners.
- Store the batteries and charger in a cool, dry place when not in use.
- Avoid storing fully discharged batteries for extended periods to prolong their lifespan.
Laasigbotitusita
| Isoro | Owun to le Fa | Ojutu |
|---|---|---|
| Batteries not charging (no LED indication) |
|
|
| Charging takes longer than 3 hours |
|
|
| Red LED does not turn on after extended charging |
|
|
Awọn pato
- Ohun elo: Ṣiṣu
- Iwọn Ọja: 20 g (total for charger and batteries)
- Iru Batiri: 425 Rechargeable Lithium Battery (compatible with CR425, CR435, CR535)
- Ṣaja Iru: Meji-Port USB Ṣaja
- Iṣawọle: USB (compatible with various USB power sources)
- Atọka gbigba agbara: Green LED (charging), Red LED (fully charged)
- Isunmọ Akoko Gbigba agbara: wakati meji 3
Atilẹyin ọja ati Support
For warranty information or technical support, please refer to the retailer's return policy or contact the manufacturer directly. Keep your purchase receipt as proof of purchase.
Fun afikun iranlowo, o le ṣàbẹwò awọn product page on Amazon.com.mx.


