1. Ifihan
O ṣeun fun riraasing the American Audio WM-419 4-Channel UHF Handheld Wireless Microphone System. This system is designed to provide high-quality, reliable wireless audio for various applications, including PA systems, karaoke, mobile entertainment, schools, and houses of worship. This manual provides essential information for the proper setup, operation, and maintenance of your WM-419 system.
Please read this manual thoroughly before operating the unit to ensure optimal performance and to prevent damage.
2. Package Awọn akoonu
Daju pe gbogbo awọn paati ti a ṣe akojọ rẹ si isalẹ wa ninu package rẹ:
- 1 x WM-419 Wireless Receiver Unit
- 4 x Awọn Gbohungbohun Alailowaya Afọwọ́kọ
- Àwọn Kípìlì Mákróókùù 4
- Batiri AA 8 x (fún àwọn gbohungbohun)
- 1 x Agbara Adapter fun Olugba
- 1 x 1/4" Okun Olohun
- Afowoyi Olumulo (iwe-ipamọ yii)
Nọmba 2.1: Included components of the WM-419 system. This image displays the receiver, four handheld microphones, four detachable antennas, eight AA batteries, a power adapter, and a 1/4" audio cable, along with four microphone clips.
3. Key Awọn ẹya ara ẹrọ
- 4-Channel UHF Wireless Handheld Microphone System
- Intelligent Frequency Autoscan with IR Synchronization
- Individual Volume Control for each microphone channel on the receiver
- XLR Audio Output for each microphone channel
- 50 Channels Available per Receiver (200 total channels)
- 16-Bit Pilot Technology to assist with eliminating frequency interference
- Wireless Range: Up to 300 feet / 90 meters (line of sight)
- Microphone Battery Life: 6-10 hours (with included AA batteries)
- OLED Screen on Handheld MIC Transmitters
4. Eto Itọsọna
4.1 Ipò Olùgbà
Place the WM-419 receiver on a stable, flat surface, away from strong electromagnetic interference sources. Ensure there is adequate ventilation around the unit. For optimal signal reception, position the receiver's antennas vertically and ensure they are not obstructed.

Nọmba 4.1: Iwaju view of the WM-419 receiver with microphones. This image shows the receiver unit with its four antennas extended, and the four handheld microphones resting on top, illustrating the compact design.
4.2 Nsopọ Olugba
- Asopọ agbara: Connect the included power adapter to the DC 12-15V input on the rear panel of the receiver. Plug the adapter into a suitable power outlet.
- Ijade ohun: Connect the receiver to your PA system, mixer, or amplifier using the XLR audio outputs for individual microphone channels (Balanced A, B, C, D) or the AF MIX OUT (1/4" unbalanced) for a combined output.

Nọmba 4.2: Rear panel connections of the WM-419 receiver. This image highlights the DC power input, four balanced XLR outputs (A, B, C, D), and a mixed 1/4" audio output, along with the antenna connections.
4.3 Installing Batteries in Microphones
Each handheld microphone requires two AA batteries. Ensure correct polarity when inserting the batteries.
- Unscrew the bottom cap of the microphone to reveal the battery compartment.
- Insert two AA batteries, observing the polarity markings (+/-).
- Fi ideri isalẹ si i lailewu.

Nọmba 4.3: Four handheld microphones. This image displays the four individual handheld microphones, each featuring an OLED display and power button, ready for battery installation and use.
5. Awọn ilana Iṣiṣẹ
5.1 Titan / Pa a
- Olugba: Press the POWER button on the front panel of the receiver to turn it on or off.
- Awọn gbohungbohun: Press and hold the power button on each handheld microphone for a few seconds to turn it on or off. The OLED screen will illuminate when powered on.
5.2 Frequency Synchronization (IR Sync)
The WM-419 features Intelligent Frequency Autoscan and IR Synchronization for easy setup.
- Turn on the receiver and the desired microphone.
- Lori olugba naa, tẹ SCAN button for the channel you wish to set. The receiver will automatically scan for an available clear frequency.
- Once a frequency is found, the display will show "SYNC". Position the IR window of the microphone (usually near the bottom of the display) close to the IR sensor on the receiver (located near the channel display).
- Tẹ awọn SET button on the receiver for that channel. The frequency information will be transmitted to the microphone via infrared. The microphone's display should show the same frequency as the receiver, indicating successful synchronization.
- Repeat this process for each microphone.

Nọmba 5.1: Receiver front panel detail. This image provides a close-up view of the receiver's illuminated OLED displays for each channel, showing frequency information, signal strength, and individual volume controls.

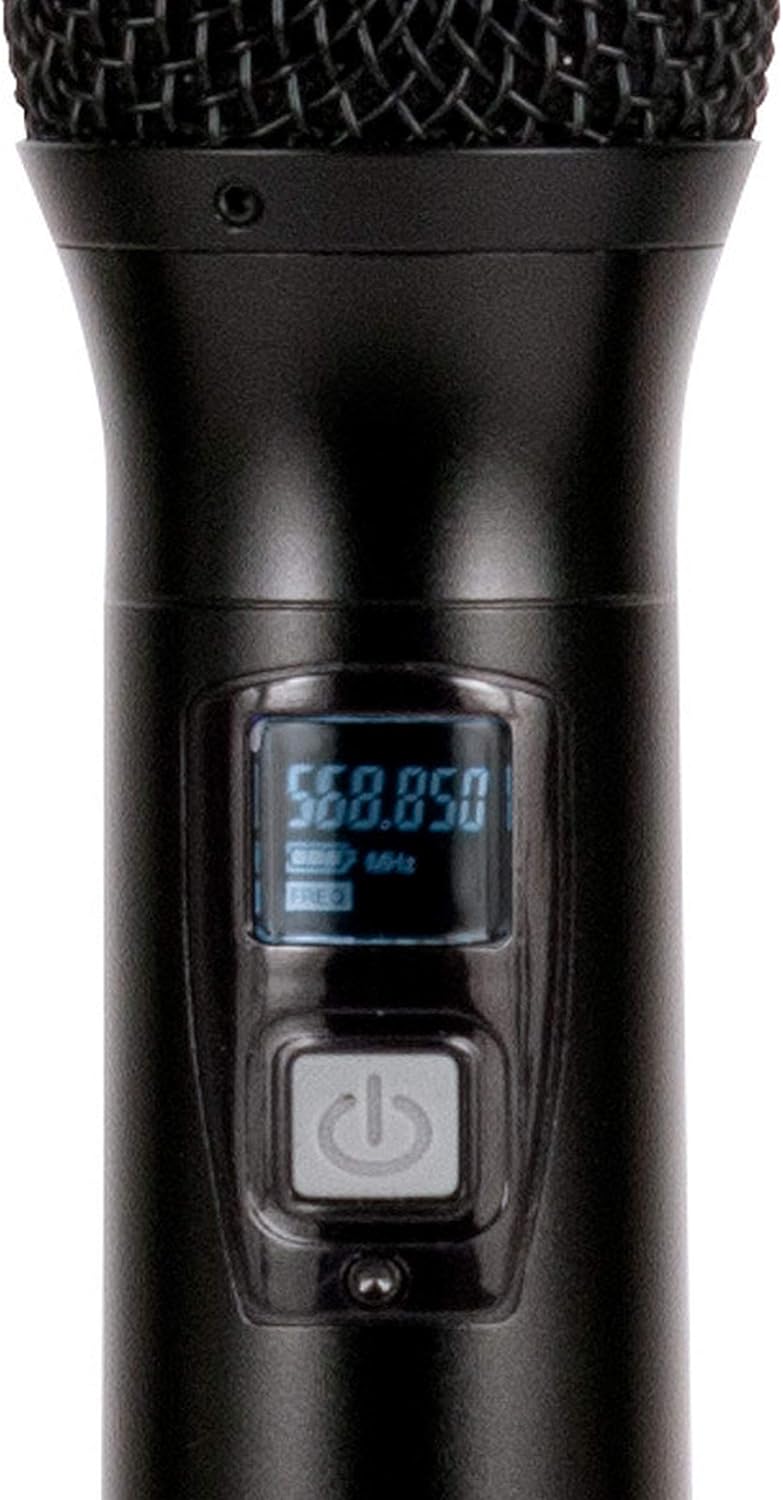
Nọmba 5.2: Microphone OLED display. A detailed view of one handheld microphone's OLED screen, showing the current frequency and battery indicator, along with the power/mute button.
5.3 Siṣàtúnṣe iwọn
Each channel on the receiver has an independent volume control knob. Adjust these knobs to achieve the desired audio level for each microphone.
5.4 Muting Microphones
A short press of the power button on the handheld microphone will mute/unmute the microphone. The OLED display will indicate the mute status.
6. Itọju
- Ninu: Use a soft, dry cloth to clean the surfaces of the receiver and microphones. Do not use abrasive cleaners or solvents.
- Rirọpo Batiri: Replace microphone batteries when the low battery indicator appears on the microphone's OLED screen or when audio quality degrades. Always use fresh AA batteries.
- Ibi ipamọ: When not in use for extended periods, remove batteries from the microphones to prevent leakage. Store the system in a cool, dry place.
7. Laasigbotitusita
| Isoro | Owun to le Fa | Ojutu |
|---|---|---|
| Ko si ohun lati gbohungbohun | Microphone not powered on; Batteries dead; Microphone not synchronized; Receiver volume too low; Output cable disconnected. | Ensure microphone is on; Replace batteries; Perform IR sync; Increase receiver channel volume; Check audio cable connections to mixer/PA. |
| kikọlu / Aimi | Nearby electronic devices; Other wireless systems on same frequency; Obstructions between mic and receiver; Receiver too far from microphone. | Move receiver away from interference sources; Perform Autoscan and re-sync to a clear frequency; Ensure line of sight; Reduce distance between mic and receiver. |
| Iwọn alailowaya kukuru | Antennas not properly positioned; Obstructions; Low microphone battery. | Ensure antennas are vertical and unobstructed; Minimize physical barriers; Replace microphone batteries. |
| Ifihan gbohungbohun ko ṣiṣẹ | Dead batteries; Microphone not powered on. | Replace batteries; Press and hold power button to turn on. |
8. Awọn pato
| Ẹya ara ẹrọ | Ẹ̀kúnrẹ́rẹ́ |
|---|---|
| Orukọ awoṣe | American Audio WM-419 |
| Gbohungbo Fọọmù ifosiwewe | Ètò Gbohungbohun (Ìmúlò) |
| Nọmba ti awọn ikanni | 4 (50 channels available per receiver, 200 total) |
| Asopọmọra Technology | UHF Wireless, XLR |
| Orisun agbara | Receiver: AC Adapter; Microphones: 2 x AA Batteries (per mic) |
| Battery Life (Microphones) | 6-10 wakati |
| Alailowaya Ibiti | Up to 300 feet / 90 meters (line of sight) |
| Ifihan Ibuwọlu-si-Noise | 70 dB |
| Ariwo Ipele | 85 dB |
| Awọn iwọn Ọja (Olugba) | 22 x 14 x 6 inches |
| Iwọn Nkan | 9 iwon |
| Àwọ̀ | Dudu |
| Awọn ẹrọ ibaramu | PA System, Karaoke Machine |
| Pataki Ẹya | Volume Control (individual channel) |
| Pola Àpẹẹrẹ | Unidirectional |
9. Atilẹyin ọja ati Support
For warranty information and technical support, please contact ADJ Products directly or visit their official webojula. Tọju iwe-ẹri rira rẹ bi ẹri rira fun eyikeyi awọn ibeere atilẹyin ọja.
Olupese: Awọn ọja ADJ
Brand: ADJ
Webojula: www.adj.com
10. Alaye Aabo
IKILO: Ọja yii le fi ọ han si awọn kemikali pẹlu asiwaju, eyiti a mọ si Ipinle California lati fa akàn ati awọn abawọn ibimọ tabi ipalara ibisi miiran. Fun alaye diẹ sii lọ si www.P65Warnings.ca.gov.
- Ma ṣe fi ẹrọ naa han si ojo tabi ọrinrin.
- Maṣe yọ ideri kuro. Ko si awọn ẹya olumulo-iṣẹ inu. Tọkasi iṣẹ si oṣiṣẹ oṣiṣẹ.
- Rii daju pe fentilesonu to dara. Ma ṣe dina awọn ṣiṣi atẹgun.
- Lo oluyipada agbara nikan ti a pese pẹlu ẹyọkan.
- Sọ awọn batiri sọnu ni ifojusọna ni ibamu si awọn ilana agbegbe.


