Ọrọ Iṣaaju
The BELL Arella 400 is a wireless turn signal bicycle tail light designed to enhance visibility and safety for cyclists. This device functions as a steady tail light, a flashing tail light, and incorporates sequential turn signals. It is controlled by a wireless remote and features a USB rechargeable battery.
Awọn ẹya pataki pẹlu:
- Steady, flash, and sequential turn signal modes.
- Tool-free installation with silicone straps for various seat post and handlebar sizes.
- USB rechargeable battery.
- Taillight output of 12 lumens for day or night visibility.
- Run time of 5 to 8 hours, depending on the selected mode.
Package Awọn akoonu
Jẹrisi pe gbogbo awọn paati wa ninu package:
- 1 x Arella 400 Tail Light
- 1 x Iṣakoso latọna jijin Alailowaya
- 1 x Li-Poly Battery (pre-installed in tail light)
- 1 x CR2032 Battery (pre-installed in remote control)
- 1 x Micro-USB Ngba agbara USB
- Mounting Hardware (silicone straps for tail light and remote)

Image: The BELL Arella 400 Wireless Turn Signal Bicycle Tail Light and its remote control, shown in their retail packaging. The image displays the tail light, remote, and USB charging cable.

Image: The BELL Arella 400 Tail Light and its wireless remote control, displayed separately. The tail light is off, showing its internal LED array, and the remote has three buttons.
Ṣeto
1. Mounting the Tail Light
- Select a suitable position on your bicycle's seat post. Ensure the tail light is visible from the rear and does not obstruct other bike components.
- Use the provided silicone strap to secure the tail light firmly around the seat post. The strap is designed for tool-free installation and removal.
- Adjust the angle of the tail light to ensure optimal visibility.
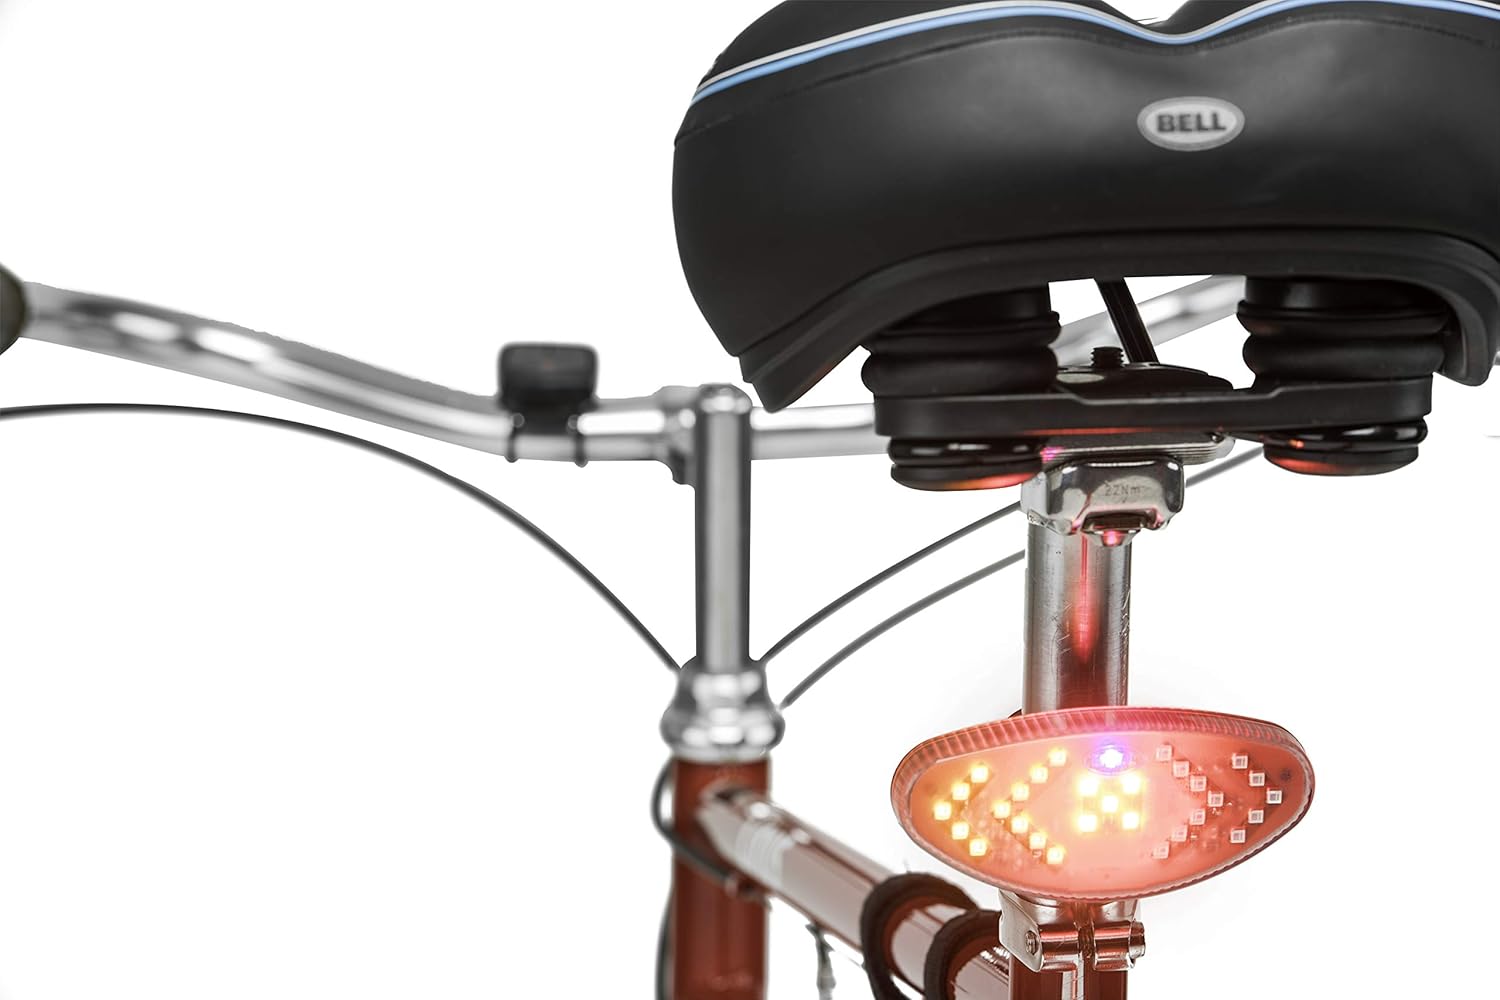
Image: The BELL Arella 400 Tail Light mounted on the seat post of a bicycle, illuminated and functioning as a tail light. The bicycle seat is visible above it.
2. Mounting the Wireless Remote Control
- Choose a convenient location on your bicycle's handlebars that allows easy access while riding.
- Attach the remote control using its silicone strap. Ensure it is securely fastened and does not interfere with braking or gear shifting.
3. Gbigba agbara akọkọ
Before first use, fully charge the tail light. Refer to the "Charging" section for detailed instructions.
Awọn ilana Iṣiṣẹ
The Arella 400 tail light is controlled wirelessly by the remote control mounted on your handlebars.
1. Agbara Tan / Pa ati Aṣayan Ipo
- Lati Fi agbara: Press the central hexagonal button on the remote control. The tail light will illuminate in its default mode (e.g., steady or flashing).
- Lati Yi Awọn ọna pada: Press the central hexagonal button repeatedly to cycle through the available modes: steady, flashing, and sequential turn signal standby.
- Lati Paarẹ: Press and hold the central hexagonal button for approximately 2-3 seconds until the tail light turns off.
2. Using Turn Signals
The remote control features dedicated buttons for left and right turn signals.
- Ifihan agbara Yipada Osi: Press the left arrow button on the remote control. The tail light will display a sequential left turn signal pattern. The signal will automatically turn off after a short duration or can be manually cancelled by pressing the left arrow button again.
- Right Turn Signal: Press the right arrow button on the remote control. The tail light will display a sequential right turn signal pattern. The signal will automatically turn off after a short duration or can be manually cancelled by pressing the right arrow button again.

Image: The BELL Arella 400 Tail Light illuminated with a left turn signal pattern, indicating a left turn. The wireless remote control is shown alongside it.

Image: The BELL Arella 400 Tail Light illuminated with a right turn signal pattern, indicating a right turn. The wireless remote control is shown alongside it.
Akiyesi pataki: Always ensure your turn signals are clearly visible to other road users. Local regulations regarding bicycle lighting and turn signals may vary. Consult local traffic laws for compliance.
Gbigba agbara
The Arella 400 Tail Light is equipped with a USB rechargeable Li-Poly battery.
- Locate the micro-USB charging port on the tail light. This port is typically covered by a rubber flap to protect against moisture.
- Open the rubber flap and insert the micro-USB end of the provided charging cable into the port.
- Connect the standard USB-A end of the cable to a USB power source (e.g., computer USB port, USB wall adapter).
- The tail light will indicate charging status (e.g., an indicator light will glow red while charging and turn green when fully charged).
- Once fully charged, disconnect the cable and securely close the rubber flap to maintain water resistance.
A full charge typically provides 5 to 8 hours of run time, depending on the mode used.
Latọna Iṣakoso Batiri
The wireless remote control uses a CR2032 coin cell battery. This battery is not rechargeable. When the remote's functionality diminishes, replace the CR2032 battery by opening the battery compartment on the back of the remote.
Itoju
- Ninu: Wipe the tail light and remote control with a soft, damp asọ. Ma ṣe lo abrasive ose tabi epo.
- Ibi ipamọ: Store the device in a cool, dry place when not in use. If storing for extended periods, ensure the tail light battery is partially charged (around 50%) to prolong battery life.
- Omi Resistance: The tail light has an IPX4 international protection rating, meaning it is resistant to splashing water from any direction. It is not designed for submersion. Ensure the USB charging port cover is securely closed to maintain water resistance.
- Itọju Batiri: Avoid fully discharging the tail light battery frequently. Recharge promptly when the battery indicator shows low power.
Laasigbotitusita
| Isoro | Owun to le Fa | Ojutu |
|---|---|---|
| Tail light does not turn on. | Batiri ti wa ni idasilẹ. | Charge the tail light using the provided USB cable. |
| Isakoṣo latọna jijin ko dahun. | Remote control battery (CR2032) is low or depleted. | Rọpo batiri CR2032 ni isakoṣo latọna jijin. |
| Turn signals do not activate. | Tail light is not powered on or remote battery is low. | Ensure tail light is on. Replace remote control battery if needed. |
| Tail light falls off during ride. | Silicone strap not secured properly. | Re-attach the tail light, ensuring the silicone strap is tightly fastened around the seat post. |
| Blue light in the center of the tail light. | This is part of the product's design. | Be aware that some jurisdictions may have restrictions on blue lights on bicycles. Consult local traffic laws to ensure compliance. |
Awọn pato
| Nọmba awoṣe | 7118791 |
| Ọja Mefa | 40.64 x 20.32 x 15.24 cm |
| Iwọn Nkan | 115 g |
| Àwọ̀ | Dudu |
| Ohun elo | Other (as per manufacturer) |
| Orisun agbara | Agbara Batiri (USB A le gba agbara) |
| Tail Light Battery | 1 Lithium Polymer (Li-Poly) battery (included) |
| Latọna Iṣakoso Batiri | 1 CR2032 batiri (pẹlu) |
| Taillight Output | 12 lumen |
| Ṣiṣe Aago | 5 – 8 hours (depending on mode) |
| Nọmba ti Eto | 3 (Steady, Flash, Turn Signal) |
| Omi Resistance Ipele | IPX4 (Atako omi) |
| Iṣagbesori Iru | Seat Mount (Tail Light), Handlebar Mount (Remote) |
Atilẹyin ọja ati Support
For warranty information or technical support, please refer to the documentation included with your purchase or contact BELL customer service directly. Contact details can typically be found on the manufacturer's official webaaye tabi lori apoti ọja.
Jọwọ ṣe idaduro ẹri rira rẹ fun eyikeyi awọn ibeere atilẹyin ọja.


