Ọrọ Iṣaaju
The Curtis 9-in-1 Pressure Cooker and Air Fryer is a versatile kitchen appliance designed to simplify your cooking experience. This multi-functional unit combines the capabilities of a pressure cooker, air fryer, slow cooker, rice cooker, steamer, yogurt maker, and offers sauté/sear functions. It features a dual-lid system, allowing you to switch between pressure cooking for speed and air frying for a crispy finish. This manual provides essential information for safe operation, setup, maintenance, and troubleshooting to ensure optimal performance of your appliance.
Awọn Aabo pataki
Nigbati o ba nlo awọn ohun elo itanna, awọn iṣọra aabo ipilẹ yẹ ki o tẹle nigbagbogbo, pẹlu atẹle naa:
- Ka gbogbo awọn itọnisọna daradara ṣaaju ṣiṣe ohun elo naa.
- Maṣe fi ọwọ kan awọn aaye ti o gbona. Lo awọn ọwọ tabi awọn koko.
- Láti dáàbò bo ara rẹ lọ́wọ́ ìkọlù iná mànàmáná, má ṣe tẹ okùn, púlọ́ọ̀gì, tàbí ẹ̀rọ pàtàkì sínú omi tàbí omi mìíràn.
- Abojuto sunmọ jẹ pataki nigbati eyikeyi ohun elo ba lo nipasẹ tabi sunmọ awọn ọmọde.
- Yọọ kuro lati inu iṣan nigbati ko si ni lilo ati ṣaaju ṣiṣe mimọ. Gba laaye lati tutu ṣaaju fifi si tabi mu awọn ẹya kuro.
- Ma ṣe ṣiṣẹ ohun elo eyikeyi pẹlu okun tabi pulọọgi ti o bajẹ, tabi lẹhin aiṣe ohun elo tabi ti bajẹ ni eyikeyi ọna.
- Lilo awọn asomọ ẹya ẹrọ ti a ko ṣeduro nipasẹ olupese ohun elo le fa awọn ipalara.
- Maṣe lo ni ita.
- Ma ṣe jẹ ki okun duro lori eti tabili tabi counter, tabi fi ọwọ kan awọn aaye ti o gbona.
- Ma ṣe gbe sori tabi sunmọ gaasi ti o gbona tabi ina ina, tabi ni adiro ti o gbona.
- Išọra to gaju gbọdọ ṣee lo nigba gbigbe ohun elo ti o ni epo gbona tabi awọn olomi gbona miiran.
- Nigbagbogbo so plug to ohun elo akọkọ, ki o si pulọọgi okun sinu ogiri iṣan. Lati ge asopọ, tan eyikeyi iṣakoso si “pa”, lẹhinna yọ plug kuro ni iṣan ogiri.
- Ma ṣe lo ohun elo fun miiran ju lilo ti a pinnu lọ.
- Ohun elo yii n se labẹ titẹ. Lilo aibojumu le ja si ipalara ọgbẹ. Rii daju pe ẹrọ kan ti wa ni pipade daradara ṣaaju ṣiṣe.
- Never force open the pressure cooker lid. Ensure the pressure inside the cooker has been completely released before opening.
- Maa ko kun kuro lori 2/3 ni kikun. Nigbati o ba n ṣe awọn ounjẹ ti o gbooro sii nigba sise, gẹgẹbi iresi tabi awọn ẹfọ ti o gbẹ, maṣe kun aaye naa ju 1/2 ni kikun.
- Máa ṣàyẹ̀wò fọ́ọ̀fù ìtújáde ìfúnpá àti fọ́ọ̀fù float nígbà gbogbo fún dídí kí o tó lò ó.
Ọja irinše ati awọn ẹya ẹrọ
Your Curtis 9-in-1 Pressure Cooker and Air Fryer comes with several components and accessories to enhance your cooking versatility.
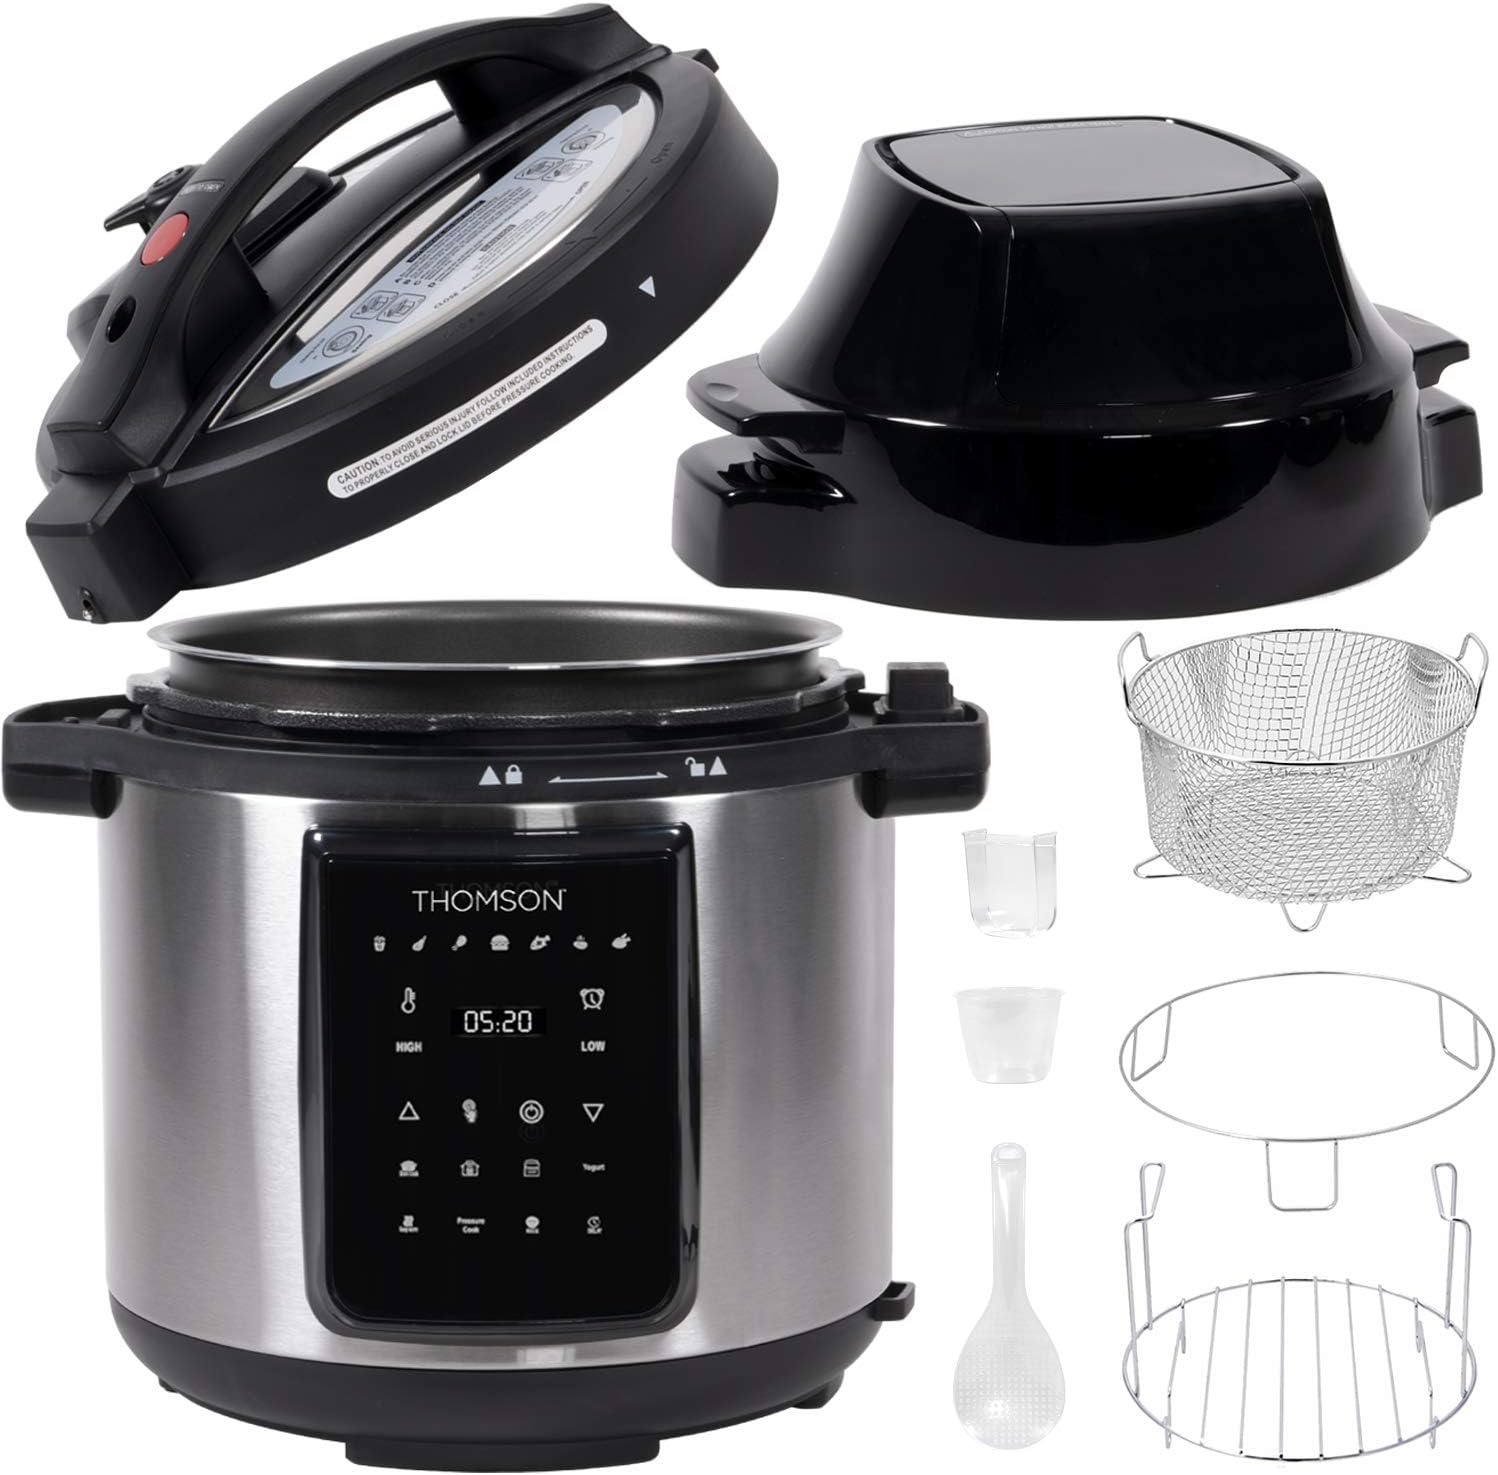

- Main Cooker Unit: The base unit with the digital control panel.
- Ideri Sise Atẹgun: Features an adjustable release valve and safety lock.
- Air Fryer Lid: Contains a 1500W heating element for air frying.
- Ikoko inu: 6-liter double-coated, non-stick, PTFE/PFOA-free, dishwasher-safe pot.
- Agbọn didin: 4-quart capacity, stainless steel, PTFE/PFOA-free basket for air frying.
- Dipping Rack/Trivet: Can be used for steaming or elevating food for air frying.
- Idiwọn Cup: For precise ingredient measurements.
- Plastic Spoon: For serving and stirring.
- Lid Stand: For safely resting the hot pressure cooking lid.
Eto ati Lilo akọkọ
Before using your appliance for the first time, follow these steps:
- Unpack all components and accessories from the box.
- Wash the inner pot, frying basket, dipping rack, measuring cup, and plastic spoon with warm, soapy water. Rinse thoroughly and dry completely.
- Wipe the exterior of the main cooker unit and both lids with a damp cloth. Do not immerse the main unit or lids in water.
- Ensure the sealing ring is properly seated in the pressure cooker lid.
- Place the main cooker unit on a stable, level, heat-resistant surface away from heat sources and water.
- Insert the inner pot into the main cooker unit.
Awọn ilana Iṣiṣẹ
Digital Fọwọkan Ifihan
The appliance features a sleek digital touch display that automatically detects which lid is in use and presents the appropriate cooking options. You can select preset programs or use manual settings.

Using the Pressure Cooker Lid
The pressure cooker lid allows for cooking up to 70% faster than traditional methods. It features a safety mechanism that prevents opening when pressure is present.


Pressure Cooking Methods: The appliance includes 14 smart built-in programs for pressure cooking:
- Bimo / Arakunrin
- Eran/ipẹtẹ
- Ewa/Ata
- Adie
- Nya si
- Iresi
- Porridge
- Ilẹ pupọ
- O lọra Cook
- Jeki-gbona
- Yogọti
- Pasteurize
- Pressure Cook (Manual)
- Sauté/Sear (via digital display)

Using the Air Fryer Lid
The air fryer lid allows you to achieve crispy, golden finishes with up to 75% less fat than traditional frying methods. It operates with 1500W of power and uses cyclonic heating.

To use the air fryer function:
- Ensure the inner pot is in place and food is prepared in the frying basket or on the dipping rack.
- Place the Air Fryer Lid securely on top of the main cooker unit. The digital display will automatically recognize the lid.
- Select the desired air frying program or set manual time and temperature.
- Press Start. The appliance will begin the air frying process.
Ninu ati Itọju
Proper cleaning and maintenance will extend the life of your appliance and ensure safe operation.


- Yọọ ohun elo nigbagbogbo ki o jẹ ki o tutu patapata ṣaaju ṣiṣe mimọ.
- Inner Pot, Frying Basket, Dipping Rack, Measuring Cup, Plastic Spoon: These parts are dishwasher safe. Alternatively, wash them with warm, soapy water and rinse thoroughly.
- Pressure Cooker Lid and Air Fryer Lid: Mu ese ita ati inu inu pẹlu ipolowoamp cloth. Do not immerse either lid in water. Ensure the sealing ring and valves on the pressure cooker lid are clean and free of food debris.
- Main Cooker Unit: Pa ode nu pẹlu ipolowoamp asọ. Maṣe fi ẹya akọkọ bọ inu omi tabi omi miiran.
- Olùkójọpọ̀ ìtútù: Empty and clean the removable plastic receptacle regularly to prevent water accumulation.
- Tọju ohun elo naa ni aaye gbigbẹ nigbati o ko ba lo.
Laasigbotitusita
Ti o ba ni awọn iṣoro pẹlu ẹrọ rẹ, wo awọn iṣoro ati awọn solusan ti o wọpọ wọnyi:
| Isoro | Owun to le Fa | Ojutu |
|---|---|---|
| Ohun elo ko tan. | Not plugged in; power outlet malfunction; damaged cord. | Ensure power cord is securely plugged into a working outlet. Check for power at the outlet. Inspect cord for damage. Contact customer support if damaged. |
| Pressure cooker lid cannot be opened. | Agbára ìfúnpá ṣì wà nínú sísè. | Ensure all pressure has been released through the pressure release valve. The float valve must be fully dropped before attempting to open. |
| Steam leaks from pressure cooker lid during operation. | Sealing ring not properly seated; food debris on sealing ring or rim; lid not closed correctly. | Check and reseat the sealing ring. Clean the sealing ring and rim of the pot. Ensure the lid is properly aligned and locked. |
| Air fryer fan makes unusual noise. | Air fryer lid not seated correctly; debris inside the lid. | Ensure the air fryer lid is placed straight and snug on the cooker. Unplug and inspect for any foreign objects inside the lid's fan area (when cool). |
| Food not cooking evenly in air fryer. | Overcrowding the basket; incorrect temperature/time. | Do not overcrowd the frying basket. Cook in batches if necessary. Adjust cooking time and temperature as per recipe or desired crispiness. Shake or flip food halfway through. |
Awọn pato
- Brand: Curtis
- Nọmba awoṣe: TFPC607
- Agbara: Lita 6 (6.5 QT)
- Ohun elo: Stainless Steel (exterior), Double-coated non-stick (inner pot)
- Àwọ̀: Fadaka
- Pressure Cooker Wattage: 1000 W
- Air Fryer Wattage: 1500 W
- Product Dimensions (with Pressure Cooker Lid): 13.38"D x 12.20"W x 13.38"H
- Product Dimensions (with Air Fryer Lid): 13.38"D x 12.20"W x 14.56"H
- Ìwọ̀n Nkan: To 4 iwon
- Ọna Iṣakoso: Fọwọkan
- Awọn apakan Ailewu Apoti: Inner Pot, Frying Basket, Dipping Rack, Measuring Cup, Plastic Spoon
- UPC: 058465816834
Atilẹyin ọja ati Support
For warranty information, technical support, or service inquiries, please refer to the warranty card included with your purchase or visit the official Curtis product support website. Please have your model number (TFPC607) and proof of purchase ready when contacting support.
Manufacturer: CURTIS INTERNATIONAL LTD


