1. Ifihan
The SINOTIMER TM919B is a 30A 7-day programmable electronic timer switch designed for automatic control of various electrical equipment. It allows you to set specific ON/OFF times over a 24-hour or 7-day cycle, providing convenience and energy efficiency for applications such as streetlights, lamps, water heaters, air conditioners, and more.
Awọn ẹya pataki:
- Ideal for household use in DB Boards.
- High capacity: 5000 Watt / 30 Amps.
- Flexible programming: 24 Hours / 7 Days a Week Programmable.
- Automatic time error correction: +/- 30 seconds weekly.
- Multiple programs: Repeat programs with 16 ON/OFF settings.
- Iṣakoso TI/PA pẹlu ọwọ.
2. Ọja Ipariview
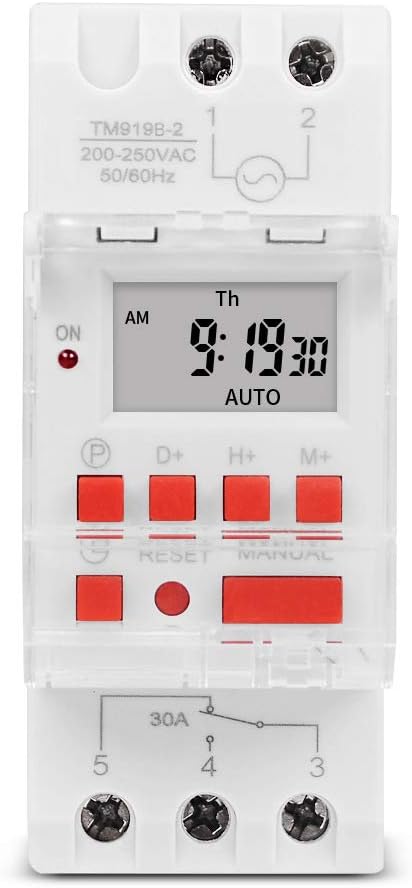
olusin 1: Iwaju view of the TM919B timer switch, displaying the LCD screen with time and day, and the array of control buttons including P, D+, H+, M+, RESET, and MANUAL.

olusin 2: Angled view of the TM919B timer switch, showing its side profile and the clear protective cover over the buttons.

olusin 3: Apa view of the TM919B timer switch, detailing the wiring terminals (L, N, 1, 2, 3, 4, 5) and product specifications like voltage ati lọwọlọwọ-wonsi.
3. Awọn pato
| Paramita | Iye |
|---|---|
| Iwọn otutu | -20°C si +50°C |
| Awọn ọna Voltage (Ui) | 110V |
| Agbara agbara | 4.5 VA (MAX) |
| Ifihan | LCD |
| Ìyípadà Olùbáṣepọ̀ | 1 changeover yipada |
| Awọn eto | 16 ON/OFF settings per day or week |
| Hysteresis | Ìṣẹ́jú-àáyá 2/ọjọ́ kan (ní 25°C) |
| Aarin ti o kere julọ | 1 iseju |
| Agbara | 30A 250V AC |
| Ìrántí Dídì | 60 ọjọ |
| Ibiti Aago | Iṣẹju 1 si awọn wakati 168 |
| Àṣìṣe Àpapọ̀ | 1 second/24 hours (at 25°C) |
| Iwọn Nkan | 5.3 ounces (0.2kg) |
| Package Mefa | 3.95 x 3.2 x 2 inches |
| Iwon iboju | 1.5 inches |
4. Fifi sori ẹrọ ati Wiring
The TM919B timer switch is designed for DIN rail mounting, making it suitable for integration into electrical distribution boards. Ensure all power is disconnected before attempting installation.
Aworan atọka:

Figure 4: Wiring diagram for the TM919B. Terminals 1 and 2 are for power input (L and N). Terminals 3, 4, and 5 are for the output, typically used for NO (Normally Open) and NC (Normally Closed) connections to control the load.
- Iṣagbewọle agbara: Connect the live (L) and neutral (N) wires to terminals 1 and 2 respectively. Ensure the voltage matches the timer's specification (110V for this model).
- Asopọmọra fifuye: The timer has a single changeover switch.
- Terminal 3: Normally Closed (NC) contact.
- Terminal 4: Common (COM) contact.
- Terminal 5: Normally Open (NO) contact.
- Connect your load (e.g., lamp, motor) between the common terminal (4) and either the NO (5) or NC (3) terminal, depending on whether you want the load to be ON or OFF when the timer is in its default state.
- Securely fasten all wires to prevent loose connections.
- Once wiring is complete, restore power and proceed with programming.
5. Operating Instructions and Programming
The TM919B timer allows for up to 16 ON/OFF programs. Follow these steps to set the current time and program the timer.
Awọn iṣẹ bọtini:
- P (Eto): Wọle ipo siseto.
- D+ (Ọjọ́): Adjusts the day of the week.
- H+ (Wákàtí): Adjusts the hour.
- M+ (Iṣẹ́jú): Adjusts the minute.
- Tun: Resets all settings to factory defaults. Use a pointed object to press.
- Afọwọṣe: Ó máa ń yí padà láàárín àwọn ipò ON, AUTO, àti PA.
Eto Akoko lọwọlọwọ:
- Tẹ awọn D+ bọtini lati ṣeto awọn ti isiyi ọjọ ti awọn ọsẹ.
- Tẹ awọn H+ bọtini lati ṣeto awọn ti isiyi wakati.
- Tẹ awọn M+ bọtini lati ṣeto awọn ti isiyi iseju.
- The time will automatically save after a few seconds of inactivity.
Programming ON/OFF Times (Up to 16 Programs):
- Tẹ awọn P button once. The display will show "1 ON". This is for setting the first ON time.
- Tẹ H+ ati M+ to set the desired hour and minute for the first ON event.
- Tẹ D+ to select the days of the week for this program. Options include: every day, specific days (e.g., MO-FR, MO-SA, SA-SU), or individual days. If you want the same setting every day, you do not need to press D+.
- Tẹ awọn P button again. The display will show "1 OFF". This is for setting the first OFF time.
- Tẹ H+ ati M+ to set the desired hour and minute for the first OFF event.
- Tẹ D+ again if you need to specify different days for the OFF event, or leave it if it matches the ON event's days.
- Repeat steps 1-6 for programs 2 through 16 (e.g., "2 ON", "2 OFF", etc.).
- Lẹhin ti ṣeto gbogbo awọn eto ti o fẹ, tẹ bọtini naa Afọwọṣe button repeatedly until "AUTO" is displayed. This ensures the timer operates according to your programmed schedule.
Iṣakoso Afowoyi:
Tẹ awọn Afọwọṣe bọtini lati yipo nipasẹ awọn ipo iṣiṣẹ:
- LATI: The output is continuously ON, overriding programmed settings.
- PA: The output is continuously OFF, overriding programmed settings.
- LATIO: The timer operates according to the programmed ON/OFF schedules. Ensure the timer is in AUTO mode for automatic operation.
6. Itọju
The TM919B timer switch requires minimal maintenance. Keep the device clean and free from dust. Do not expose it to excessive moisture or extreme temperatures. If the display becomes dim or unresponsive, check the power supply. The internal battery provides backup for settings during power outages for up to 60 days.
7. Laasigbotitusita
| Isoro | Owun to le Fa | Ojutu |
|---|---|---|
| Aago naa ko tan/pa ni awọn akoko ti a ṣeto. | Not in AUTO mode; incorrect programming; power issue. | Press MANUAL until "AUTO" is displayed. Review programming steps carefully. Check power supply to the timer. |
| Ifihan ti ṣofo tabi baibai. | No power supply; internal battery low (unlikely for display). | Check power connections. Ensure the timer is receiving power. |
| Ko le ṣeto akoko tabi awọn eto. | Buttons unresponsive; unit frozen. | Press the RESET button using a pointed object. This will clear all settings, so you will need to reprogram. |
| Load not switching. | Incorrect wiring; faulty load; timer output issue. | Verify wiring according to the diagram. Test the load independently. If issues persist, contact support. |
8. Atilẹyin ọja ati Support
This SINOTIMER product is covered by a standard manufacturer's warranty against defects in materials and workmanship. For warranty claims or technical support, please contact your retailer or the manufacturer directly. Keep your purchase receipt as proof of purchase.
For further assistance, visit the official SINOTIMER store: Ile itaja SINOTIMER lori Amazon


