Ọrọ Iṣaaju
Welcome to the user manual for your new Astro Men's Digital Watch, model A9916-PPHB. This guide provides comprehensive instructions on how to set up, operate, and maintain your watch to ensure optimal performance and longevity. Please read this manual carefully before using your watch.
Ọja Pariview ati Awọn iṣẹ bọtini
Your Astro digital watch features a clear display and intuitive button controls for various functions.
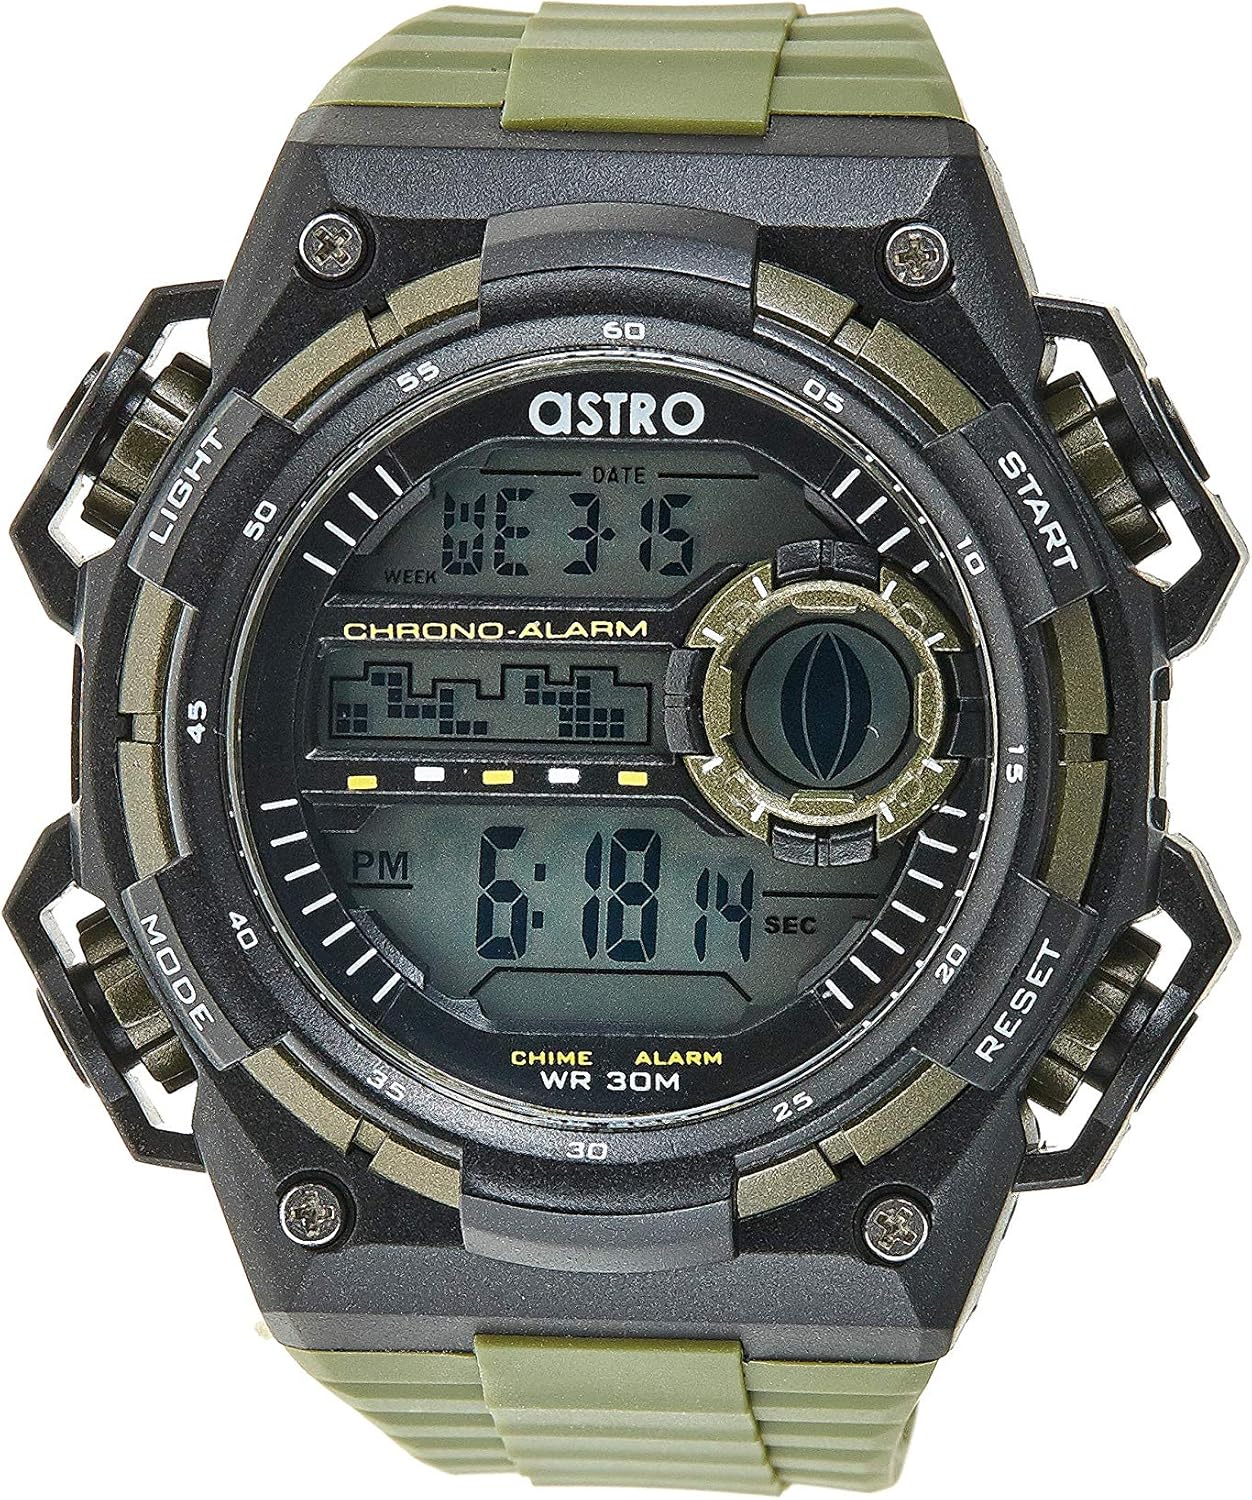
olusin 1: Iwaju View of the Watch. This image displays the watch face, highlighting the digital display and the four primary control buttons: LIGHT (top left), MODE (bottom left), START (top right), and RESET (bottom right). The display shows the time, day of the week, and date, along with indicators for chronograph and alarm functions.

olusin 2: Apa View of the Watch. This image provides a profile view of the watch, clearly showing the placement and design of the "LIGHT" and "MODE" buttons on the left side of the watch case. These buttons are essential for navigating through the watch's functions and activating the backlight.

olusin 3: Pada View of the Watch. This image shows the reverse side of the watch, featuring the stainless steel case back secured by four screws. The durable olive green plastic strap, with its buckle closure, is also visible, indicating the watch's robust construction.
Awọn iṣẹ bọtini:
- Bọtini Imọlẹ (Loke Osi): Activates the backlight for viewing the display in low-light conditions.
- Bọtini MODE (Isalẹ Osi): Cycles through different modes: Time Display, Alarm Setting, Chronograph (Stopwatch), and Date Setting.
- Bọtini Bẹrẹ (Oke apa ọtun): Used to start/stop the chronograph, adjust values during setting, or activate the alarm.
- Bọtini Tunto (Isalẹ Ọtun): Used to reset the chronograph, confirm settings, or switch between 12/24-hour format.
Eto ati Iṣeto Ibẹrẹ
1. Unboxing ati ayewo
Upon receiving your watch, carefully unbox it and inspect for any visible damage. Ensure all components, including the watch and any accompanying documentation (like the guarantee card), are present.

Figure 4: Watch Packaging and Guarantee Card. This image shows the watch's protective tin packaging and the included guarantee card, which is important for warranty claims.
2. Ṣiṣeto Aago ati Ọjọ
- Lati ipo ifihan akoko deede, tẹ bọtini naa MODE bọ́tìnì náà ní ìgbà mẹ́ta láti wọ inú ipò ìṣètò àkókò. Àwọn nọ́mbà ìṣẹ́jú-àáyá náà yóò bẹ̀rẹ̀ sí í tàn yanranyanran.
- Tẹ awọn Tunto button to cycle through the settings: Seconds → Hour → Minute → Month → Date → Day of the Week.
- Nígbà tí nọ́mbà kan bá ń tàn, tẹ nọ́mbà náà BERE bọ́tìnì náà láti mú iye náà pọ̀ sí i. BERE bọtini lati ṣe ilọsiwaju awọn nọmba naa ni kiakia.
- Ni kete ti gbogbo eto ti wa ni titunse, tẹ awọn MODE bọtini lati jade kuro ni ipo eto ati pada si ifihan akoko deede.
3. 12/24-Hour Format Selection
Ni ipo ifihan akoko deede, tẹ bọtini naa Tunto bọ́tìnì láti yí padà láàrín wákàtí 12 (pẹ̀lú àmì 'AM'/'PM') àti àwọn ọ̀nà ìkọ̀wé wákàtí 24.
Awọn ilana Iṣiṣẹ
1. Iṣẹ-ṣiṣe itaniji
- Lati ifihan akoko deede, tẹ bọtini naa MODE button once to enter the Alarm mode. The alarm time will be displayed.
- Tẹ awọn Tunto button to select the hour or minute to set. The selected digit will flash.
- Tẹ awọn BERE bọ́tìnì láti ṣàtúnṣe nọ́mbà ìfìhàn.
- Lati mu itaniji ṣiṣẹ/mu ma ṣiṣẹ, tẹ awọn BERE bọ́tìnì nígbà tí ó bá wà ní ipò ìró ìró (láìsí àwọn nọ́mbà kankan tí ń tàn). Àmì ìró ìró yóò farahàn/parẹ́ lórí ìbòjú náà.
- Tẹ awọn MODE bọtini lati pada si awọn deede akoko àpapọ.
2. Hourly Chime
Láti mu tabi láti pa housing náàurly chime (which beeps at the top of every hour):
- Nínú ipo itaniji, tẹ Tunto bọtini lati yi awọn hourly chime on/off. A chime icon will appear/disappear on the display.
3. Chronograph (Aago iṣẹju-aaya)
- Lati ifihan akoko deede, tẹ bọtini naa MODE button twice to enter the Chronograph mode. The display will show "00:00:00".
- Tẹ awọn BERE bọtini lati bẹrẹ akoko.
- Tẹ awọn BERE bọtini lẹẹkansi lati sinmi akoko.
- Tẹ awọn Tunto button while paused to reset the chronograph to "00:00:00".
- Tẹ awọn MODE bọtini lati pada si awọn deede akoko àpapọ.
4. Iṣẹ́ ìmọ́lẹ̀ ẹ̀yìn
Tẹ awọn Imọlẹ button (top left) at any time to illuminate the display for a few seconds, making it visible in dark environments.
Itọju ati Itọju
1. Ninu Rẹ Watch
Láti jẹ́ kí aago rẹ rí bí ó ti dára jùlọ, fi aṣọ rírọ̀ tí ó gbẹ nu ún déédéé. Fún eruku líle, díẹ́ díẹ̀.amp asọ le ṣee lo, atẹle nipa gbigbe lẹsẹkẹsẹ. Yago fun lilo awọn kẹmika lile tabi awọn ohun elo abrasive.
2. Water Resistance (WR 30M)
Your Astro watch is water resistant up to 30 meters (3 ATM). This means it is suitable for daily use and can withstand splashes or brief immersion in water, such as during hand washing or light rain. It is NOT suitable for showering, swimming, diving, or any water sports. Do not operate buttons when the watch is wet.
3. Batiri Rirọpo
When the display becomes dim or functions become erratic, it may be time to replace the battery. Battery replacement should ideally be performed by a qualified watch technician to ensure proper sealing and water resistance integrity.
Laasigbotitusita
| Isoro | Owun to le Fa | Ojutu |
|---|---|---|
| Ifihan ti ṣofo tabi baibai. | Batiri kekere. | Rọpo batiri naa. |
| Akoko ko tọ. | Akoko ko ṣeto bi o ti tọ tabi tẹ bọtini lairotẹlẹ. | Refer to "Setting the Time and Date" section to reset the time. |
| Awọn bọtini ko dahun. | Watch may be in a frozen state or battery is extremely low. | Gbìyànjú láti tẹ gbogbo bọ́tìnì náà ní àkókò kan náà fún ìṣẹ́jú díẹ̀ láti tún un ṣe. Tí ìṣòro náà bá ń bá a lọ, fi bátírì rọ́pò rẹ̀. |
| Itaniji ko dun. | A ko mu itaniji ṣiṣẹ. | Ensure the alarm icon is displayed on the screen. Refer to "Alarm Function" section. |
Awọn pato
- Nọmba awoṣe: A9916-PPHB
- Iru ifihan: Oni-nọmba
- Ohun elo okun: Ṣiṣu
- Ohun elo ọran: Plastic / Stainless Steel Back
- Omi Resistance: 30 Mita (ATM 3)
- Awọn iṣẹ: Time (12/24-hour), Date, Day, Alarm, Hourly Chime, Chronograph, Backlight
- Olupese: Astro
Atilẹyin ọja ati Support
Your Astro A9916-PPHB watch comes with a manufacturer's guarantee. Please refer to the included guarantee card (Figure 4) for specific terms and conditions of your warranty. Keep your purchase receipt and guarantee card in a safe place as proof of purchase.
For technical support, warranty claims, or any inquiries not covered in this manual, please contact your retailer or the official Astro customer service channel as indicated on your guarantee card or product packaging.


