MOUNTUP MU0034 Nikan Atẹle Iduro Oke Ilana Itọsọna
Brand: MOUNTUP | Awoṣe: MU0034
1. Ifihan
This manual provides detailed instructions for the installation, operation, and maintenance of your MOUNTUP MU0034 Single Monitor Desk Mount. Please read this manual thoroughly before installation to ensure correct setup and safe operation. This monitor mount is designed to enhance your workspace ergonomics by providing adjustable positioning for a single monitor.
2. Alaye Aabo
- Ensure all components are present and undamaged before installation. Do not use if any parts are missing or faulty.
- This product is intended for monitors weighing up to 17.6 lbs (8 kg) and screen sizes from 17 to 32 inches. Do not exceed the maximum weight capacity.
- Compatible VESA patterns are 75x75mm and 100x100mm. Verify your monitor's VESA pattern before proceeding.
- Ensure the desk surface is stable and strong enough to support the combined weight of the mount and monitor.
- Tighten all screws firmly, but do not overtighten to avoid stripping threads or damaging components.
- Pa awọn ọmọde ati awọn ohun ọsin kuro lakoko fifi sori ẹrọ.
- Ti o ba ni iyemeji nipa ilana fifi sori ẹrọ, kan si alamọja ti o peye.
3. Package Awọn akoonu
Jọwọ rii daju pe gbogbo awọn ẹya wa ninu package rẹ:
- Bojuto Arm Apejọ
- Iduro Clamp Ipilẹ
- Grommet Mimọ irinše
- VESA Awo
- Ohun èlò ìṣiṣẹ́ (àwọn skru, àwọn ẹ̀rọ ìfọṣọ, àwọn kọ́kọ́rọ́ Allen)
- Ilana itọnisọna
4. Awọn pato
| Ẹya ara ẹrọ | Sipesifikesonu |
|---|---|
| Nọmba awoṣe | MU0034 |
| Ohun elo | Aluminiomu didan |
| Ibamu Iwon Iboju | 17" to 32" (flat or curved) |
| Agbara iwuwo | Titi di 17.6 lbs (8 kg) |
| VESA ibamu | 75x75mm, 100x100mm |
| Atunṣe Giga | Up to 11" (16.3" total height adjustment range) |
| Titẹ Range | +45° si -45° |
| Swivel Ibiti | 360° (arm), 180° (monitor plate) |
| Yiyi | 360° (ala-ilẹ si aworan) |
| Max Desk Thickness (C-clamp) | 3.35" |
| Grommet Iho opin | 0.39"-3.1" |
5. Eto ati fifi sori
The MOUNTUP MU0034 offers two installation options: C-clamp mounting and Grommet mounting. Choose the method suitable for your desk.
5.1. C-Clamp Iṣagbesori
This method is for desks without existing grommet holes, or if you prefer clamping to the edge of your desk. Ensure your desk thickness is no more than 3.35 inches.
- So C-clamp: Assemble the C-clamp components to the base of the monitor arm. Position the base on the edge of your desk and tighten the clamp screw until it is secure.
- So VESA Awo lati Atẹle: Secure the VESA plate to the back of your monitor using the appropriate screws from the hardware kit. Ensure the screws are tightened securely.
- Slide Monitor onto Arm: Carefully slide the monitor (with the attached VESA plate) onto the monitor arm's VESA head. Ensure it clicks into place or is secured with the provided locking mechanism.
- Ṣatunṣe Iṣoro: Refer to Section 6.1 for adjusting the gas spring tension to match your monitor's weight.

Figure 1: Illustration of C-clamp and Grommet mounting options. The C-clamp is shown securing the mount to the desk edge, while the grommet mount uses a desk hole.
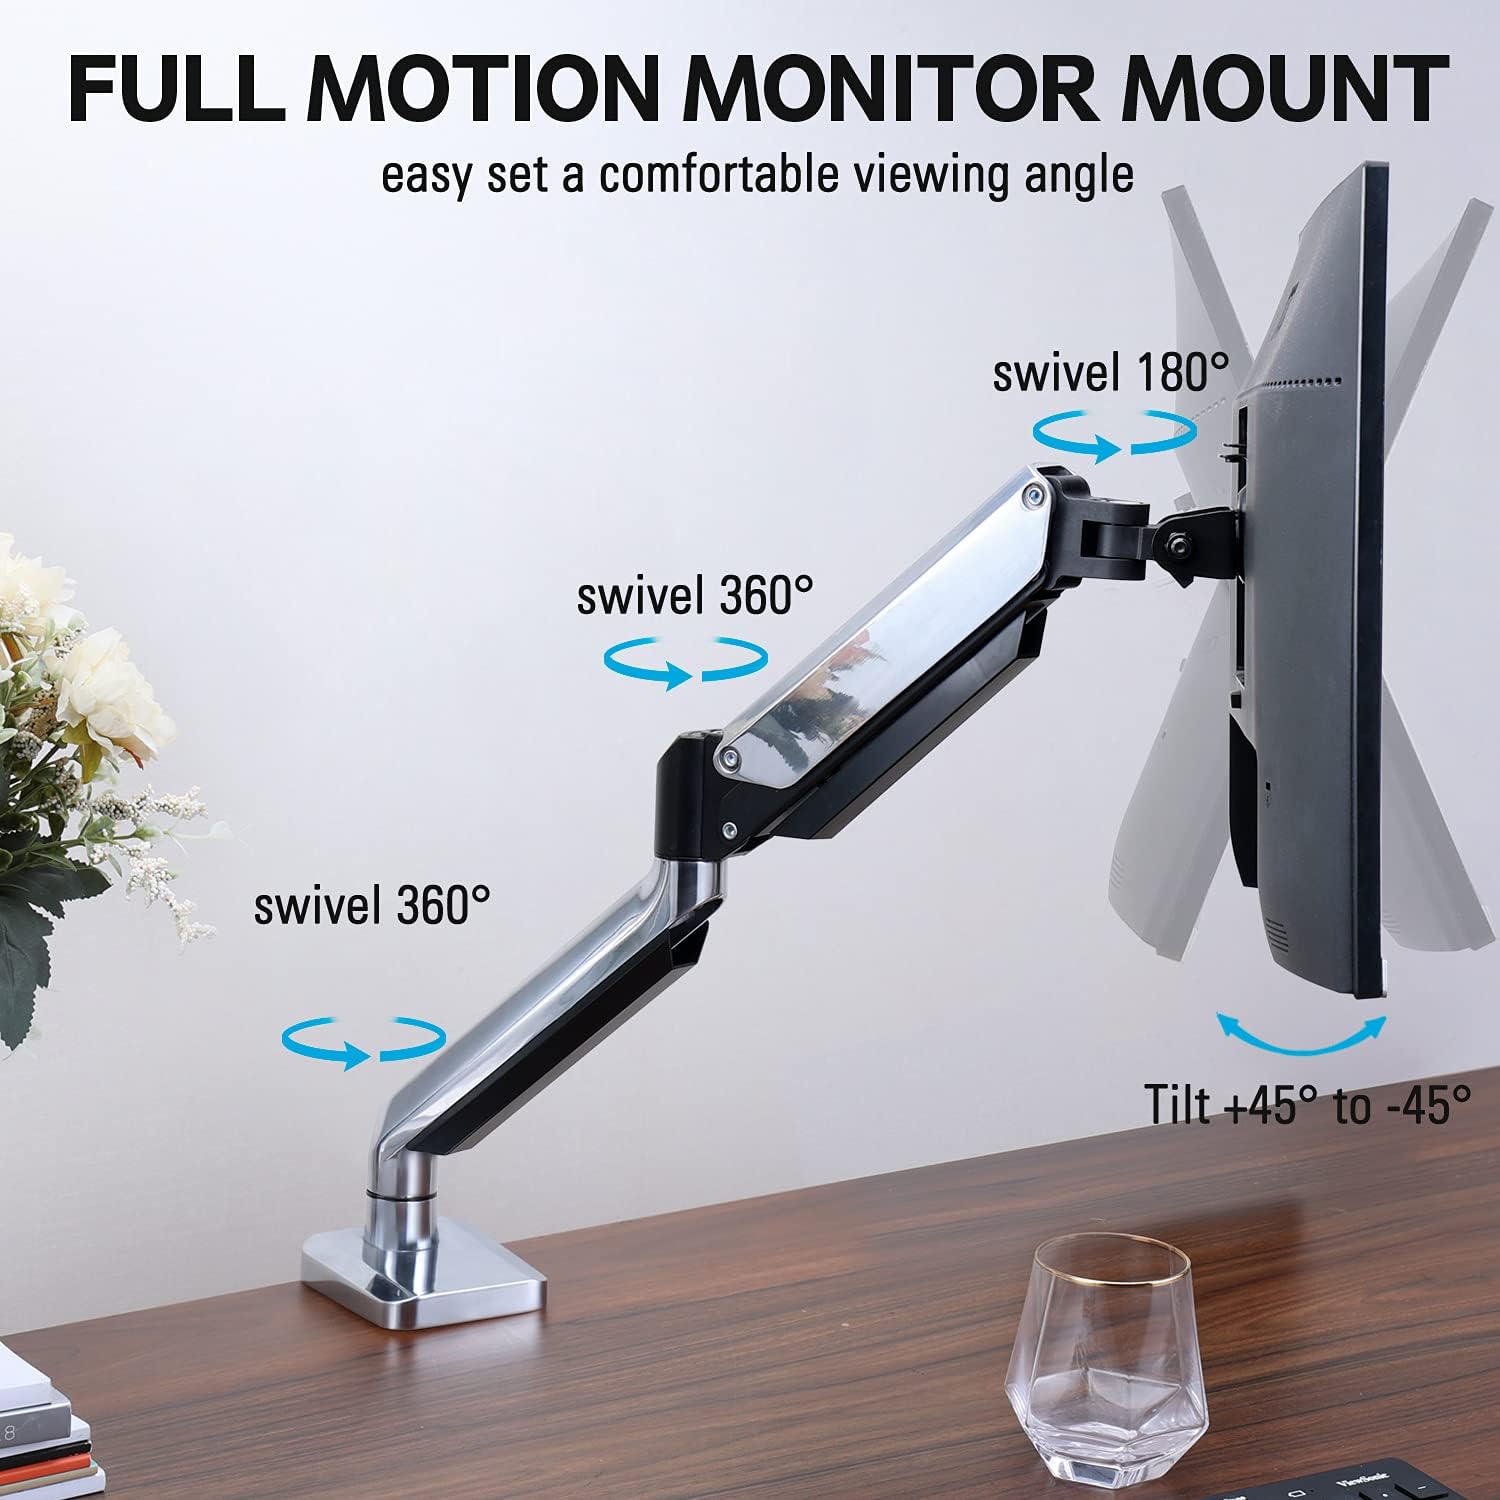
Figure 2: The removable VESA plate being attached to the back of a monitor, then sliding onto the monitor arm for easier installation.
5.2. Grommet iṣagbesori
This method utilizes an existing hole in your desk. Ensure your desk thickness is no more than 3.35 inches and the grommet hole diameter is between 0.39 and 3.1 inches.
- Assemble Grommet Base: Insert the grommet base components through the desk hole and secure them from underneath the desk using the provided plate and nut.
- So VESA Awo lati Atẹle: Secure the VESA plate to the back of your monitor using the appropriate screws from the hardware kit. Ensure the screws are tightened securely.
- Slide Monitor onto Arm: Carefully slide the monitor (with the attached VESA plate) onto the monitor arm's VESA head. Ensure it clicks into place or is secured with the provided locking mechanism.
- Ṣatunṣe Iṣoro: Refer to Section 6.1 for adjusting the gas spring tension to match your monitor's weight.
6. Ṣiṣẹ ati Awọn atunṣe
The MOUNTUP MU0034 monitor arm offers various adjustments for optimal viewinu itunu.
6.1. Gaasi Spring ẹdọfu Atunṣe
The gas spring tension needs to be adjusted to match the weight of your monitor. This ensures the monitor stays in position once adjusted.
- If the monitor drifts down, turn the adjustment screw (usually located on the arm joint) clockwise ("+") to increase tension.
- If the monitor floats up, turn the adjustment screw counter-clockwise ("-") to decrease tension.
- Adjust gradually until the monitor remains stable at any height.
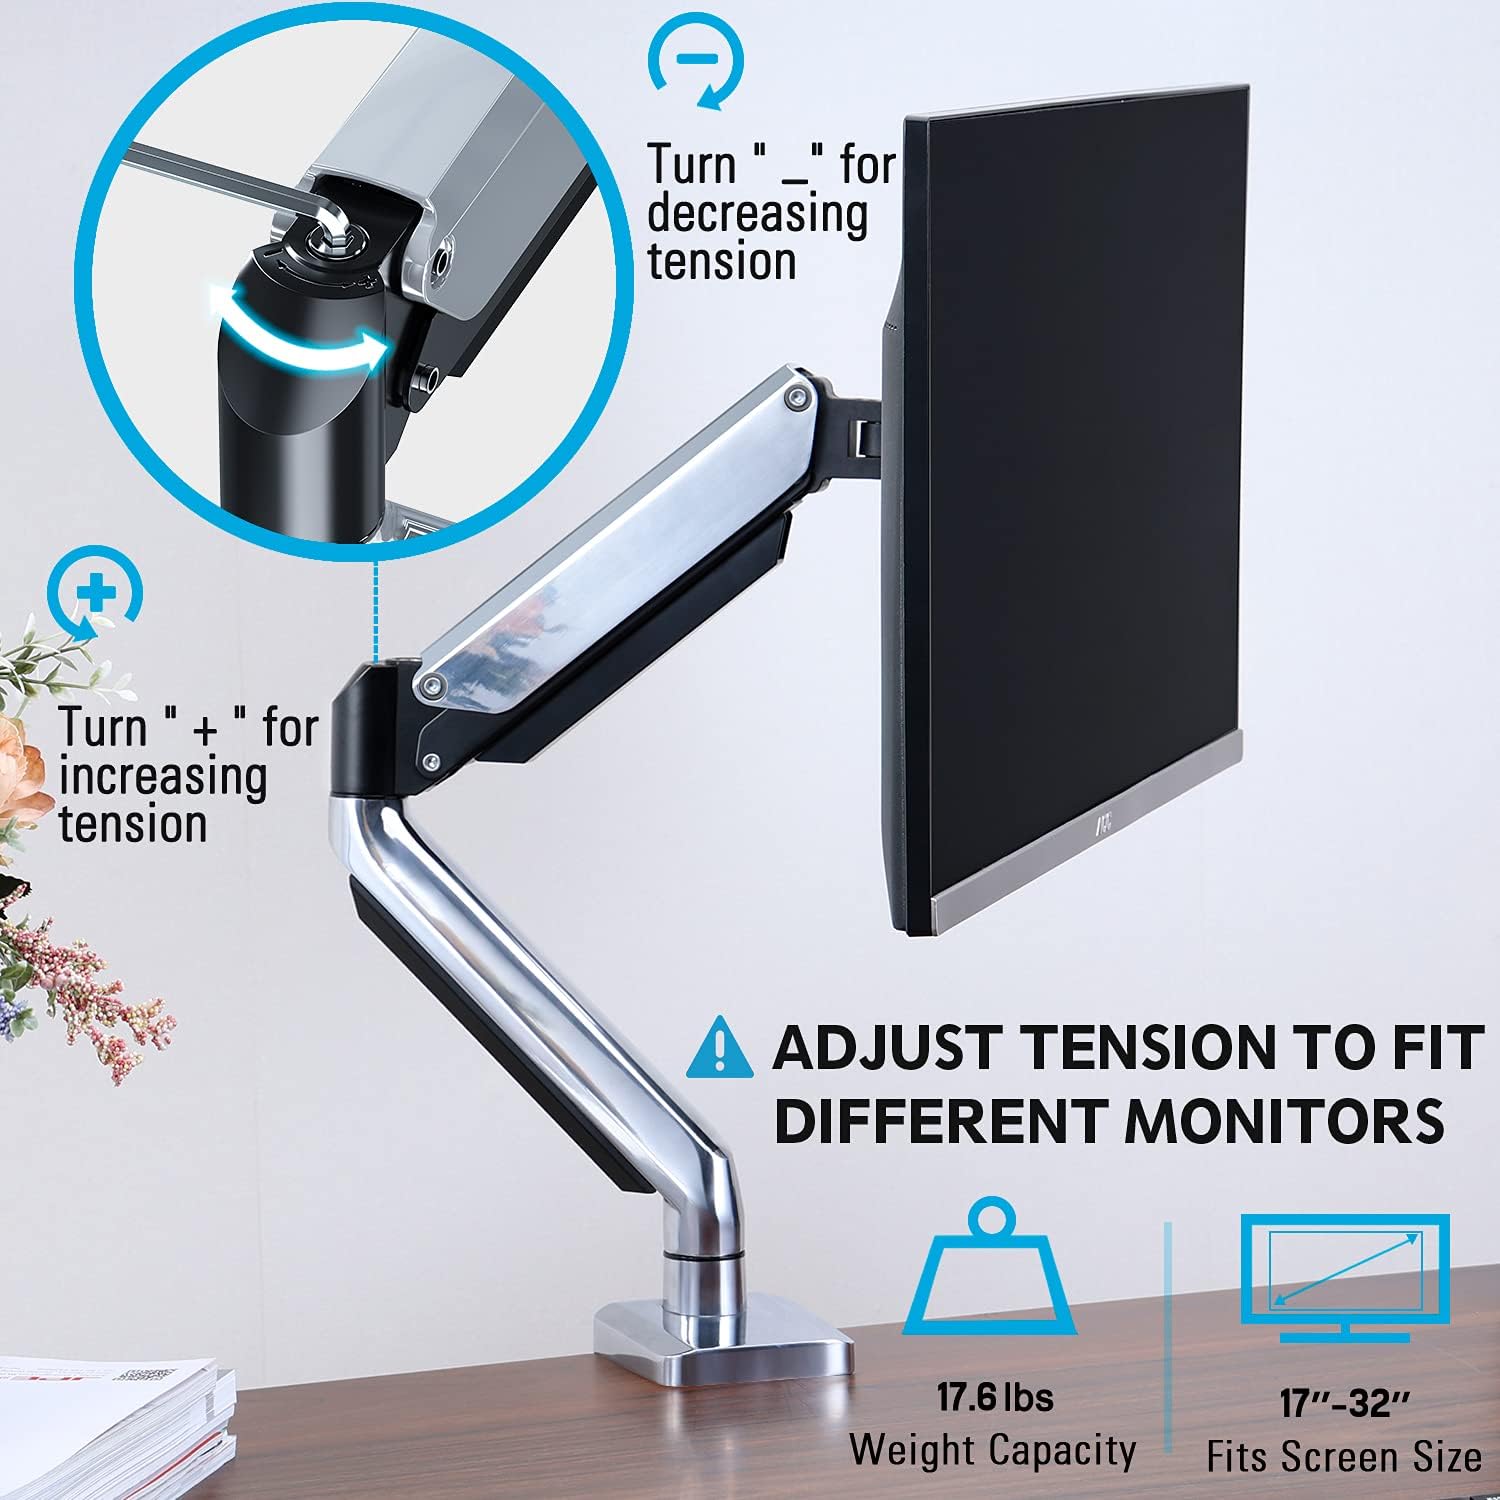
Figure 3: Instructions for adjusting the gas spring tension using an Allen key. Turning clockwise increases tension, counter-clockwise decreases it.
6.2. Giga tolesese
Once the gas spring tension is correctly set, you can easily raise or lower your monitor to your desired ergonomic height. The arm allows for up to 11 inches of vertical adjustment.

Figure 4: Diagram illustrating the maximum height adjustment of 11 inches and maximum extension of 17.5 inches.
6.3. Pulọọgi, Swivel, ati Yiyi
The monitor arm provides full motion capabilities:
- Tẹ: Adjust the monitor screen +45° to -45° to reduce glare or find a comfortable viewigun igun.
- Swivel: The arm can swivel 360° at the base and 360° at the middle joint. The monitor plate itself can swivel 180°. This allows for easy screen sharing or repositioning.
- Yiyi: Yi atẹle naa 360° lati yipada laarin ala-ilẹ ati awọn iṣalaye aworan.

Figure 5: Visual representation of the monitor arm's full motion capabilities, including 360° swivel, 180° swivel at the monitor plate, and +45° to -45° tilt.

Figure 6: An image demonstrating the monitor's ability to rotate 360 degrees, allowing for both landscape and portrait viewing awọn ipo.
7. Iṣakoso USB
The MOUNTUP MU0034 features integrated cable management to keep your workspace tidy.
- Route your monitor cables (power, video, etc.) along the underside of the arm.
- Use the provided cable clips or covers to secure the cables within the arm channels.
- Rí i dájú pé àwọn wáyà náà ní ìrọ̀rùn tó láti jẹ́ kí gbogbo ìṣípò náà lè lọ láìsí ìdààmú.

Figure 7: Illustration of how cables are routed and organized through the integrated channels on the monitor arm, keeping the desk clear.
8. Itọju
- Ṣayẹwo gbogbo awọn skru ati awọn asopọ nigbagbogbo lati rii daju pe wọn wa ni wiwọ.
- Nu òke pẹlu asọ, damp asọ. Yago fun abrasive ose tabi epo.
- Ma ṣe lubricate ẹrọ orisun omi gaasi.
9. Laasigbotitusita
| Isoro | Owun to le Fa | Ojutu |
|---|---|---|
| Monitor sags or won't stay up | Ìwọ̀n ìsun omi gaasi kéré jù fún ìwọ̀n àtẹ̀gùn. | Increase gas spring tension by turning the adjustment screw clockwise ("+"). |
| Monitor floats up or is hard to push down | Ìfúnpọ̀ gaasi orísun omi ga jù fún ìwọ̀n àtẹ̀gùn. | Decrease gas spring tension by turning the adjustment screw counter-clockwise ("-"). |
| Monitor is wobbly | Mount not securely fastened to desk or VESA plate not tight. | Check and tighten all clamp/grommet screws and VESA plate screws. |
| Difficulty rotating/tilting monitor | Awọn isẹpo ni o wa ju. | Loosen the corresponding joint screws slightly (do not remove). |
10. Atilẹyin ọja ati Support
The MOUNTUP MU0034 Single Monitor Desk Mount is backed by a 3-year support period. For technical assistance, missing parts, or warranty claims, please contact MOUNTUP customer support through their official channels or the retailer where the product was purchased.
Jọwọ ṣe idaduro ẹri rira rẹ fun awọn idi atilẹyin ọja.


