1. Ifihan
This manual provides comprehensive instructions for the installation, operation, and maintenance of your CALEX Smart Mini Indoor IP Camera. Please read this manual thoroughly before using the product to ensure proper functionality and safety.
The CALEX Smart Mini Indoor IP Camera is a Wi-Fi surveillance camera offering 1080P Full HD resolution, night vision capabilities, two-way audio communication, and flexible storage options via MicroSD card or cloud.
2. Package Awọn akoonu
Jẹrisi pe gbogbo awọn ohun kan wa ninu package:
- 1 x CALEX Smart Mini Indoor IP Camera
- 1 x Power Adapter (AC 220-240 V, 50/60 Hz input; DC 5 V output)
- 1 x Okun USB
- 1 x Itọsọna olumulo (iwe yii)
- Mounting accessories (if applicable, not explicitly listed but common for cameras)

Figure 2.1: CALEX Smart Mini Indoor IP Camera and its retail packaging. The packaging highlights 1080P Full HD, Wi-Fi 2.4 GHz, and compatibility with the Calex Smart app.
3. Ọja Ipariview
Familiarize yourself with the components of your CALEX Smart Mini Indoor IP Camera.
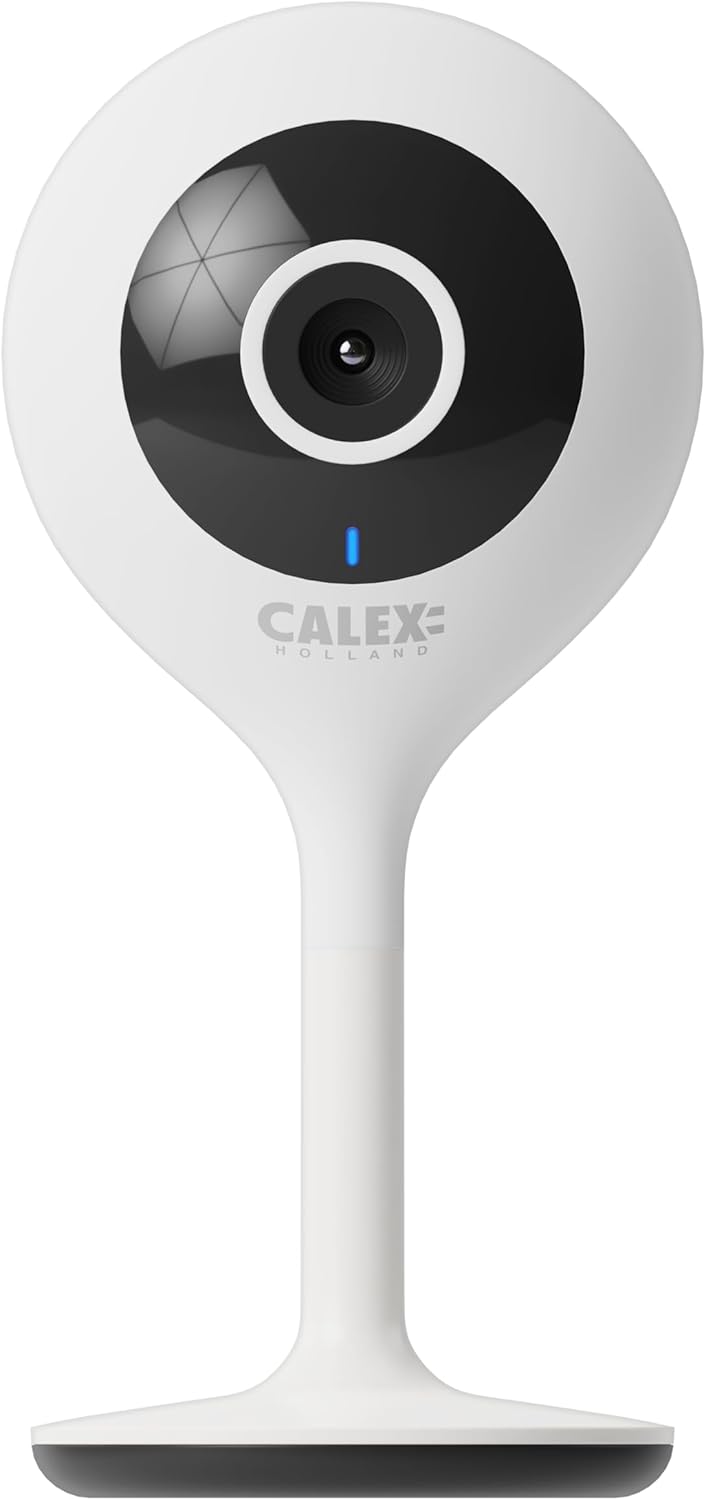
olusin 3.1: Iwaju view of the CALEX Smart Mini Indoor IP Camera. It features a central lens, an indicator light, and the CALEX HOLLAND logo.

olusin 3.2: Ẹyìn view of the CALEX Smart Mini Indoor IP Camera. This view shows the speaker grille, a reset button, and the MicroSD card slot. The USB power input is located at the base.
Awọn ẹya pataki:
- Ipinnu HD 1080P ni kikun: Pese ko o ati alaye foo fidiotage.
- Iran Alẹ: Equipped with infrared LEDs for clear monitoring in low-light or dark conditions.
- Audio Ọna Meji: Gbohungbohun ti a ṣe sinu ati agbọrọsọ fun ibaraẹnisọrọ.
- Wi-Fi Asopọmọra: Connects to your home Wi-Fi network (2.4 GHz only).
- Ibi ipamọ agbegbe: Supports MicroSD card for continuous recording or event-triggered recording.
- Ibi ipamọ awọsanma: Optional cloud storage service for secure off-site recording.
- Iwari išipopada: Alerts and records upon detecting movement.
- Ohun elo Alagbeka Iṣakoso: Ṣakoso awọn ati view live feed via the Calex Smart app.
- Ibamu Iranlọwọ Oluranlọwọ: Works with Amazon Alexa and Google Home.
4. Eto ati fifi sori
4.1 Ṣaaju ki o to bẹrẹ
- Rí i dájú pé nẹ́tíwọ́ọ̀kì Wi-Fi rẹ jẹ́ 2.4 GHz. Kámẹ́rà náà kò lè lo 5 GHz Wi-Fi.
- Múra orúkọ nẹ́tíwọ́ọ̀kì Wi-Fi rẹ (SSID) àti ọ̀rọ̀ìpamọ́ sílẹ̀.
- Download the "Calex Smart" app from your mobile device's app store.
- Place the camera within range of your Wi-Fi router.

Figure 4.1: QR codes for downloading the Calex Smart app. Scan the appropriate QR code for your device (iOS or Android) to download the application.
Download the Calex Smart app here: iOS App itaja | Google Play itaja
4.2 Awọn Igbesẹ Iṣeto Ibẹrẹ
- Agbara Tan: Connect the camera to a power outlet using the provided USB cable and power adapter. The camera's indicator light will begin to flash, indicating it is ready for pairing.
- Open Calex Smart App: Launch the Calex Smart app on your smartphone. If you are a new user, register an account. If you already have an account, log in.
- Fi ẹrọ kun: Tap the "+" icon in the top right corner of the app to add a new device. Select "Security & Video Surveillance" and then "Smart Camera".
- Confirm Indicator Status: Follow the in-app instructions. Confirm that the indicator light on your camera is flashing rapidly.
- Tẹ awọn alaye Wi-Fi sii: Enter your 2.4 GHz Wi-Fi network name and password when prompted.
- Ṣayẹwo koodu QR: The app will generate a QR code. Hold your phone with the QR code approximately 15-20 cm (6-8 inches) in front of the camera lens. The camera will emit a sound when it successfully scans the QR code.
- Asopọmọra: Tap "I heard a prompt" in the app. The camera will then attempt to connect to your Wi-Fi network. Once connected, the indicator light will turn solid blue.
- Orukọ Ẹrọ: Once connected, you can name your camera (e.g., "Living Room Camera", "Nursery Camera").


Olusin 4.2: Examples of the Calex Smart app interface. The left image shows a live camera feed with options for screenshot, speaking, and recording. The right image shows a settings screen within the app.
5. Ṣiṣẹ Kamẹra rẹ
5.1 Live View
Open the Calex Smart app and select your camera from the device list to access the live video feed. You can view the feed in portrait or landscape mode.

Àwòrán 5.1: Olùlò kan viewing the live feed from the CALEX Smart Mini Indoor IP Camera on their smartphone.
5.2 Meji-Ona Audio
Lakoko ti o wa ni ifiwe view, tap the microphone icon to speak through the camera's speaker. Tap the speaker icon to listen to audio from the camera's microphone.
5.3 Gbigbasilẹ ati Sisisẹsẹhin
- Gbigbasilẹ pẹlu ọwọ: Tap the "Record" button in the live view interface to start or stop manual recording. Recordings are saved to your phone's gallery.
- Sikirinifoto: Tap the "Screenshot" button to capture a still image from the live feed.
- Gbigbasilẹ kaadi MicroSD: Insert a MicroSD card (up to 128GB, not included) into the camera's slot for continuous or event-triggered recording. Ensure the card is formatted within the app settings.
- Ibi ipamọ awọsanma: Subscribe to the cloud storage service via the app for secure, off-site storage of event recordings.
- Sisisẹsẹhin: Wiwọle gba silẹ footage from the "Playback" section within the camera's settings in the app.

Figure 5.2: The Calex Smart app interface displaying options for cloud storage and video playback. This allows users to review ti o ti gbasilẹ iṣẹlẹ.
5.4 Išipopada erin ati titaniji
Configure motion detection sensitivity and alert settings in the app. You will receive push notifications on your smartphone when motion is detected.
5.5 Iṣakoso Ohun (Alexa/Ile Google)
To integrate your camera with Amazon Alexa or Google Home, follow the instructions in the respective voice assistant app to enable the "Calex Smart" skill/action. You can then use voice commands to view ifunni kamẹra lori awọn ifihan smati ti o baamu.

Figure 5.3: A couple using voice commands with an Amazon Echo device, demonstrating the camera's compatibility with smart home ecosystems like Alexa and Google Home.
6. Itọju
- Ninu: Lo asọ ti o rọ, ti o gbẹ lati nu lẹnsi kamẹra ati ara. Maṣe lo awọn olutọpa olomi tabi awọn aerosols.
- Awọn imudojuiwọn famuwia: Periodically check the Calex Smart app for available firmware updates for your camera. Keeping the firmware updated ensures optimal performance and security.
- Atunto Kamẹra: If you experience connectivity issues or need to reconfigure the camera, locate the reset button on the back of the device (refer to Figure 3.2). Use a pin or a straightened paperclip to press and hold the reset button for approximately 5-10 seconds until the indicator light flashes rapidly. This will restore the camera to factory settings.
7. Laasigbotitusita
| Isoro | Owun to le Fa | Ojutu |
|---|---|---|
| Kamẹra kuna lati sopọ si Wi-Fi. | Incorrect Wi-Fi password; 5 GHz Wi-Fi network; camera too far from router; Wi-Fi signal interference. |
|
| No live video feed. | Camera offline; poor internet connection; app issue. |
|
| A ko mọ kaadi MicroSD. | Card not inserted correctly; card corrupted; unsupported card size/format. |
|
| Ohùn ọ̀nà méjì kò ṣiṣẹ́. | Microphone/speaker muted in app; low volume; app permissions. |
|
8. Awọn pato
| Ẹya ara ẹrọ | Ẹ̀kúnrẹ́rẹ́ |
|---|---|
| Orukọ awoṣe | Smart Aabo |
| Nọmba awoṣe | 5501000300 |
| Ipinnu | 1080p ni kikun HD |
| Asopọmọra | Wi-Fi (2.4 GHz nikan) |
| Agbara Input | AC 220-240 Volts, 50/60 Hz |
| Ijade agbara (Ohun ti nmu badọgba) | DC 5 folti |
| Agbara agbara | 5 Wattis |
| Awọn iwọn (L x W x H) | 3.2 x 5.3 x 11 cm (1.26 x 2.09 x 4.33 inches) |
| Iwọn | 167 Giramu (0.37 lbs) |
| Ohun elo | Ṣiṣu |
| Àwọ̀ | Funfun |
| Awọn aṣayan ipamọ | MicroSD (tó tó 128GB), Ibi ìpamọ́ àwọsánmà |
| Pataki Awọn ẹya ara ẹrọ | Night Vision, Two-Way Audio, Motion Detection, Compatible with Alexa/Google Home |
| Ayika Lilo | Ninu ile |
9. Atilẹyin ọja ati Support
CALEX products are designed and manufactured to the highest quality standards. For warranty information and technical support, please refer to the official CALEX webojula tabi kan si wọn onibara iṣẹ taara.
Olupese: CALEX
Fun iranlọwọ siwaju sii, ṣabẹwo si CALEX Official Webojula.
10. Alaye Aabo
- Do not expose the camera to water or moisture. This product is designed for indoor use only.
- Ma ṣe gbiyanju lati tu tabi tun kamẹra ṣe funrararẹ. Tọkasi gbogbo iṣẹ si oṣiṣẹ oṣiṣẹ.
- Use only the provided power adapter and cable to prevent damage or fire.
- Keep the camera away from direct sunlight, heat sources, and strong magnetic fields.
- Ensure the camera is placed on a stable surface to prevent it from falling.


