Ọrọ Iṣaaju
This manual provides detailed instructions for the setup, operation, and maintenance of your ARRIS TBS Tango 2 PRO V3 FPV RC Radio Controller. Please read this manual thoroughly before using the device to ensure proper function and safety.
Ọja Pariview
The TBS Tango 2 PRO V3 is a compact and ergonomic FPV RC radio controller designed for precise control of drones. It features built-in TBS Crossfire technology for reliable long-range communication.
Awọn ẹya pataki:
- Full-size Hall sensor gimbals for accurate control.
- Integrated TBS Crossfire for robust radio link.
- Ergonomic and compact design with comfortable rubber grips.
- Built-in 5000mAh 1S LiPo battery with USB-C 2A charging.
- Speech audio output with audio jack and haptic vibration alerts.
- Open Source operating system (FreedomTX, a fork of OpenTX).
- Rocker dial and 3-button menu for navigation.
- High-resolution (128x96) black & white OLED screen with backlight.
- Digital rocker dial trim.
- Over 100 model memory with included SD-card.
- TBS Cloud compatible.

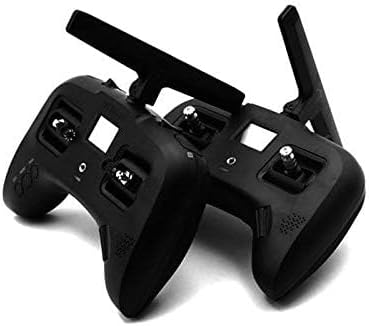
olusin 1: Iwaju view of the ARRIS TBS Tango 2 PRO V3 FPV RC Radio Controller. This image shows the gimbals, OLED screen, and navigation buttons.
Irinše ati idari
Familiarize yourself with the various parts of your radio controller:
- Gimbals: Control sticks for pitch, roll, yaw, and throttle.
- Iboju OLED: Displays system information, menus, and model data.
- Awọn bọtini lilọ kiri: "EXIT", "MENU", "PAGE" buttons for menu interaction.
- Rocker Dial: Used for scrolling through menu options and adjusting values.
- Eriali: Foldable antenna for radio signal transmission.
- Ibudo USB-C: Fun gbigba agbara ati asopọ data.
- Jack Audio: For connecting headphones for speech audio output.
- Rubber Grips: Provide comfortable handling.
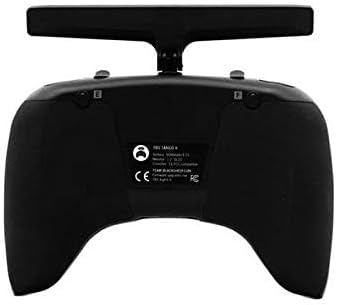
olusin 2: Top-isalẹ view of the controller, highlighting the foldable antenna and screen.
olusin 3: Isalẹ view showing the USB-C charging port and audio jack.
Ṣeto
1. Gbigba agbara akọkọ
- Connect the included USB-C cable to the USB-C port on the bottom of the controller.
- So opin keji okun USB-C pọ mọ adapter agbara USB ti o baamu (ko si ninu rẹ).
- The built-in 5000mAh 1S LiPo battery will begin charging. A full charge typically takes approximately 2.5 hours using a 2A charger.
- The OLED screen will indicate charging status.
2. Agbara lori / Paa
- To power on: Press and hold the power button (usually located near the screen) until the OLED screen illuminates.
- To power off: Press and hold the power button until the shutdown sequence is initiated on the screen, then release.
3. Antenna Deployment
The antenna is foldable for transport. To deploy, gently pull the antenna upwards and rotate it into the upright position. To fold, apply a small amount of force to bend it inward and down.
Isẹ
1. Navigation and Menu System
The controller uses a rocker dial and three buttons ("EXIT", "MENU", "PAGE") for navigating the FreedomTX operating system.
- Rocker Dial: Rotate to scroll through menu options. Press to select an option or confirm a setting.
- Bọtini MENU: Accesses the main menu or enters sub-menus.
- Bọ́tìnì Ojú-ìwé: Cycles through different pages or screens within a menu.
- Bọtini Ijade: Pada si iboju ti tẹlẹ tabi jade ni akojọ aṣayan lọwọlọwọ.

Figure 4: Detail of the EXIT, MENU, and PAGE buttons for system navigation.
2. Gimbal Usage
The Hall sensor gimbals provide precise control. Move the sticks smoothly to control your FPV drone's flight characteristics (throttle, yaw, pitch, roll).

Figure 5: Close-up of a Hall sensor gimbal, illustrating the precision control mechanism.
3. Model Memory and SD Card
The controller supports over 100 model memories, stored on the included SD card. Use the menu system to select, create, or modify model profiles.
Itoju
- Ninu: Lo aṣọ rírọrùn tí ó gbẹ láti nu ìta ohun èlò ìdarí náà. Yẹra fún lílo àwọn kẹ́míkà líle tàbí àwọn ohun èlò ìpalára.
- Ibi ipamọ: Store the controller in a cool, dry place away from direct sunlight and extreme temperatures. Ensure the antenna is folded for protection during storage and transport.
- Itọju Batiri: For optimal battery life, avoid fully discharging the battery frequently. Charge the battery regularly, even if not in use for extended periods.
- Awọn imudojuiwọn famuwia: Periodically check the official TBS website for firmware updates for the FreedomTX operating system. Follow the provided instructions carefully for any update procedures.
Laasigbotitusita
| Isoro | Owun to le Fa | Ojutu |
|---|---|---|
| Adarí ko ni agbara lori. | Batiri kekere tabi dinku. | Charge the controller using the USB-C port. Ensure the charging cable and adapter are functional. |
| Gimbals not responding or inaccurate. | Ó nílò ìṣàtúnṣe; ìdènà ara. | Access the calibration menu in FreedomTX and follow the on-screen instructions. Check for any debris around the gimbals. |
| No signal to drone. | Drone not bound; antenna not deployed; range issue. | Ensure the drone is properly bound to the controller. Verify the antenna is fully deployed. Check for obstacles or interference. |
| Screen is blank or unresponsive. | Software issue; power issue. | Attempt a hard reset (refer to specific FreedomTX documentation if available). Ensure battery is charged. |
Awọn pato
- Brand: ARRIS
- Orukọ awoṣe: TBS Tango 2 Pro V3
- Nọmba Awoṣe Nkan: TBS Tango 2 Pro V3
- Imọ-ẹrọ Asopọmọra: RF
- Iru Adari: Iṣakoso bọtini
- Awọn ẹrọ ibaramu: Drone
- Batiri: 1 Lithium Polymer battery required (built-in 5000mAh 1S LiPo)
- Gbigba agbara: USB-C 2A (approx. 2.5 hours for full charge)
- Iboju: High resolution (128x96) black & white OLED with backlight
- Gimbals: Full size Hall sensor
- Eto isesise: FreedomTX (temporary fork of OpenTX)
- Iranti Awoṣe: 100+ models with included SD-card
- Ijade ohun: Speech audio output with audio jack
- Awọn itaniji: Haptic vibration alert
- Ìwọ̀n Nkan: 1.3 iwon
- Awọn iwọn idii: 8.07 x 6.18 x 3.35 inches
- Ọjọ ori Ti a ṣeduro Olupese: 10 ọdun ati si oke
Atilẹyin ọja ati Support
For warranty information and technical support, please refer to the official documentation provided with your purchase or visit the ARRIS official webojula. Jeki ẹri rira rẹ fun eyikeyi awọn ibeere atilẹyin ọja.
Note: Some users have reported varied experiences with third-party support channels. For the most accurate and reliable assistance, always consult official brand resources.


