1. Ifihan
Thank you for choosing the DIGITEN DHTC1011 Humidity and Temperature Controller. This integrated plug-and-play device is designed to precisely control both temperature and humidity, making it ideal for various applications such as homebrewing, pet breeding, incubation, greenhouse management, and more. This manual provides detailed instructions for setting up, operating, and maintaining your controller to ensure optimal performance and longevity.
2. Ọja Ipariview
The DHTC1011 features a large LCD screen for simultaneous display of measured and set values, a sensitive 2-in-1 temperature and humidity probe, and two pre-wired outlets for independent control of heating/cooling and humidifying/dehumidifying devices.

Figure 2.1: Main components of the DHTC1011 controller, including the main unit, integrated probe, and dual power outlets.
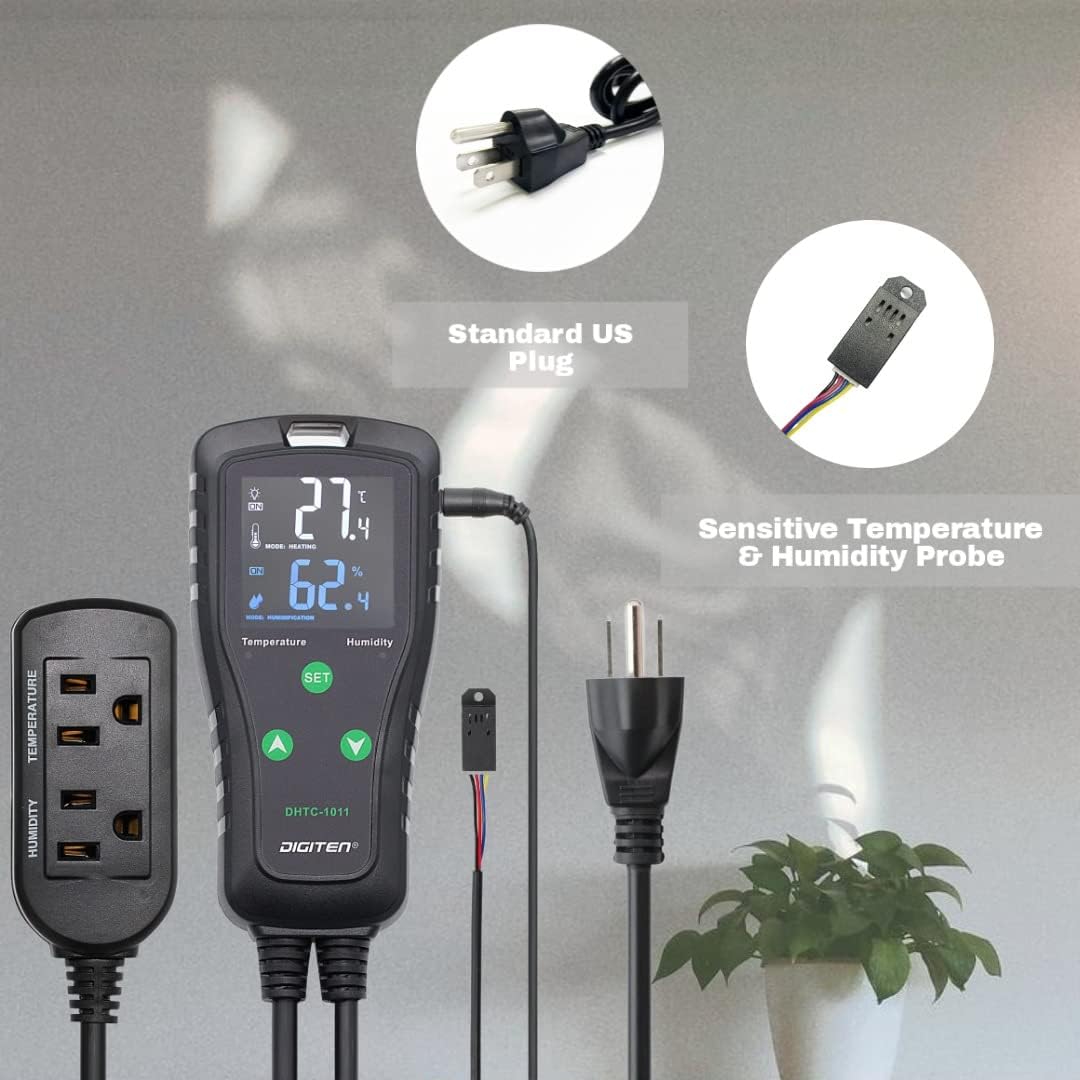
Figure 2.2: Key features of the DHTC1011, highlighting dual outlets, Celsius/Fahrenheit support, alarm function, and control over heating/cooling and humidifying/dehumidifying.

Nọmba 2.3: Alaye view of the controller's display and buttons. (1) PV: Measuring Value, (2) LCD Backlight, (3) Working Status of the Load (ON/OFF), (4) High/Low Temperature/Humidity Alarm Value (HI/LO), (5) Heating/Cooling Mode (RV < SV: Heating, RV > SV: Cooling), (6) Humidification/Dehumidification Mode (RV < SV: Humidification, RV > SV: Dehumidification), (7) Temperature/Humidity Indicator Light (Red: Stop, Green: Running), (8) SET Button, (9) UP/DOWN Button. DP: Time of Compressor Delay Starting, CA: Temperature/Humidity Calibration, RV: Run Value, SV: Stop Value.
2.1 irinše
- Main Controller Unit: Features a large LCD display and control buttons.
- Temperature & Humidity Probe: A 2-in-1 sensor for accurate environmental readings.
- Awọn ọna agbara Meji: One for temperature control (heating/cooling) and one for humidity control (humidifying/dehumidifying).
- Okun Agbara: Standard US plug for power supply.
3. Key Awọn ẹya ara ẹrọ
- Ibiti Iṣakoso jakejado: Temperature control from -40℉ to 248℉ (-40℃ to 120℃), humidity control from 1%RH to 100%RH.
- Multi-functional Setting: Supports calibration, compressor delay, and saving reset setting values.
- Aṣayan Ẹka: Easily switch between Centigrade (℃) and Fahrenheit (℉) display.
- Awọn itaniji: Configurable high or low temperature and humidity alarms.
- Apẹrẹ Rọrun: Large LCD screen with simple 3-button interface and pre-wired plug-and-play setup.
- Ijade Iyika Meji: Independent control for temperature and humidity equipment simultaneously.
- Awọn ohun elo to pọ: Suitable for home brewing, fermentation, greenhouses, terrariums, reptile enclosures, planting, meat storage, wine cellars, and more.
4. Eto
- Yọ Alakoso kuro: Ni ifarabalẹ yọ gbogbo awọn paati kuro ninu apoti.
- Darapọ mọ Iwadii: Insert the temperature and humidity probe's jack into the designated port on the top of the main controller unit. Ensure it is securely connected.
- Ipo Iwadi naa: Place the probe in the environment where you wish to monitor and control temperature and humidity. Ensure it is not directly exposed to heat sources, moisture, or airflow that could skew readings.
- Plug in Devices:
- Plug your temperature-controlling device (e.g., heater, cooler) into the outlet labeled "TEMPERATURE" on the power strip.
- Plug your humidity-controlling device (e.g., humidifier, dehumidifier) into the outlet labeled "HUMIDITY" on the power strip.
- Agbara Tan: Plug the main controller unit's power cord into a standard electrical outlet. The LCD display will illuminate, showing current temperature and humidity readings.
5. Awọn ilana Iṣiṣẹ
5.1 Ipilẹ Ifihan Alaye
- The top large number displays the current measured temperature (PV).
- The bottom large number displays the current measured humidity (PV).
- Below the measured values, the set temperature and humidity values (SV) are displayed.
- Indicator lights (red/green) show the working status of connected devices.
5.2 Eto paramita
To enter the function setting menu, press and hold the SET button for approximately 3 seconds. Use the UP (▲) ati SILE (▼) buttons to navigate through the parameters and adjust values. Press SET briefly to confirm a selection or move to the next parameter. To exit the menu and save changes, press and hold SET fun 3 aaya lẹẹkansi.
| Paramita | Apejuwe | Ibiti o | Aiyipada |
|---|---|---|---|
| TS (Temperature Start) | Temperature at which heating/cooling starts. | -40 si 248°F (-40 si 120°C) | 77°F (25°C) |
| TC (Temperature Stop) | Temperature at which heating/cooling stops. | -40 si 248°F (-40 si 120°C) | 78.8°F (26°C) |
| HS (Humidity Start) | Humidity at which humidifying/dehumidifying starts. | 1 si 100% RH | 50% RH |
| HC (Humidity Stop) | Humidity at which humidifying/dehumidifying stops. | 1 si 100% RH | 55% RH |
| CA (Temperature Calibration) | Adjusts temperature reading for accuracy. | -10 si 10°F (-5 si 5°C) | 0 |
| HA (Humidity Calibration) | Adjusts humidity reading for accuracy. | -10 si 10% RH | 0 |
| DP (Compressor Delay) | Delay time for compressor protection. | 0 to 10 iṣẹju | 0 |
| AH (High Temp Alarm) | Sets high temperature alarm threshold. | -40 si 248°F (-40 si 120°C) | 248°F (120°C) |
| AL (Low Temp Alarm) | Sets low temperature alarm threshold. | -40 si 248°F (-40 si 120°C) | -40°F (-40°C) |
| HH (High Hum Alarm) | Sets high humidity alarm threshold. | 1 si 100% RH | 100% RH |
| HL (Low Hum Alarm) | Sets low humidity alarm threshold. | 1 si 100% RH | 1% RH |
| CF (Celsius/Fahrenheit) | Switches temperature unit. | C / F | F |
5.3 Setting Heating/Cooling Mode
The controller automatically determines heating or cooling mode based on your set values (TS and TC).
- If TS < TC: The controller operates in Alapapo Ipo. The heating device will turn on when the measured temperature drops below TS and turn off when it reaches TC.
- If TS > TC: The controller operates in Ipo itutu. The cooling device will turn on when the measured temperature rises above TS and turn off when it drops to TC.
5.4 Setting Humidifying/Dehumidifying Mode
Similar to temperature, the controller determines humidifying or dehumidifying mode based on your set values (HS and HC).
- If HS < HC: The controller operates in Ipo ọriniinitutu. The humidifying device will turn on when the measured humidity drops below HS and turn off when it reaches HC.
- If HS > HC: The controller operates in Ipo Dehumidifying. The dehumidifying device will turn on when the measured humidity rises above HS and turn off when it drops to HC.
5.5 LCD Backlight Control
Tẹ awọn UP (▲) ati SET buttons simultaneously for about 3 seconds. The LCD backlight will automatically turn off after 30 seconds. Repeat the same method to restore the backlight to be always on.
6. Itọju
- Ninu: Wipe the controller unit and probe with a soft, dry cloth. Do not use abrasive cleaners or immerse the unit in water.
- Itọju Iwadii: Keep the probe clean and free from dust or debris. Avoid bending or damaging the probe cable. Ensure the probe is not submerged in liquid unless specifically designed for it (this probe is not).
- Ibi ipamọ: If storing the device for an extended period, unplug it from the power source and store it in a cool, dry place away from direct sunlight.
7. Laasigbotitusita
| Isoro | Owun to le Fa | Ojutu |
|---|---|---|
| Display is blank or not powering on. | Ko si ipese agbara; loose asopọ. | Ensure the power cord is securely plugged into a live outlet. Check the outlet with another device. |
| Awọn kika iwọn otutu/ọrinrin ko pe. | Probe dirty or damaged; calibration needed; probe not positioned correctly. | Clean the probe. Perform temperature/humidity calibration (CA/HA parameter). Reposition the probe away from direct influences. |
| Connected device (heater/humidifier) is not turning on/off as expected. | Incorrect TS/TC or HS/HC settings; device not plugged into correct outlet; device malfunction. | Verify your TS/TC and HS/HC settings are appropriate for your desired control. Ensure the device is plugged into the correct temperature or humidity outlet. Test the connected device directly in a wall outlet. |
| Itaniji n dun nigbagbogbo. | Alarm thresholds (AH/AL/HH/HL) are set too close to operating range or current conditions. | Adjust the alarm thresholds to a wider range or to values that reflect critical conditions. |
| "Error" code displayed. | Probe connection issue or sensor malfunction. | Unplug and re-plug the probe firmly. If the error persists, the probe may be faulty and require replacement. |
8. Awọn pato
| Ẹya ara ẹrọ | Ẹ̀kúnrẹ́rẹ́ |
|---|---|
| Brand | DIGITEN |
| Orukọ awoṣe | DHTC1011 |
| Adarí Iru | Titari Bọtini |
| Pataki Ẹya | Cooling Heating Humidifier Dehumidifier |
| Àwọ̀ | Dudu |
| Awọn Lilo Ni pato Fun Ọja | Humidifier, Reptile, Greenhouse |
| Iwọn Iṣakoso Iru | Alapapo, Itutu |
| Humidity Control Type | Humidifying, Dehumidifying |
| Asopọmọra Technology | Wi-Fi (Note: Product description mentions Wi-Fi, but the physical device and manual details suggest it's a standalone controller. User should verify if Wi-Fi features are present or require additional components.) |
| Orisun agbara | Okun Itanna |
| Voltage | 240 Volts (Note: Standard US plug implies 120V, but spec says 240V. User should verify product label for correct voltage.) |
| Apẹrẹ | onigun merin |
| Ifihan Iru | Oni-nọmba |
| Iṣakoso Iru | Iṣakoso bọtini |
| Ọna Iṣakoso | Remote (Note: This likely refers to the ability to control connected devices, not necessarily a separate remote control unit.) |
| Iṣagbesori Iru | Ògiri Ògiri |
| Imọlẹ ẹhin | Bẹẹni |
| Package Mefa | 8.19 x 8.07 x 1.69 inches |
| Iwọn Nkan | 15.8 iwon |
Note: Some specifications like "Connectivity Technology: Wi-Fi" and "Voltage: 240 Volts" appear in the product data but may not align with the typical functionality or standard plug type (US plug is typically 120V). Please refer to the product label for definitive electrical ratings and actual Wi-Fi capabilities.
9. Atilẹyin ọja ati Support
DIGITEN provides a one-year warranty term for any product quality problems. For technical support, troubleshooting assistance, or warranty claims, please contact DIGITEN customer service through the retailer's platform or visit the official DIGITEN webojula fun alaye olubasọrọ.
For more information, you may also refer to the official DIGITEN store: Visit the DIGITEN Store