1. Ifihan
O ṣeun fun riraasing the Udreamer Turntable Vinyl Record Player Model UD001. This manual provides essential information for the proper setup, operation, and maintenance of your new record player. Please read these instructions carefully before use to ensure optimal performance and longevity of the product. Keep this manual for future reference.

Image 1.1: Udreamer Turntable Vinyl Record Player Model UD001. This image shows the turntable with its clear dust cover open, revealing the black platter, tonearm, and cartridge.
2. Awọn ilana aabo
- Orisun Agbara: Lo oluyipada agbara pàtó kan. Rii daju pe voltage ibaamu ti agbegbe rẹ ipese agbara.
- Omi ati Ọrinrin: Do not expose the unit to rain, moisture, or liquids. Do not place objects filled with liquids, such as vases, on the unit.
- Ooru: Maṣe gbe ẹyọ naa si nitosi awọn orisun ooru gẹgẹbi awọn imooru, awọn iforukọsilẹ ooru, awọn adiro, tabi awọn ohun elo miiran (pẹlu ampliifiers) ti o gbe ooru jade.
- Afẹfẹ: Rii daju pe fentilesonu to dara. Ma ṣe dina eyikeyi awọn ṣiṣi atẹgun.
- Ninu: Yọọ kuro lati inu iṣan ogiri ṣaaju ṣiṣe mimọ. Lo asọ ti o tutu nikan.
- Ṣiṣẹ: Maṣe gbiyanju lati ṣiṣẹ ọja yi funrararẹ. Tọkasi gbogbo iṣẹ si oṣiṣẹ oṣiṣẹ ti o peye.
- Ibi: Place the unit on a stable, level surface to prevent damage from falling.
3. Package Awọn akoonu
Jọwọ ṣayẹwo pe gbogbo awọn nkan ti a ṣe akojọ rẹ si isalẹ wa ninu package rẹ:
- Udreamer Turntable Unit
- Ideri Eruku
- Pẹpẹ
- Fet Mat
- Àdánù ìwọ̀n
- Adapter RPM 45
- Adapter agbara
- Okun USB
- Afowoyi Olumulo (iwe-ipamọ yii)
4. Ọja Ipariview
Familiarize yourself with the various parts and controls of your Udreamer Turntable.

Image 4.1: Key features of the Udreamer Turntable. This image highlights the turntable's capabilities such as Vinyl to Computer conversion, Bluetooth output, iron platter, built-in phono equalizer, needle pressure adjustment, speed alignment, and moving magnet cartridge.

Aworan 4.2: alaye view of the turntable's components. This image shows the solid iron platter for stability and the moving magnet cartridge, which provides accurate audio reproduction and has a longer lifespan.

Image 4.3: Internal and external components of the turntable system. This diagram illustrates the belt-driven mechanism, arm lifter, record mat, foot pads for vibration isolation, and the 45 RPM adapter.
4.1 Iwaju ati Top View
- Ideri Ekuru: Protects the platter and tonearm from dust.
- Platter: The surface on which records are placed.
- Spindle: Holds the record in place on the platter.
- Felt Mat: Provides cushioning for records and reduces static.
- Ohun orin: Oun ni katiriji ati stylus.
- Káàtìrì pẹ̀lú Stylus: Ó ka àwọn ihò inú àwo orin náà.
- Iwọn iwuwo: Balances the tonearm and adjusts tracking force.
- Ohun elo Itọju: Raises and lowers the tonearm gently.
- Isinmi ohun orin: Secures the tonearm when not in use.
- Yiyan Iyara: Switches between 33 1/3 and 45 RPM.
- Iṣakoso ipolowo: Adjusts playback speed fine-tuning.
4.2 ru Panel
- LINE/BT OUT/PHONO Switch: Selects output mode (Line Out, Bluetooth Out, Phono Out).
- RCA Output Jacks (L/R): Connects to external active speakers or an amplifier.
- USB-PC Port: Connects to a computer for vinyl-to-digital conversion.
- DC IN Jack: So ohun ti nmu badọgba agbara.
- Agbara PA / PA Yipada: Yipada ẹyọ naa tan tabi pa.
5. Eto
5.1 Ṣiṣii ati Gbe
- Carefully remove the turntable from its packaging. Retain packaging for future transport.
- Place the turntable on a stable, level surface, away from direct sunlight, heat sources, and excessive dust or vibrations.
5.2 Platter ati igbanu fifi sori
- Gbe awọn platter lori awọn spindle aarin.
- Carefully lift the felt mat to expose the drive belt underneath the platter.
- Locate the motor pulley (a small brass cylinder) on the top left of the turntable chassis.
- Using the provided ribbon or your fingers, gently stretch the drive belt and hook it around the motor pulley. Ensure the belt is flat and not twisted.
- Place the felt mat back on the platter.
5.3 Counterweight Atunse
Proper counterweight adjustment is crucial for optimal sound quality and to prevent damage to your records and stylus.

Image 5.1: Counterweight and Pitch Adjustment. This image illustrates how to accurately adjust the tonearm pressure using the counterweight and fine-tune the playback speed with the pitch control.
- Gently remove the stylus protector.
- Place the counterweight onto the rear of the tonearm. Rotate it clockwise until it is fully threaded.
- Release the tonearm from its rest. Move the cueing lever to the down position.
- Carefully rotate the counterweight until the tonearm is perfectly balanced horizontally, floating freely without touching the surface or rising too high.
- Once balanced, hold the counterweight steady with one hand and rotate the numbered ring on the front of the counterweight until '0' aligns with the line on the tonearm.
- Rotate the entire counterweight (including the numbered ring) counter-clockwise to the recommended tracking force. For the pre-installed magnetic cartridge, a typical tracking force is between 2.5 to 3.5 grams. Refer to your cartridge's specific recommendations if available.
- Return the tonearm to its rest and engage the tonearm clamp.
5.4 Eruku Ideri fifi sori
Insert the hinges of the dust cover into the hinge receptacles at the rear of the turntable chassis.
5.5 Asopọ agbara
Connect the power adapter to the DC IN jack on the rear of the turntable, then plug the adapter into a wall outlet.
6. Awọn ilana Iṣiṣẹ
6.1 Basic Record Playback
- Place a record on the platter. If playing a 45 RPM single, place the 45 RPM adapter on the spindle first.
- Select the appropriate speed (33 1/3 or 45 RPM) using the speed selector switch.
- Ensure the LINE/BT OUT/PHONO switch is set to 'LINE OUT' or 'PHONO' if connecting to external speakers, or 'BT OUT' for Bluetooth.
- Turn on the turntable using the Power ON/OFF switch.
- Release the tonearm from its rest.
- Gbe apa ohun orin soke nipa lilo lefa ika.
- Pẹlu ọwọ gbe ohun orin ipe si ori ibi ibẹrẹ ti o fẹ ti igbasilẹ naa.
- Fi ọwọ́ rọra gbé ohun orin náà kalẹ̀ pẹ̀lú ìtọ́ka ìfàmọ́ra. Àtẹ ìfàmọ́ra náà yóò kan àwo orin náà, ìjíròrò náà yóò sì bẹ̀rẹ̀.
- At the end of the record, the auto-stop function will stop the platter rotation. Lift the tonearm, return it to its rest, and turn off the turntable.
6.2 ipolowo Atunṣe
Use the Pitch Control knob (refer to Image 5.1) to fine-tune the playback speed. Rotate the knob to increase or decrease the speed slightly.
6.3 Bluetooth Output
The turntable can wirelessly stream audio to Bluetooth-enabled devices such as headphones, speakers, or soundbars.

Image 6.1: Bluetooth Output functionality. This image demonstrates the turntable's ability to wirelessly connect to various Bluetooth receivers like earphones, soundbars, and external speakers.
- Ensure the LINE/BT OUT/PHONO switch on the rear is set to 'BT OUT'.
- Turn on your Bluetooth receiving device (e.g., speaker, headphones) and set it to pairing mode.
- Turn on the turntable. The Bluetooth indicator light on the turntable will flash, indicating it is searching for a device.
- Once paired, the Bluetooth indicator light will become solid. Audio from the turntable will now play through your Bluetooth device.
- Ti sisopọ ba kuna, pa awọn ẹrọ mejeeji ki o tun gbiyanju lẹẹkansi.
6.4 Vinyl to Computer Recording (USB-PC)
You can convert your vinyl records into digital audio files using the USB-PC output.

Image 6.2: Vinyl to Computer conversion setup. This image shows the turntable connected to a laptop via a USB cable, illustrating the process of converting vinyl audio to MP3 format for computer playback.
- Connect the USB cable from the turntable's USB-PC port to an available USB port on your computer.
- Ensure the LINE/BT OUT/PHONO switch is set to 'LINE OUT' or 'PHONO'.
- Install and open audio recording software on your computer (e.g., Audacity, a free open-source software).
- In your recording software's preferences, select the turntable as the audio input device (it may appear as 'USB Audio CODEC' or similar).
- Start recording in the software, then begin playing your record on the turntable (refer to Section 6.1).
- Once the record finishes, stop recording in the software and save your digital audio file.
6.5 Connecting External Speakers (RCA)
The turntable features RCA output jacks for connecting to external active speakers or an amplifier.
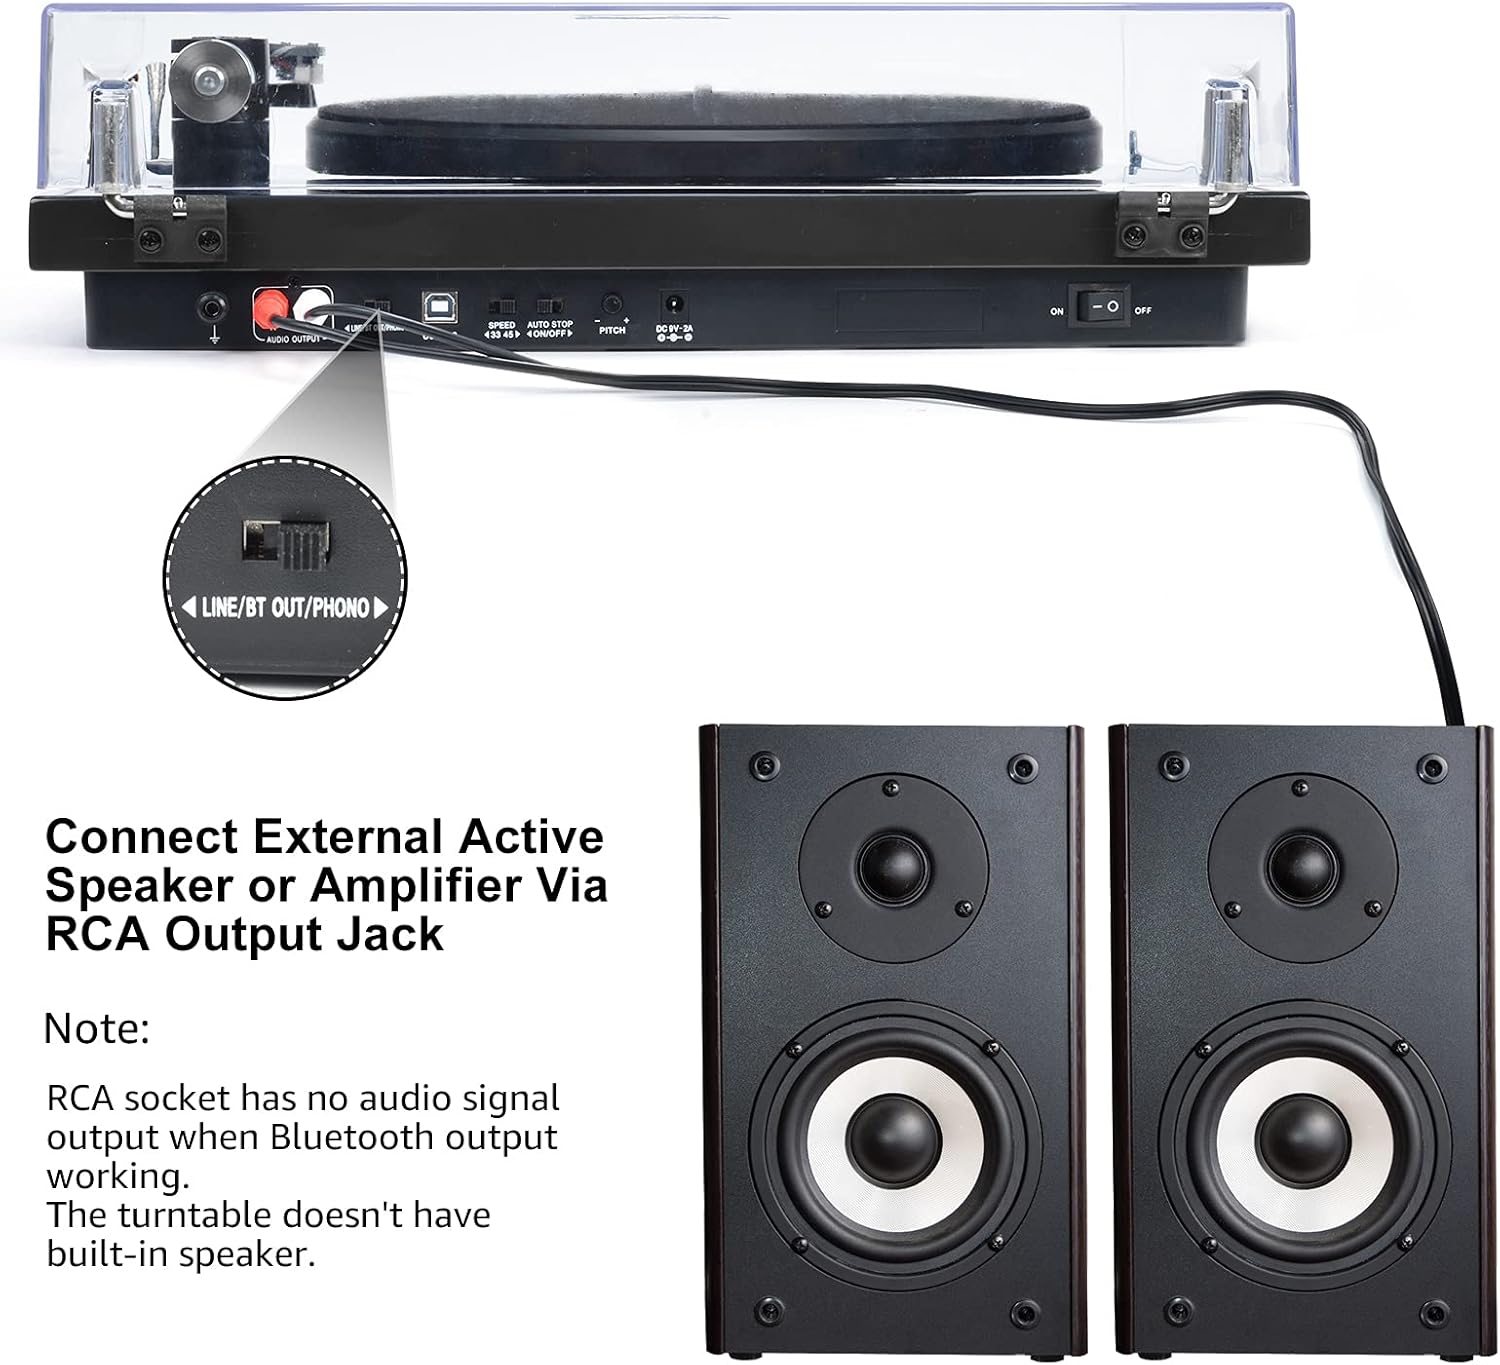
Image 6.3: Connecting to external speakers. This image shows the rear panel of the turntable with the RCA output jacks connected to a pair of external active speakers, indicating how to route audio for amplified playback.
- Ensure the LINE/BT OUT/PHONO switch on the rear is set to 'LINE OUT' if connecting to active speakers (speakers with their own amplifier) tabi ẹya amplifier's 'LINE IN' input. Set to 'PHONO' if connecting to an amplifier with a dedicated 'PHONO' input.
- Connect the RCA cables (red for right channel, white for left channel) from the turntable's RCA output jacks to the corresponding input jacks on your active speakers or amplifier.
- Turn on your external audio system and adjust the volume.
Akiyesi: The Udreamer Turntable Model UD001 does not have built-in speakers. An external audio system (active speakers, amplifier, or Bluetooth device) is required for sound output.
7. Itọju
7.1 Ninu
- Turntable Unit: Wipe the exterior with a soft, dry, lint-free cloth. Do not use harsh chemicals or abrasive cleaners.
- Ideri Ekuru: Clean with a soft cloth and a mild, non-abrasive cleaner. Avoid scratching the surface.
- Stylus: Use a soft stylus brush, brushing gently from back to front (in the direction of play) to remove dust and debris. Never use your fingers.
7.2 Stylus Replacement
The stylus (needle) is a consumable part and will wear out over time, typically after 300-500 hours of playback. A worn stylus can damage your records and degrade sound quality. Replace the stylus when you notice a decrease in sound quality or visible wear.
- Gently grasp the front of the cartridge body.
- Pull the old stylus assembly downwards and forwards to detach it from the cartridge body.
- Align the new stylus assembly with the cartridge body and push it upwards and backwards until it clicks into place.
- Re-adjust the tracking force if necessary after replacing the stylus.
8. Laasigbotitusita
If you encounter issues with your turntable, refer to the following common problems and solutions:
| Isoro | Owun to le Fa | Ojutu |
|---|---|---|
| Ko si agbara | Power adapter not connected; Power switch off | Ensure power adapter is securely plugged in; Turn power switch ON |
| Ko si ohun | Incorrect output mode selected; External speakers not connected/powered; Bluetooth not paired | Set LINE/BT OUT/PHONO switch correctly; Connect/power on external speakers; Pair Bluetooth device |
| Ohun daru tabi fo | Stylus dirty or worn; Tracking force incorrect; Turntable not level; Record dirty or damaged | Clean or replace stylus; Adjust counterweight; Place turntable on a level surface; Clean record |
| Platter ko nyi | Drive belt dislodged or broken; Auto-stop engaged | Re-install or replace drive belt; Ensure tonearm is over the record to disengage auto-stop |
| Sisopọ Bluetooth kuna | Device too far; Device not in pairing mode; Interference | Move devices closer; Ensure receiving device is in pairing mode; Restart both devices |
9. Awọn pato
| Ẹya ara ẹrọ | Sipesifikesonu |
|---|---|
| Ọja Mefa | 12.8 x 9.8 x 4.7 inches |
| Iwọn Nkan | 5.79 iwon |
| Nọmba Awoṣe Nkan | UD001 |
| Brand | Olódùmarè |
| Pataki Ẹya | Olugba Bluetooth ti a ṣe sinu |
| Ohun elo | Ṣiṣu |
| Ara | Vintage |
| Awọn ẹrọ ibaramu | Agbekọri, Agbọrọsọ |
| Motor Iru | AC mọto |
| Ilana ifihan agbara | Oni-nọmba |
| Orisun agbara | Okun Itanna |
| Ifihan Ibuwọlu-si-Noise | 60 dB |
10. Atilẹyin ọja ati Support
Udreamer products are designed and manufactured to the highest quality standards. For warranty information or technical support, please refer to the contact details provided with your purchase or visit the official Udreamer website. Please have your model number (UD001) and purchase information ready when contacting support.


