1. Ifihan
The Arduino Nano RP2040 Connect is a compact and powerful development board designed for a wide range of embedded projects. It integrates the Raspberry Pi RP2040 microcontroller with a u-blox NINA-W102 radio module, providing Wi-Fi and Bluetooth connectivity. This board also includes a built-in microphone and a six-axis Inertial Measurement Unit (IMU) with AI capabilities, making it suitable for sound activation, audio control, AI voice recognition, fall sensing, and double-tap activation.
With 16MB of external flash memory, the Nano RP2040 Connect offers ample space for code and data storage. It supports the entire RP2040 software ecosystem, including MicroPython, providing flexibility for developers.
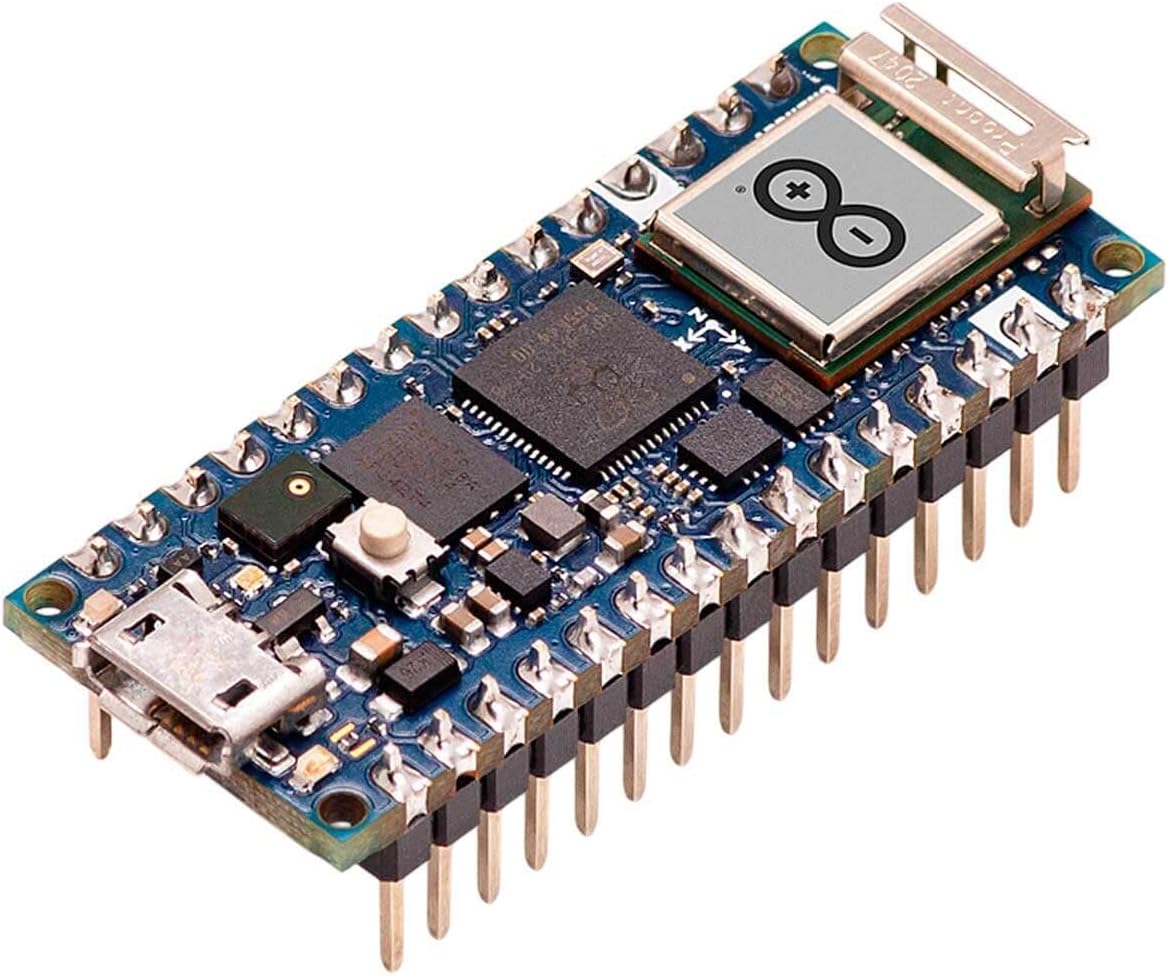
Nọmba 1.1: Iwaju view of the Arduino Nano RP2040 Connect board with pre-soldered headers.
2. Eto
To begin using your Arduino Nano RP2040 Connect, follow these steps:
- Fi Arduino IDE sori ẹrọ: Ṣe igbasilẹ ati fi ẹya tuntun ti Arduino IDE sori ẹrọ lati Arduino osise webAaye (arduino.cc/en/software).
- Add Board Support: Ṣí IDE Arduino. Lọ sí Tools > Board > Boards Manager... Wa fun "Arduino Mbed OS RP2040 Boards" and install it.
- So Pátákó pọ̀: Connect the Arduino Nano RP2040 Connect to your computer using a micro-USB cable. Ensure the cable is data-capable.
- Select Board and Port: In the Arduino IDE, go to Tools > Board > Arduino Mbed OS RP2040 Boards and select "Arduino Nano RP2040 Connect". Then, go to Àwọn Irinṣẹ́ > Ibudo and select the serial port corresponding to your connected board.
- First Upload (Blink Sketch): Open the "Blink" example sketch from File > Exampawọn > 01.Awọn ipilẹ > Flink. Click the "Upload" button (right arrow icon) to compile and upload the sketch to your board. The onboard LED should start blinking.
- MicroPython Setup (Optional): For MicroPython development, refer to the official Arduino documentation for instructions on flashing the MicroPython firmware and using a compatible IDE or serial terminal.

Nọmba 2.1: Apa view of the board, highlighting the micro-USB port for connection.
3. Operating the Board
The Arduino Nano RP2040 Connect can be powered via the micro-USB port or through the VIN pin (4.5-21V). Once powered and programmed, the board operates autonomously based on the uploaded sketch.
3.1. Wi-Fi ati Bluetooth Asopọmọra
The integrated u-blox NINA-W102 module provides Wi-Fi (802.11b/g/n) and Bluetooth/BLE v4.2 capabilities. Libraries are available in the Arduino IDE to enable network communication, connect to Wi-Fi networks, and establish Bluetooth connections for various IoT applications.
3.2. Onboard Sensors
- Gbohungbohun: The built-in microphone can be used for sound detection, audio processing, and voice recognition projects.
- Six-axis IMU: The Inertial Measurement Unit provides accelerometer and gyroscope data, enabling motion sensing, orientation tracking, fall detection, and gesture recognition.
3.3. Digital and Analog Pins
The board features 22 digital pins (20 with PWM support) and 8 analog pins. These pins can be configured as inputs or outputs to interface with external components such as LEDs, sensors, motors, and other modules.

Nọmba 3.1: The Arduino Nano RP2040 Connect in an active development environment.
4. Itọju
The Arduino Nano RP2040 Connect is a robust electronic device, but proper care ensures its longevity and reliable operation:
- Mu pẹlu Itọju: Yẹra fún fífi àpò náà sílẹ̀ tàbí fífi ara rẹ̀ sínú wàhálà tó pọ̀ jù.
- Yiyọ Aimi: Always handle the board by its edges and avoid touching the electronic components directly to prevent damage from electrostatic discharge.
- Mimọ: Keep the board free from dust, dirt, and moisture. Use a soft, dry brush or compressed air for cleaning if necessary.
- Ibi ti ina elekitiriki ti nwa: Ensure you use a stable power supply within the specified voltage range (5V via USB, 4.5-21V via VIN). Incorrect voltage can damage the board.
- Ibi ipamọ: Store the board in an anti-static bag or a protective enclosure when not in use.
5. Laasigbotitusita
If you encounter issues with your Arduino Nano RP2040 Connect, consider the following troubleshooting steps:
5.1. Board Not Recognized by Computer
- Ṣayẹwo okun USB: Ensure the micro-USB cable is a data-capable cable, not just a charging cable. Try a different cable.
- Ṣayẹwo ibudo USB: Gbiyanju lati sopọ si ibudo USB ti o yatọ lori kọnputa rẹ.
- Fifi sori Awakọ: Verify that the necessary drivers are installed. The Arduino IDE installation typically handles this, but manual installation might be needed on some systems.
- Bọtini atunto: Double-tap the reset button on the board quickly. This often puts the board into bootloader mode, making it discoverable by the computer.
5.2. Code Upload Failure
- Correct Board and Port: Confirm that the correct board type and serial port are selected in the Arduino IDE (Àwọn irinṣẹ́ > Pátákó ati Àwọn Irinṣẹ́ > Ibudo).
- Ipo agberu: If uploads consistently fail, try putting the board into bootloader mode by double-tapping the reset button before attempting to upload.
- Syntax Errors: Check your code for any syntax errors that might prevent compilation.
5.3. Flimsy USB Connector
Some users have reported issues with the micro-USB connector being fragile. To minimize stress on the connector:
- Mimu ni pẹlẹ: Always insert and remove the USB cable gently and without force.
- Isopọ to ni aabo: If possible, secure the board to a breadboard or enclosure to prevent movement that could strain the connector.
6. Awọn pato
Below are the technical specifications for the Arduino Nano RP2040 Connect:

Nọmba 6.1: Packaging detail showing key specifications.
| Ẹya ara ẹrọ | Ẹ̀kúnrẹ́rẹ́ |
|---|---|
| isise | Dual-core ARM Cortex M0+ (RP2040) |
| Iyara aago | 133 MHz |
| Àgbo | 264 KB SRAM |
| Flash Memory | 16 MB (external) |
| Alailowaya Asopọmọra | Wi-Fi 802.11b/g/n, Bluetooth & BLE v4.2 (u-blox NINA-W102) |
| Awọn sensọ inu ọkọ | Microphone, 6-axis IMU |
| Digital Mo / O Pinni | 22 (20 with PWM) |
| Afọwọṣe Input Pinni | 8 |
| Awọn ọna Voltage | 3.3V |
| Iṣagbewọle Voltage (VIN) | 4.5-21V |
| Iṣagbewọle Voltage (USB) | 5V |
| Awọn iwọn (LxWxH) | 3.15 x 2.28 x 0.91 inches (isunmọ 80 x 58 x 23 mm) |
| Iwọn | 0.6 iwon (nipa 17 giramu) |
| Nọmba Awoṣe Nkan | ABX00053 |
7. Atilẹyin ọja ati Support
For information regarding product warranty, returns, and technical support, please refer to the official Arduino website or contact Arduino customer service directly. Specific warranty terms may vary by region and retailer.
Official Arduino Webojula: www.arduino.cc
Community Forums: The Arduino community forums are an excellent resource for project ideas, troubleshooting, and peer support.


