1. Awọn Ilana Aabo pataki
Before beginning any exercise program, consult your physician. This is especially important for individuals over the age of 35 or those with pre-existing health conditions. Read all instructions before using the equipment. Physionics assumes no responsibility for personal injury or property damage sustained by or through the use of this product.
- Jeki awọn ọmọde ati awọn ohun ọsin kuro lati ẹrọ.
- Place the equipment on a flat, stable surface.
- Wọ aṣọ idaraya ti o yẹ ati bata bata.
- Ṣe àyẹ̀wò ohun èlò náà kí o tó lò ó fún ìgbà kọ̀ọ̀kan láti rí àwọn ẹ̀yà ara tí ó ti bàjẹ́ tàbí àmì ìbàjẹ́. Má ṣe lò ó bí ó bá bàjẹ́.
- Maṣe kọja iwuwo olumulo ti o pọju ti 120 kg.
- Rí i dájú pé gbogbo àwọn boluti àti èso ni a ti mú dáadáa kí a tó lò ó.
- Duro adaṣe lẹsẹkẹsẹ ti o ba ni rirẹ, dizzy, tabi ni iriri irora.
- Jeki ọwọ ati ẹsẹ kuro ninu awọn ẹya gbigbe.
2. Package Awọn akoonu
Carefully unpack all components and ensure you have received all items listed below. If any parts are missing or damaged, contact customer service immediately.
- 1 x Physionics Exercise Bike EXBK03 (unassembled)
- 1 x Multilingual Assembly Instructions (EN/DE/FR/IT)
Akiyesi: 2 x AAA 1.5V batteries for the LCD console are not included and must be purchased separately.
3. Apejọ Awọn ilana
Follow these steps carefully to assemble your Physionics Exercise Bike EXBK03. It is recommended to have two people for assembly.
- Base Stabilizers Attachment: Attach the front and rear stabilizer bars to the main frame using the provided bolts and washers. Ensure they are securely tightened.
- Fifi sori Efatelese: Identify the left (L) and right (R) pedals. The left pedal screws counter-clockwise, and the right pedal screws clockwise. Thread them into the crank arms and tighten firmly.
- Seat Post and Saddle Assembly: Insert the seat post into the main frame. Attach the saddle to the seat post. Adjust the height and horizontal position as needed (refer to 'Adjustments' section).
- Handlebar Post and Handlebar Assembly: Insert the handlebar post into the main frame. Attach the handlebar to the post. Connect the pulse sensor wires from the handlebar to the console.
- Fifi sori ẹrọ console: Mount the LCD console onto the handlebar post. Connect the sensor wires from the main frame and pulse sensor to the console. Insert 2 x AAA batteries (not included) into the console.
- Ṣayẹwo Ipari: Before first use, double-check that all bolts, nuts, and connections are secure.
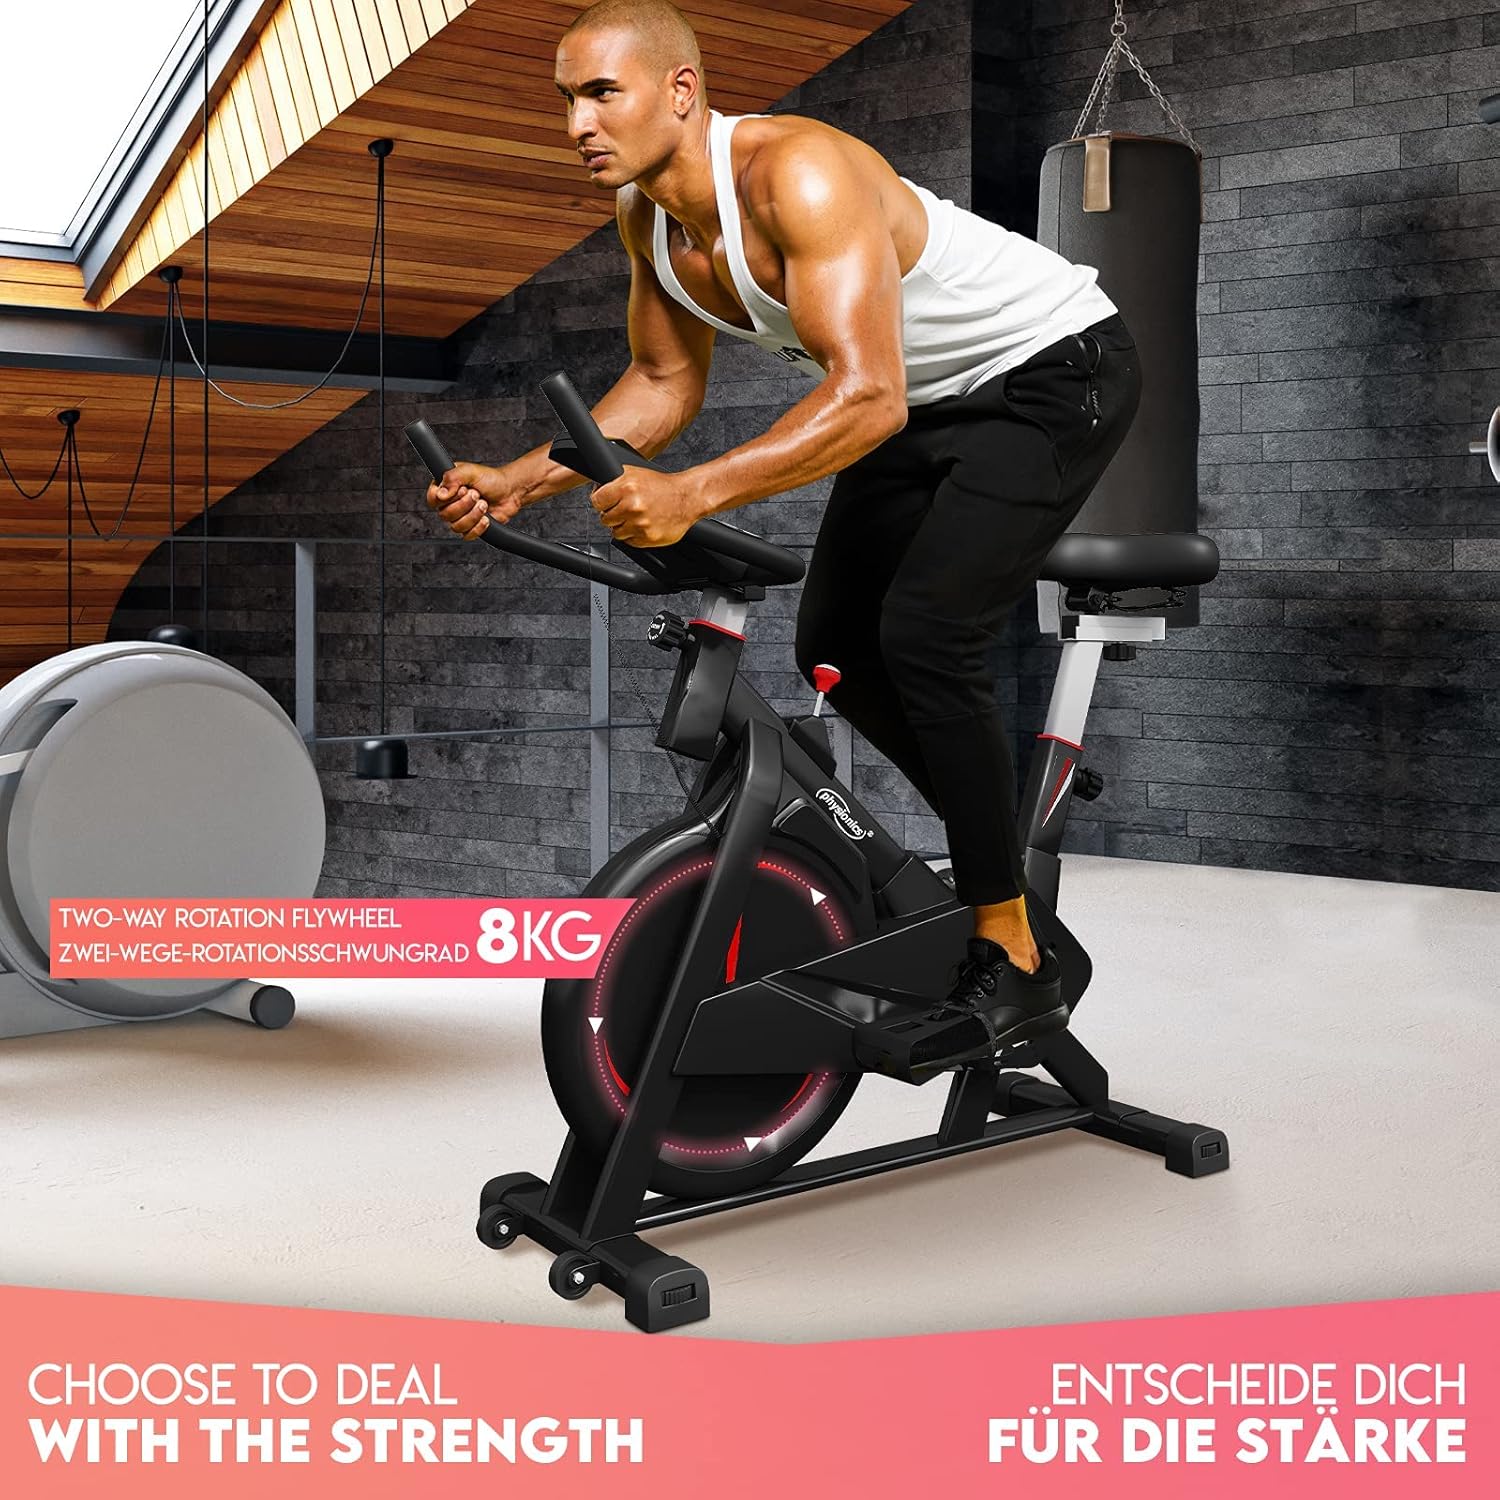
Physionics Exercise Bike EXBK03 in use, highlighting the 8kg two-way rotation flywheel.
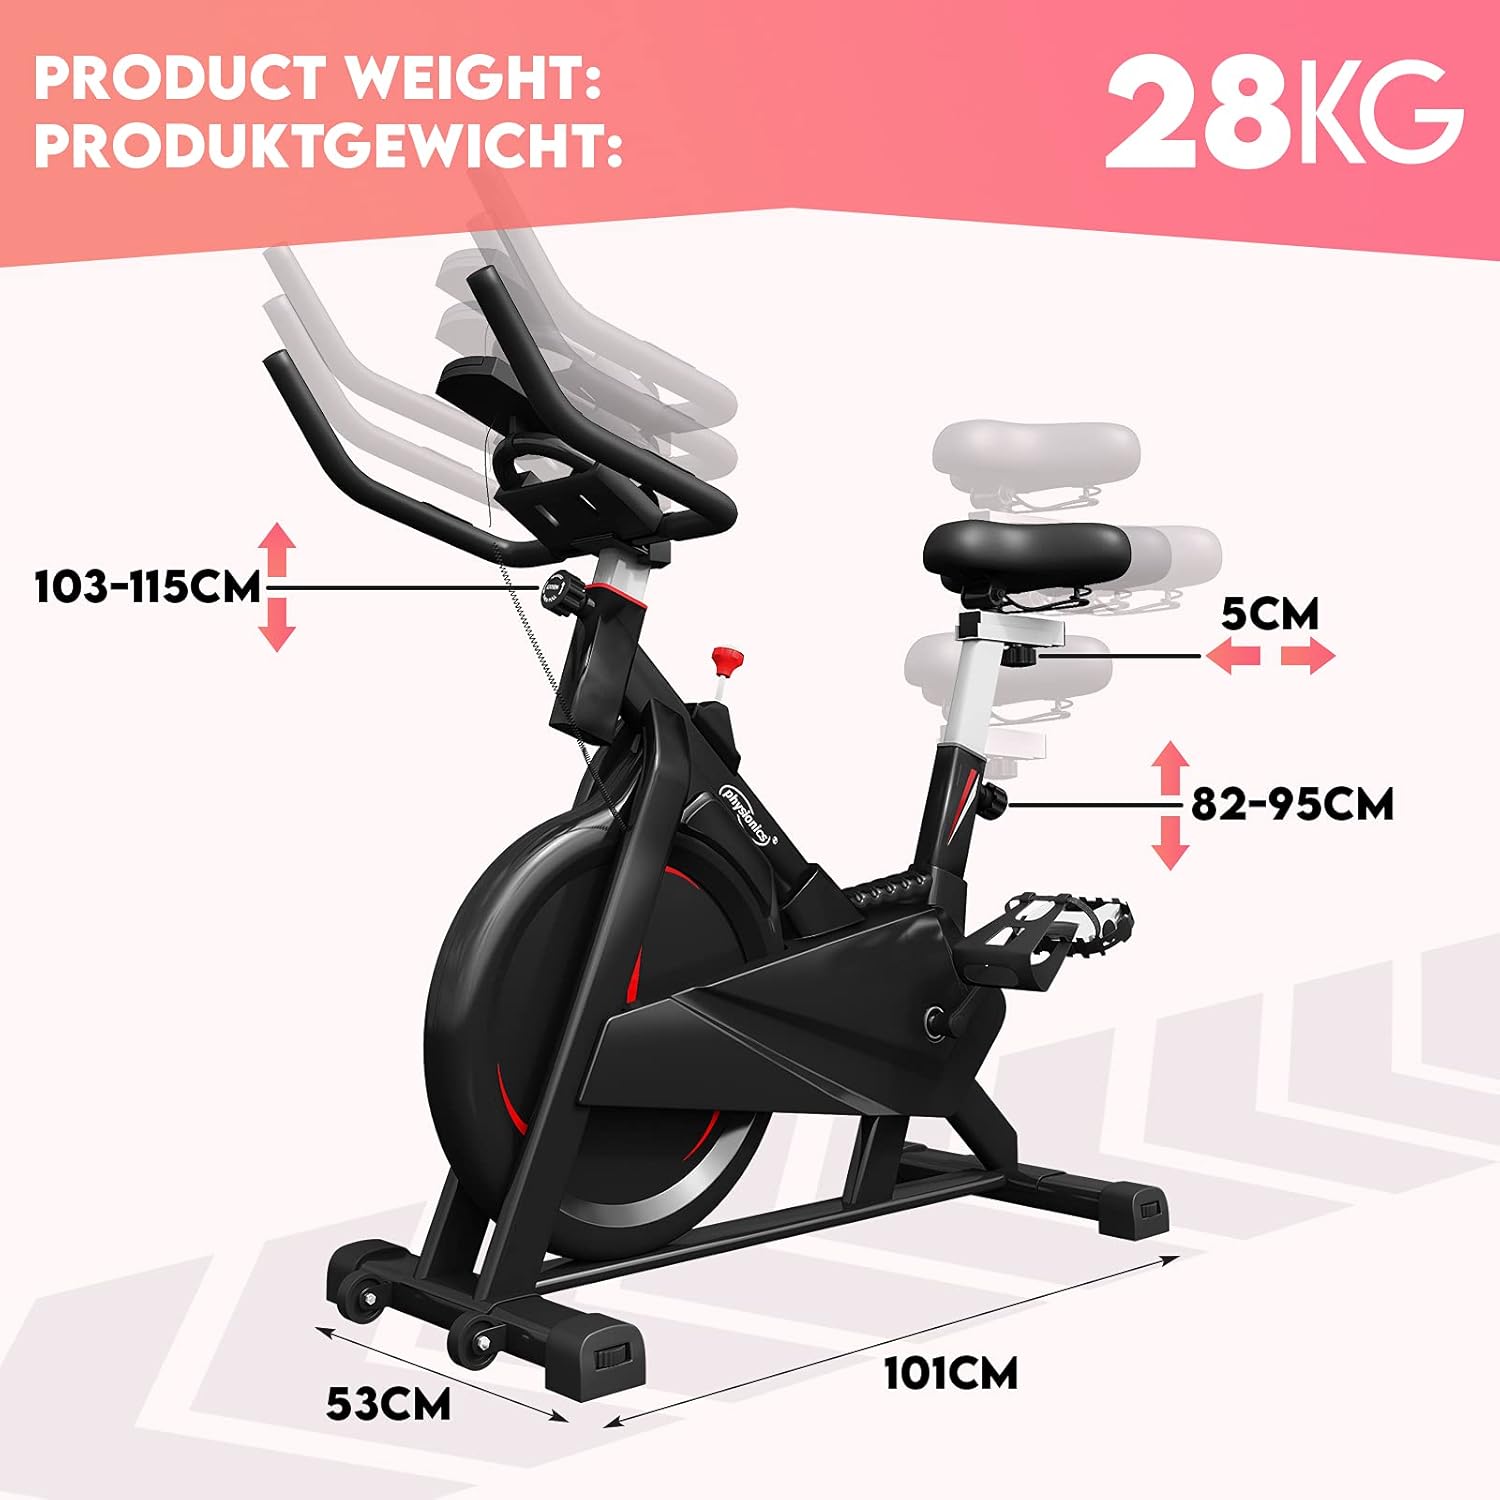
Overall dimensions of the exercise bike are 101cm (L) x 53cm (W) x 118cm (H), with a product weight of 28kg.
4. Awọn ilana Iṣiṣẹ
To begin your workout, sit on the saddle and place your feet securely in the pedal straps. Adjust the resistance to your desired level using the tension control knob.
- Bibẹrẹ Idaraya: Begin pedaling. The LCD console will automatically turn on and start displaying your workout data.
- Atunse Resistance: Turn the red tension control knob located below the handlebars. Turn clockwise to increase resistance and counter-clockwise to decrease it.
- Iduro: To stop the flywheel quickly, press down firmly on the red tension control knob. This acts as an emergency brake.

The Physionics Exercise Bike EXBK03 supports a maximum user weight of 120 kg and features 5-level adjustable handlebars.

Detail of the friction braking system and 8kg flywheel for smooth and quiet operation.

The brake knob allows for immediate stopping, and a convenient bottle holder is integrated into the design.
5. Awọn atunṣe
Ṣíṣe àtúnṣe tó yẹ fún ìjókòó àti ọ̀pá ìdábùú ṣe pàtàkì fún ìtùnú àti ìdánrawò tó gbéṣẹ́.
- Saddle Height Adjustment: Loosen the adjustment knob on the vertical seat post. Raise or lower the saddle to one of the 5 available levels (approx. 82-95 cm). Ensure your leg has a slight bend at the knee when the pedal is at its lowest point. Tighten the knob securely.
- Saddle Horizontal Adjustment: Loosen the adjustment knob under the saddle. Slide the saddle forward or backward (approx. 5 cm range) to find a comfortable position relative to the handlebars. Tighten the knob securely.
- Atunse Giga Handlebar: Loosen the adjustment knob on the handlebar post. Raise or lower the handlebars to one of the 5 available levels (approx. 103-115 cm). Tighten the knob securely.

Features include a pulse sensor on the handlebars, 5-level vertical and horizontal seat adjustments, and secure pedal straps.
6. Awọn iṣẹ console
The LCD console tracks your workout progress. It is powered by 2 x AAA 1.5V batteries (not included).
- YII: Laifọwọyi n yi gbogbo awọn iṣẹ ifihan kọja ni gbogbo iṣẹju-aaya diẹ.
- Àkókò: Displays the duration of your current workout in minutes and seconds.
- Iyara: Shows your current cycling speed.
- Ijinna: Displays the distance covered during your current workout.
- HEART RATE (PULSE): When holding the pulse sensors on the handlebars, your heart rate will be displayed in beats per minute (BPM).
- Awọn ọja: Ṣíṣe àkíyèsí àwọn kalori tí a jó nígbà ìdánrawò rẹ.
- ODOMETER: Displays the total accumulated distance since the console was reset or batteries were changed.
- Bọtini MODE: Press to select a specific display function or to activate the SCAN mode.
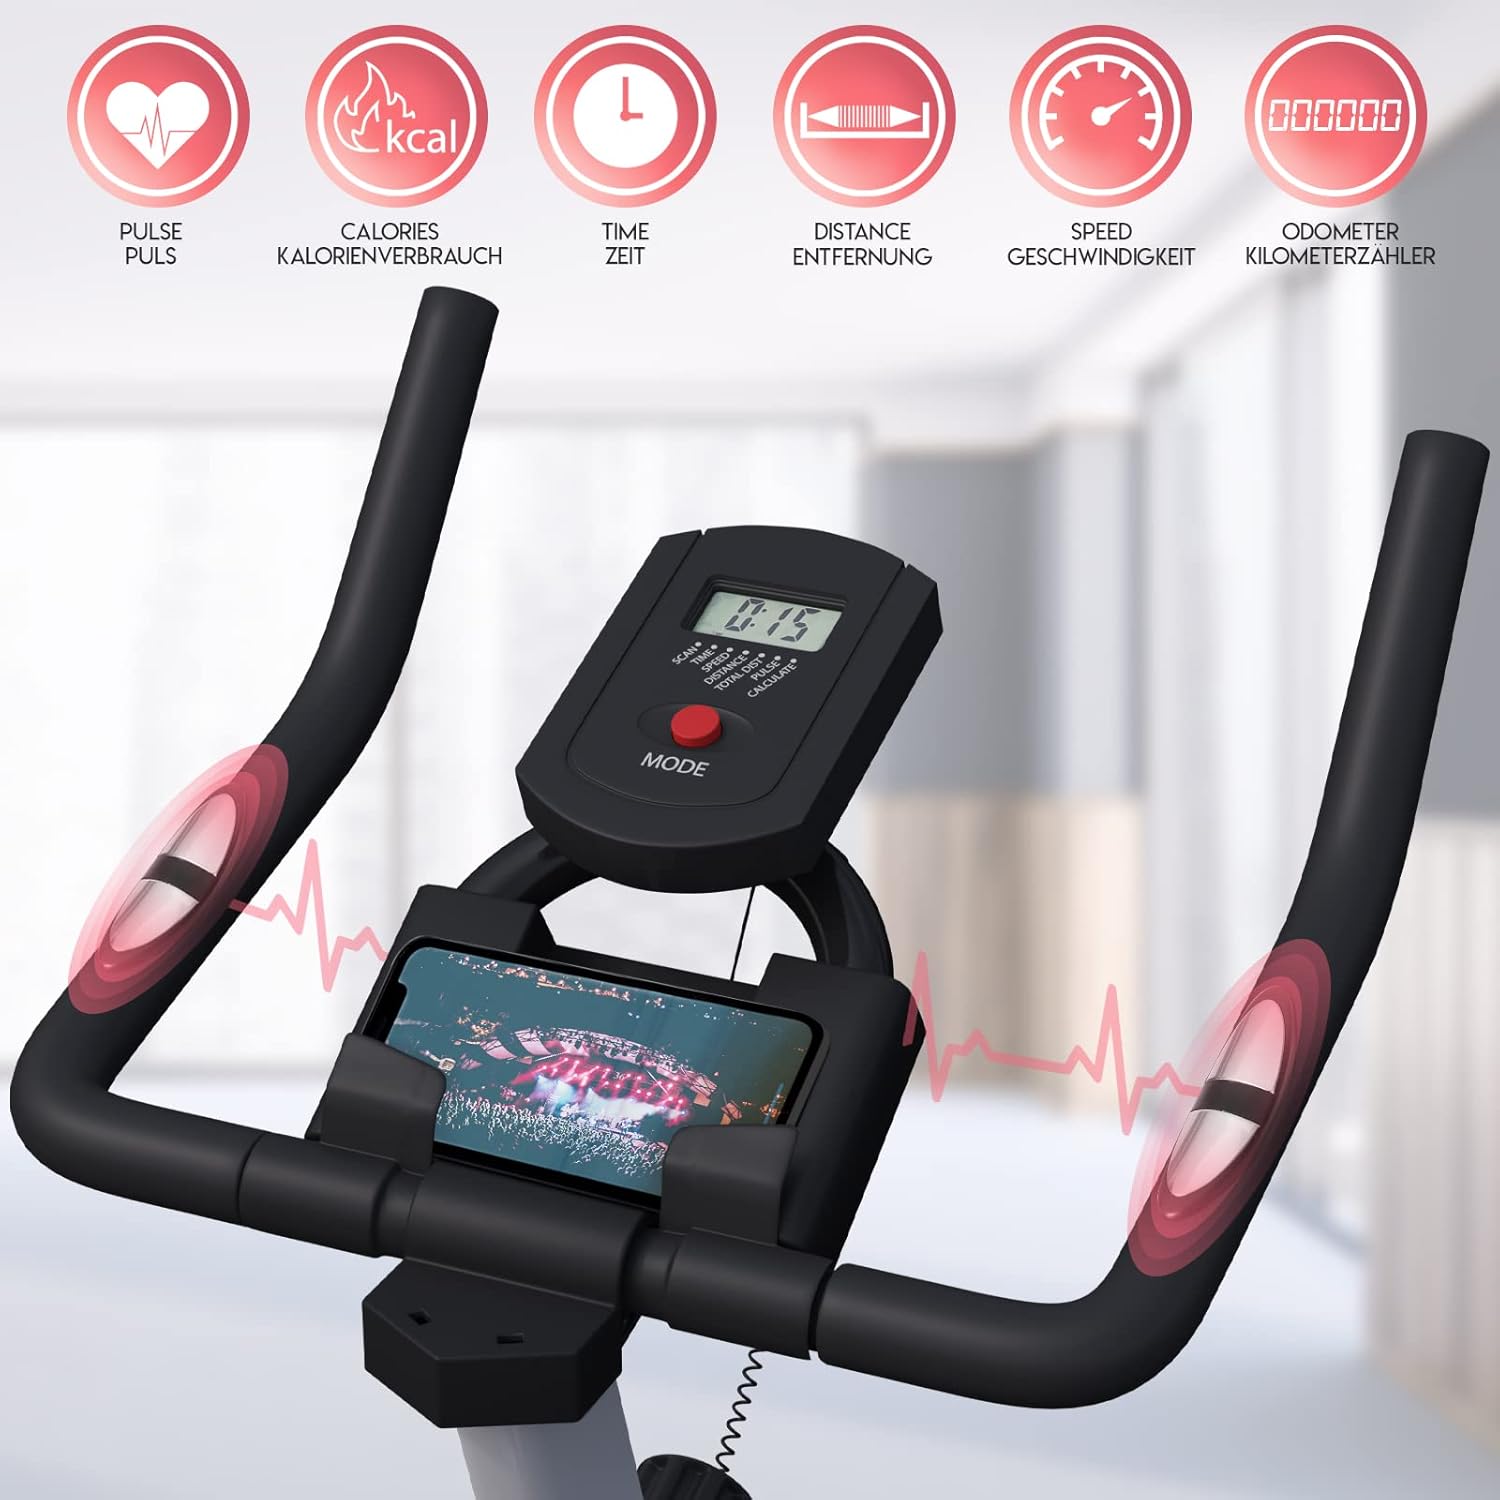
The LCD console displays pulse, calories, time, distance, speed, and odometer readings.
7. Itọju
Ìtọ́jú déédéé ń mú kí kẹ̀kẹ́ ìdánrawò rẹ pẹ́ títí, kí ó sì wà ní ààbò.
- Ninu: Pa ohun èlò náà rẹ́ pẹ̀lú ìpolówóamp aṣọ lẹ́yìn lílo kọ̀ọ̀kan láti mú òógùn àti eruku kúrò. Má ṣe lo àwọn ohun ìfọṣọ ìfọ́mọ́ra.
- Lubrication: Periodically check for any squeaking or grinding noises. If present, apply a small amount of silicone-based lubricant to moving parts as needed. Avoid over-lubricating.
- Rirọpo Batiri: When the LCD display becomes dim or stops functioning, replace the 2 x AAA 1.5V batteries in the console.
- Ṣayẹwo wiwọ: Regularly inspect all bolts, nuts, and connections to ensure they remain tight. Tighten if necessary.
- Ibi ipamọ: Store the exercise bike in a dry, cool place away from direct sunlight and moisture. Use the transport rollers for easy movement.

Integrated transport rollers at the front of the bike allow for easy relocation.
8. Laasigbotitusita
Eyi ni awọn ojutu si awọn ọran ti o wọpọ ti o le ba pade:
- No display on console:
- Ṣayẹwo boya awọn batiri ti fi sori ẹrọ daradara.
- Replace with new AAA 1.5V batteries.
- Ensure all console cables are securely connected.
- Inaccurate or no pulse reading:
- Ensure both hands are firmly gripping the pulse sensors.
- Check the connection of the pulse sensor wires to the console.
- Squeaking or grinding noise:
- Inspect all moving parts for friction. Apply a small amount of silicone lubricant if necessary.
- Check if any bolts or nuts are loose and tighten them.
- Àwọn ẹsẹ̀ rí bí ẹni pé wọ́n ti dẹ́kun:
- Ensure pedals are threaded correctly and tightened firmly. Remember the left pedal is reverse-threaded.
9. Awọn pato
| Nọmba awoṣe | EXBK03 |
| Awọn iwọn (L x W x H) | 101 cm x 53 cm x 120 cm |
| Iwọn Ọja | 28 kg |
| Maximum User Load | 120 kg |
| Niyanju User Giga | 120 cm - 180 cm |
| Iwuwo Flywheel | 8 kg (double rotation) |
| System Alatako | Wool felt friction |
| Braking System | Friction brake (push-down knob) |
| Atunse gàárì, | Vertical (5 levels: 82-95 cm), Horizontal (5 cm slider) |
| Tolesese Handlebar | Vertical (5 levels: 103-115 cm) |
| Ifihan console | LCD (Scan, Time, Speed, Distance, Heart Rate, Calories, Odometer) |
| Power Supply (Console) | Awọn batiri 2 x AAA 1.5V (ko si ninu wọn) |
| Awọn ohun elo | Steel frame, ABS plastic, PU leather, foam |
| Àwọ̀ | Dudu ati Grey |
10. Atilẹyin ọja ati Support
This product comes with a standard manufacturer's warranty. Please refer to your purchase documentation for specific warranty terms and conditions. For technical support, missing parts, or warranty claims, please contact the retailer or manufacturer directly using the contact information provided at the time of purchase.
Ṣe idaduro ẹri rira rẹ nigbagbogbo fun awọn idi atilẹyin ọja.


