1. Ifihan
Thank you for choosing the DEXTER 1500W SDS Plus Hammer Drill. This manual provides essential information for the safe and effective operation, maintenance, and troubleshooting of your new tool. Please read this manual thoroughly before first use and keep it for future reference.

Figure 1: The DEXTER 1500W SDS Plus Hammer Drill, showcasing its robust design and ergonomic features.
2. Awọn ilana aabo
Nigbagbogbo tẹle awọn iṣọra aabo ipilẹ nigba lilo awọn irinṣẹ itanna lati dinku eewu ina, mọnamọna, ati ipalara ti ara ẹni.
- Aabo Agbegbe Iṣẹ: Jeki agbegbe iṣẹ rẹ mọ ki o si tan daradara. Ma ṣe ṣiṣẹ awọn irinṣẹ agbara ni awọn bugbamu bugbamu, gẹgẹbi niwaju awọn olomi ina, gaasi, tabi eruku.
- Aabo Itanna: Awọn pilogi irinṣẹ agbara gbọdọ baramu iṣan. Maṣe yi plug naa pada ni ọna eyikeyi. Yago fun olubasọrọ ara pẹlu ilẹ tabi ilẹ roboto.
- Aabo ti ara ẹni: Máa lo ààbò ojú, ààbò ìgbọ́ran, àti àwọn ibọ̀wọ́ iṣẹ́ tó yẹ nígbà gbogbo. Máa wọ aṣọ tó yẹ; má ṣe wọ aṣọ tó wúwo tàbí ohun ọ̀ṣọ́.
- Lilo ati Itọju: Maṣe fi agbara mu ohun elo agbara. Lo ohun elo agbara ti o pe fun ohun elo rẹ. Ge asopọ plug lati orisun agbara ṣaaju ṣiṣe eyikeyi awọn atunṣe, yiyipada awọn ẹya ẹrọ, tabi titoju awọn irinṣẹ agbara.
3. Ọja Ipariview ati irinše
Familiarize yourself with the various parts of your DEXTER Hammer Drill and its included accessories.
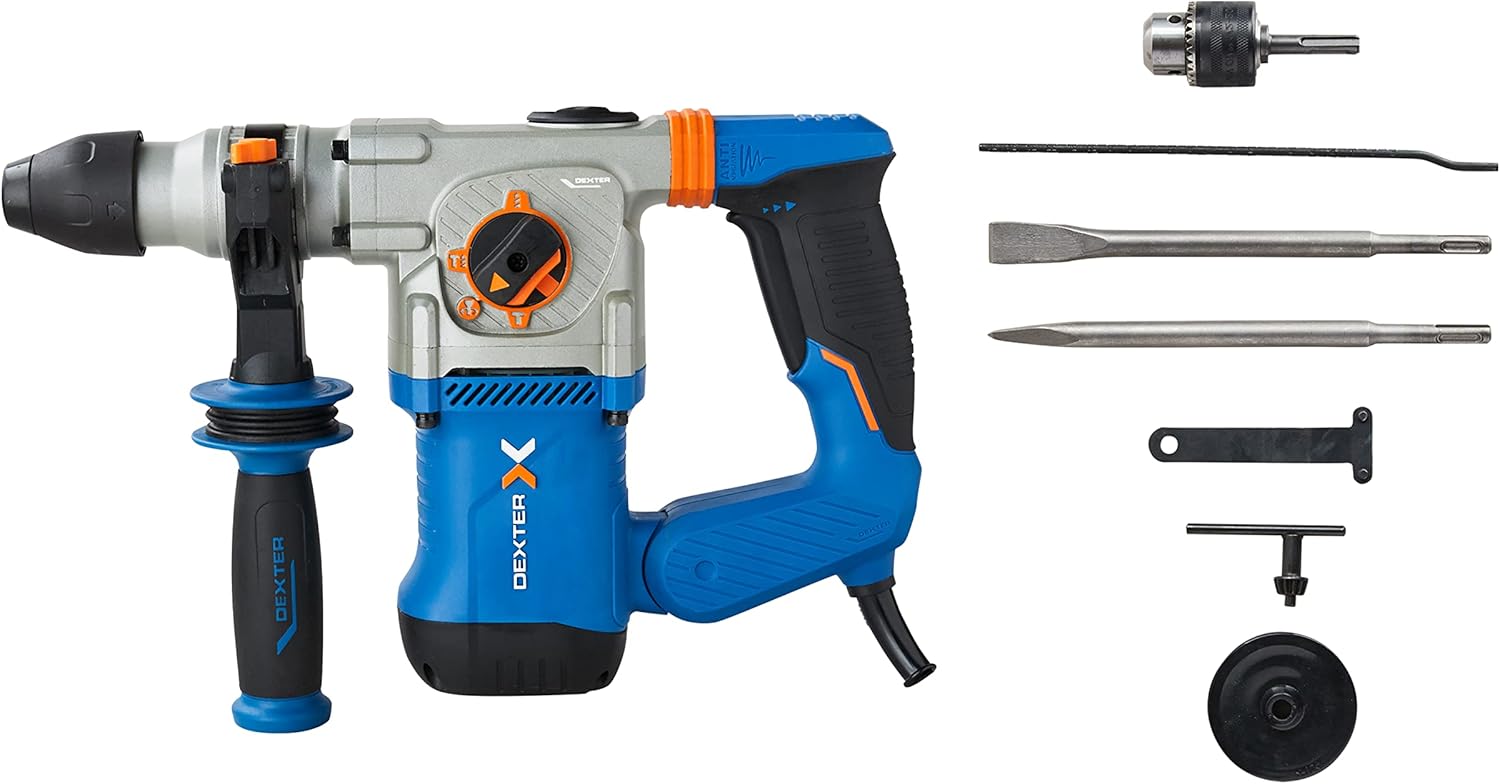
Figure 2: The hammer drill along with its standard accessories, including the SDS Plus chuck, pointed chisel, flat chisel, side handle, key, and depth gauge.
Awọn eroja pataki:
- SDS Plus Chuck: Fun awọn ọna ati ni aabo bit ayipada.
- Yipada Ipo Aṣayan: Allows selection between drilling, hammer drilling, chiseling, and chiseling with free accessory adjustment.
- Okunfa Iyara Ayipada: For precise control over drilling and chiseling speed.
- Anti-Vibration Handles: Designed to absorb shocks and reduce user fatigue.
- Imudani ẹgbẹ: Pese imudani afikun ati iṣakoso lakoko iṣẹ.
- Iwọn Ijinle: For setting precise drilling depths.
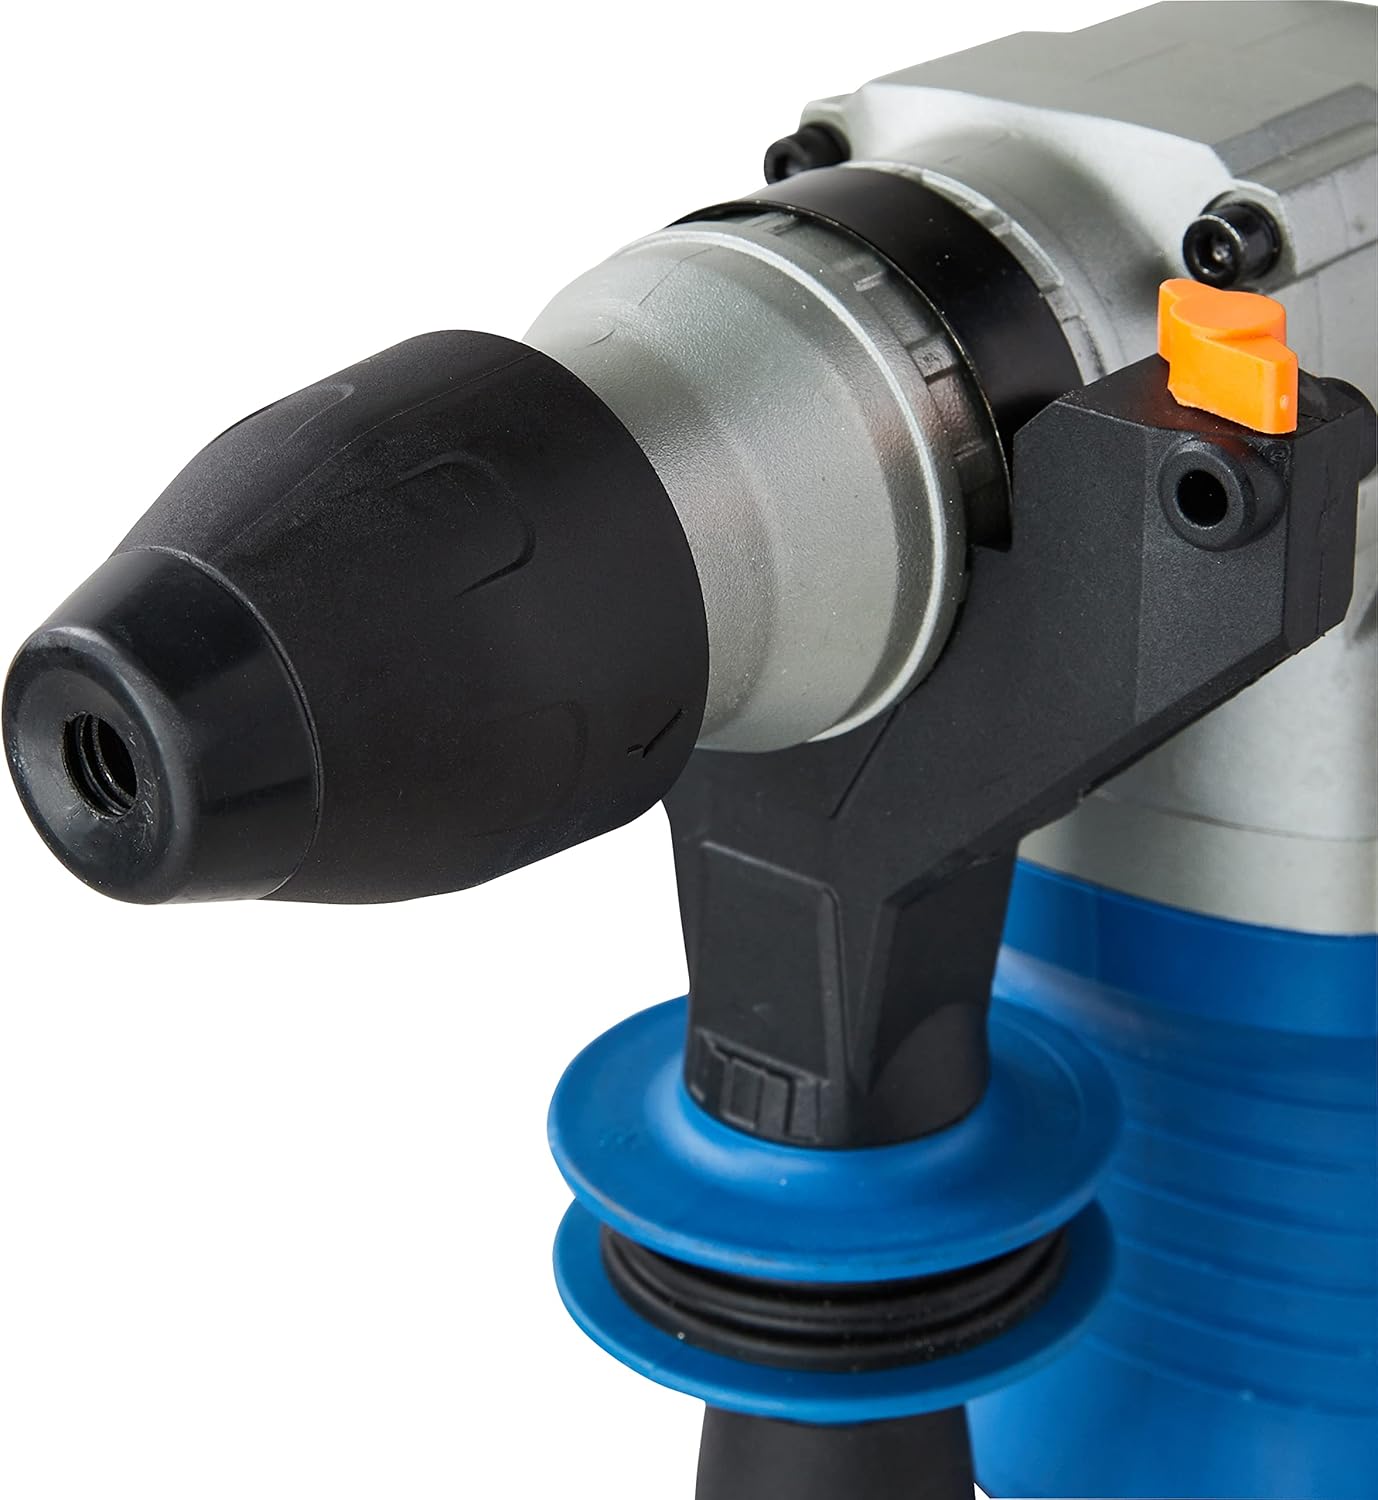
Nọmba 3: Alaye view of the SDS Plus chuck, designed for quick and secure bit insertion.

Figure 4: Close-up of the mode selector switch, indicating the different operational modes of the hammer drill.

Nọmba 5: View of the anti-vibration handle, highlighting its design for improved user comfort and reduced fatigue.
4. Eto
4.1 Attaching awọn ẹgbẹ Handle
- Tu ọwọ ẹgbẹ silẹ nipa yiyi-ilọpo-aago.
- Slide the handle onto the front of the tool until it is in the desired position.
- Rotate the handle clockwise to tighten and secure it.
4.2 Inserting and Removing SDS Plus Bits
- Nu shank ti SDS Plus bit.
- Fi bù náà sínú bù náà títí tí yóò fi tẹ̀ ẹ́ mọ́ ibi tí ó wà. Fa bù náà kí ó lè rí i dájú pé ó ti dì mọ́lẹ̀ dáadáa.
- Lati yọ kuro, fa kola Chuck pada ki o fa bit naa jade.
4.3 Attaching the Key Chuck (for standard drill bits)
For drilling with standard, non-SDS bits (e.g., for wood or metal), attach the included key chuck adapter to the SDS Plus chuck.
- Insert the key chuck adapter into the SDS Plus chuck as described in 4.2.
- Insert the desired standard drill bit into the key chuck.
- Tighten the key chuck using the provided chuck key to secure the bit.
4.4 Setting the Depth Gauge
- Fi iwọn ijinle sii sinu iho lori mu ẹgbẹ.
- Adjust the gauge to the desired drilling depth.
- Tighten the side handle to secure the depth gauge in place.
5. Ṣiṣẹ
Your DEXTER Hammer Drill offers four primary functions for various applications.

Olusin 6: Pariview of the hammer drill's capabilities, including maximum drilling diameters and power specifications.
5.1 Yiyan Ipo Ṣiṣẹ
Rotate the mode selector switch to choose the appropriate function:
- Drilling Mode (Drill Bit Symbol): For drilling in wood (up to 40mm) and metal (up to 13mm). Use with the key chuck and standard drill bits.
- Hammer Drilling Mode (Drill Bit + Hammer Symbol): For drilling in concrete or brick (up to 26mm). Use with SDS Plus drill bits.
- Chiseling Mode (Hammer Symbol): For chiseling applications, such as breaking concrete or removing tiles. The accessory is fixed in position.
- Chiseling with Free Accessory Adjustment (Hammer + Rotating Arrow Symbol): Allows the chisel to rotate freely, useful for adjusting the angle when removing tiles or similar tasks.
5.2 Ayípadà iyara Iṣakoso
The trigger features variable speed control. Press the trigger lightly for lower speeds and press harder for higher speeds. This allows for precise control depending on the material and application.
5.3 Tesiwaju Isẹ
For extended use, the tool can be set to continuous operation. Press the trigger and then engage the lock-on button (if present, typically on the handle). To disengage, press the trigger again.
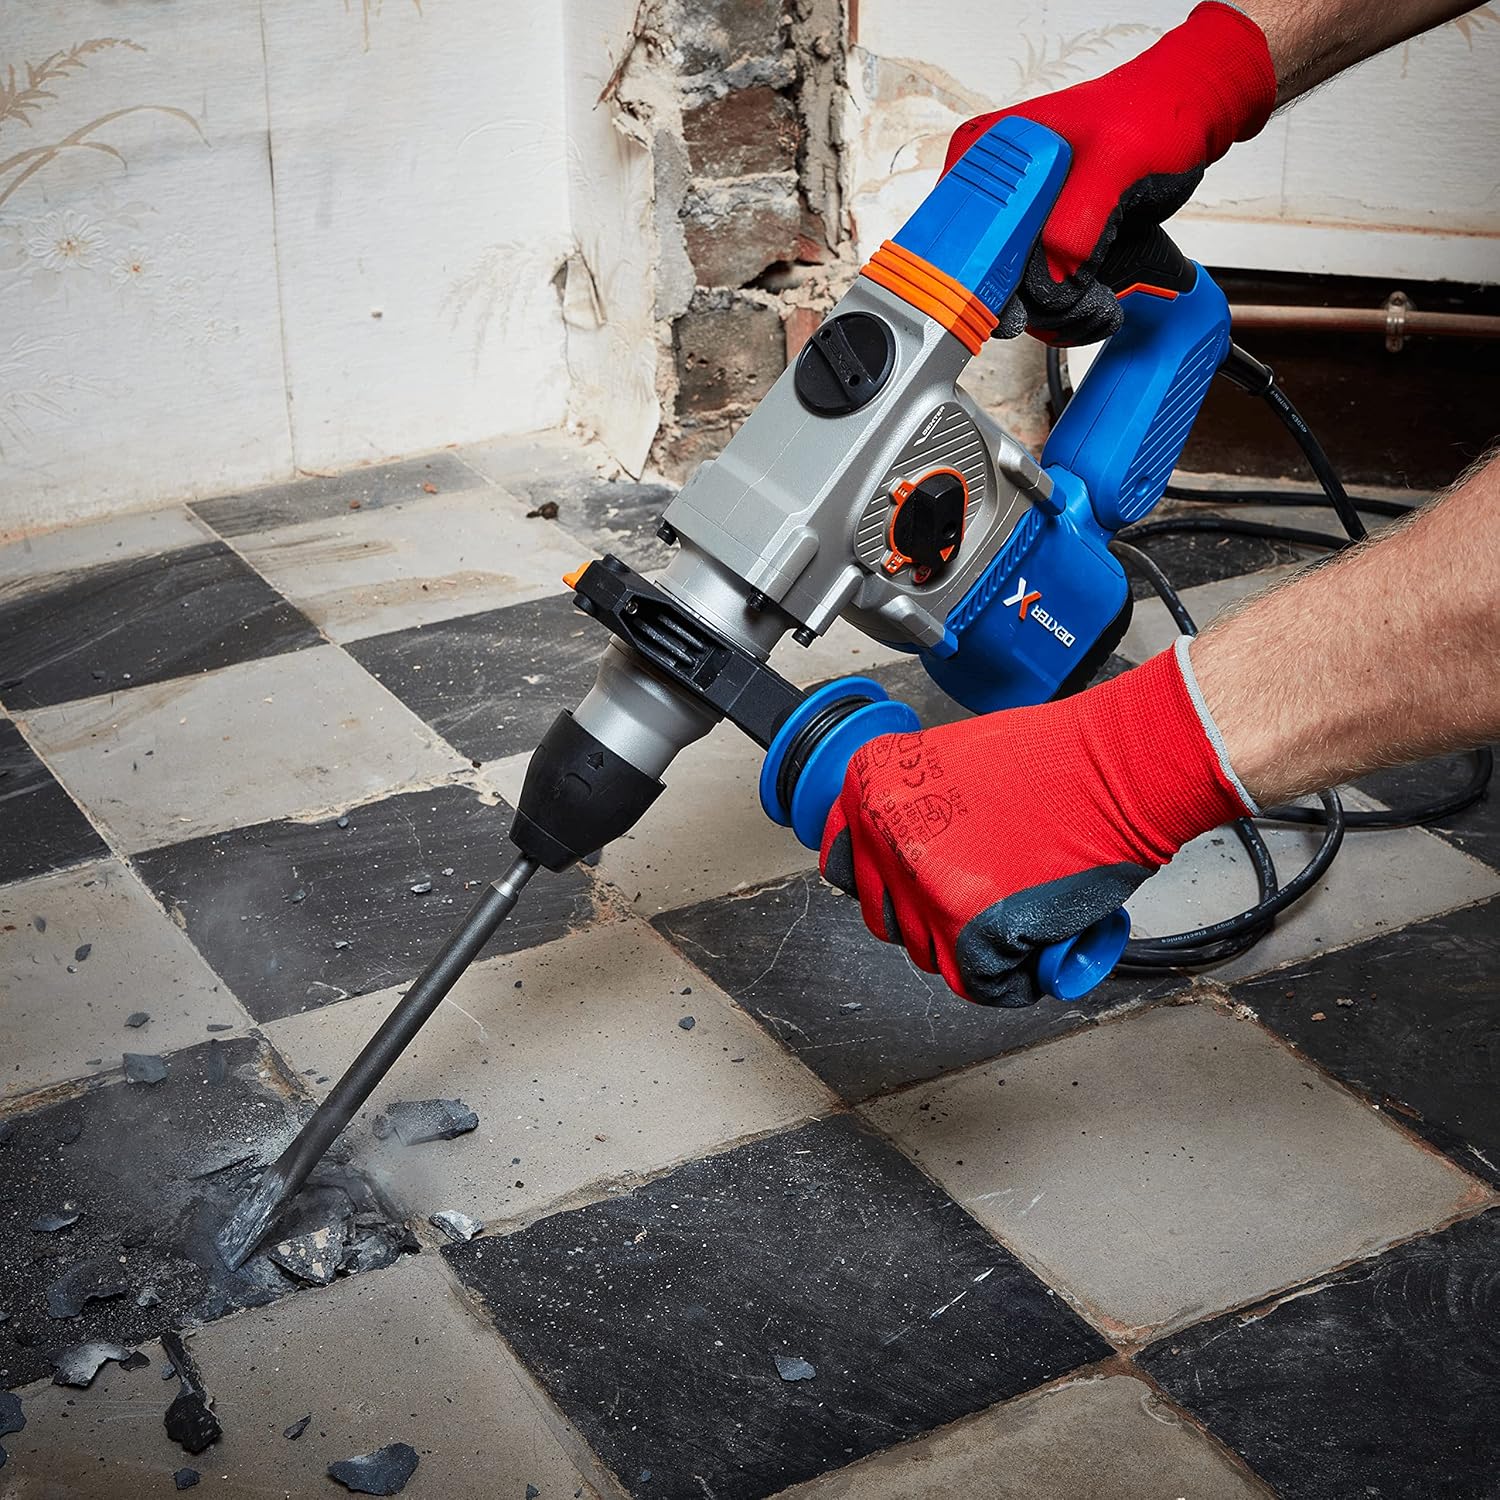
Figure 7: The hammer drill being used to chisel and break up a concrete floor, demonstrating its power in demolition tasks.

Figure 8: An operator using the hammer drill to efficiently remove floor tiles, utilizing the chiseling function.

Figure 9: The hammer drill in action, drilling into a brick wall, showcasing its capability for masonry work.
6. Itọju
Itọju deede ṣe idaniloju gigun ati iṣẹ ṣiṣe to dara julọ ti ọpa rẹ.
- Ninu: Lẹ́yìn lílo kọ̀ọ̀kan, fọ ohun èlò náà pẹ̀lú aṣọ rírọ, damp asọ. Maṣe lo awọn kẹmika ti o lewu tabi awọn afọmọ abrasive. Jeki awọn ṣiṣi afẹfẹ kuro ninu eruku ati idoti.
- Itọju Chuck: Periodically clean and lightly lubricate the SDS Plus chuck to ensure smooth bit insertion and removal.
- Awọn Fọlẹ Erogba: If the tool experiences reduced power or excessive sparking, the carbon brushes may need inspection or replacement. This should ideally be done by a qualified service technician.
- Ibi ipamọ: Tọju ọpa naa ni ibi gbigbẹ, ti o ni aabo ti ko ni arọwọto awọn ọmọde.
7. Laasigbotitusita
Àwọn ọ̀ràn tó wọ́pọ̀ àti àwọn ojútùú tó lè wà níbẹ̀ nìyí.
| Isoro | Owun to le Fa | Ojutu |
|---|---|---|
| Irinṣẹ ko bẹrẹ | No power supply; Faulty power cord/plug | Check power outlet and connections; Inspect power cord for damage. |
| Dinku agbara / išẹ | Worn carbon brushes; Overload; Incorrect mode selection | Have carbon brushes checked/replaced; Reduce load; Ensure correct mode is selected. |
| Bit ko tilekun ni Chuck | Chuck dirty; Bit shank damaged | Clean chuck and bit shank; Use a new bit if damaged. |
| Gbigbọn ti o pọju | Damaged bit; Internal issue | Replace bit; If problem persists, seek professional service. |
8. Awọn pato
| Ẹya ara ẹrọ | Sipesifikesonu |
|---|---|
| Nọmba awoṣe | 3276007131802 |
| Agbara Input | 1500 W |
| Agbara Ipa | 5.1 ayokele |
| O pọju. Oṣuwọn Ipa | 4500 bpm |
| Ko si-Fifuye Iyara | 0-850 rpm |
| Iru Chuck | SDS Plus |
| Agbara Liluho (Igi) | 40 mm |
| Agbara Liluho (irin) | 13 mm |
| Drilling Capacity (Concrete/Brick) | 26 mm |
| Voltage | 230 V |
| Ọja Mefa | 12 x 12 x 32 cm |
| Iwọn Nkan | 8.2 kg |
| USB Ipari | 4 m |
9. Atilẹyin ọja ati Support
DEXTER products are manufactured to high-quality standards. For warranty information, please refer to the warranty card included with your purchase or contact DEXTER customer support. Keep your proof of purchase for any warranty claims.
For technical assistance, spare parts, or service, please contact your local DEXTER authorized service center or visit the official DEXTER webaaye fun awọn alaye olubasọrọ.


