1. Ifihan
Thank you for choosing the Yansoo Dual Dashcam A88A. This manual provides detailed instructions for the proper installation, operation, and maintenance of your new dashcam. Please read this manual thoroughly before use to ensure optimal performance and safety.
2. Package Awọn akoonu
Jọwọ ṣayẹwo package fun awọn nkan wọnyi:
- Kamẹra iwaju
- Kamẹra ẹhin
- Ṣaja ọkọ ayọkẹlẹ
- Afamora Oke
- Okun agbara
- Itọsọna olumulo
- Ninu Asọ

Image: Yansoo Dual Dashcam A88A package contents.
3. Ọja Ipariview
The Yansoo Dual Dashcam A88A features a 3-inch IPS screen, a 1080P front camera with a 170° wide-angle lens, and a 150° waterproof rear camera. It is designed to capture clear video footage ti awọn mejeeji iwaju ati ki o ru ti ọkọ rẹ.

Image: Yansoo Dual Dashcam A88A front and rear cameras with display.
Awọn ẹya pataki:
- Iboju IPS 3-inch: Pese kan ko o view of recordings and settings.
- 1080P Full HD Recording: Captures high-resolution video at 30fps.
- Eto Kamẹra Meji: 170° front camera and 150° rear camera for comprehensive coverage.
- Super Night Vision: F1.8 large aperture, 4 IR LEDs, WDR, and HDR technology for enhanced low-light recording.
- G-Sensọ: Automatically detects collisions and locks video footage.
- Gbigbasilẹ Loop: Àwọn àkọsílẹ̀ máa ń tẹ̀síwájú, wọ́n máa ń tún àwọn àgbà kọ files when the memory card is full (locked videos are protected).
- Atẹle paati: Activates recording upon impact when parked (requires hardwire kit for 24/7 monitoring).
- Iwari išipopada: Records when motion is detected in front of the camera.
4. Eto ati fifi sori
Before installation, ensure you have a Class 10 or above 32GB Micro SD card (not included). Format the card in the camera menu before first use.
4.1. Fifi sori kamẹra iwaju
- Attach the suction mount to the dashcam.
- Clean the desired area on your windshield.
- Press the suction cup firmly against the windshield and twist the knob to secure it.
- Connect the power cable from the dashcam to your car's cigarette lighter interface.
- Route the power cable neatly along the windshield edge and A-pillar to avoid obstructing your view.

Image: Front dashcam mounted on windshield with cable routing.
4.2. Ru kamẹra fifi sori
There are two primary methods for installing the rear camera:
Method 1: Mount on the Rear Windshield
This method involves mounting the rear camera on the inside of your vehicle's rear windshield. The cable can be routed along the headliner and side panels.
Method 2: Install near the License Plate
For external mounting, the rear camera can be installed near your license plate. This typically involves drilling small holes for mounting and cable routing. The red wire from the rear camera cable should be connected to the positive pole of your car's reverse light if you desire the reverse guide line feature. If your car has a reverse system or you do not need the guide line, this red wire connection is optional.
Video: Detailed guide on how to install the rear camera, including routing the cable and connecting the reverse light wire.

Àwòrán: Kámẹ́rà ẹ̀yìn view ati awọn ẹya ara ẹrọ.
5. Awọn ilana Iṣiṣẹ
Once powered on, the dashcam will automatically start recording. Press the 'OK' button to stop recording.
5.1. Ipo Yipada
Long-press the 'M' button to switch between Video Recording, Photo, and Playback modes.
5.2. Loop Gbigbasilẹ
The dashcam supports continuous loop recording in 1, 3, or 5-minute segments. When the memory card is full, the oldest unlocked videos will be automatically overwritten. Videos locked by the G-Sensor are protected from being overwritten.
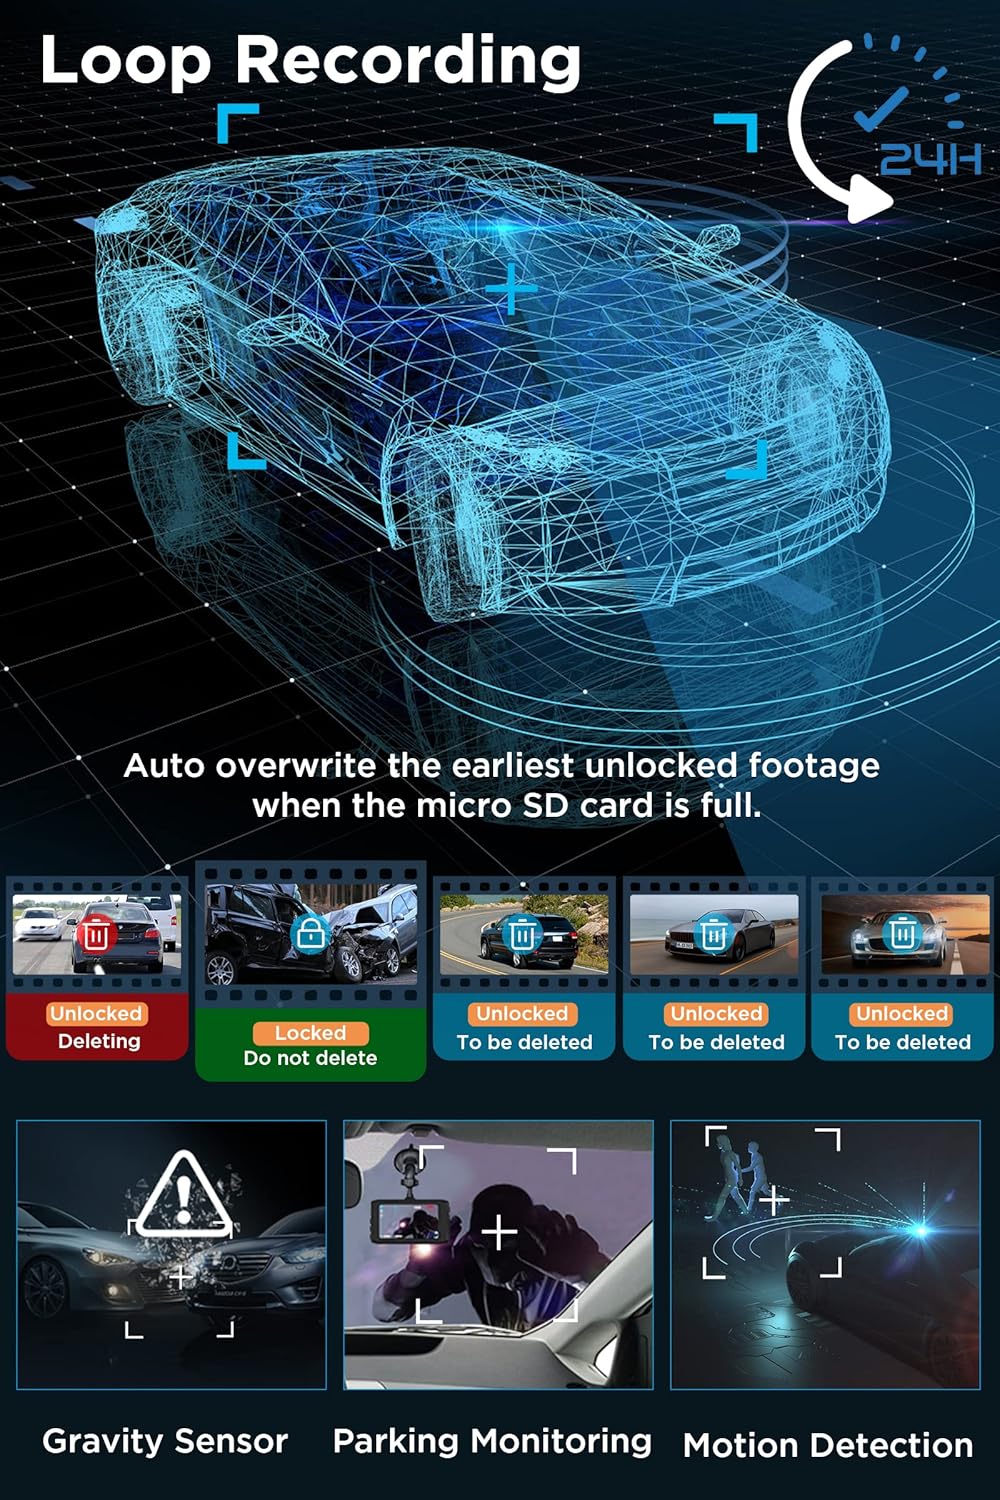
Image: Loop Recording and other key features.
5.3. G-Sensor (Emergency Recording)
The built-in G-Sensor detects sudden impacts or collisions. When an impact reaches the set G-Sensor level, the dashcam will automatically record a 31-second video, lock it, and save it to prevent overwriting.
5.4. Monitoring Parking
When enabled, the parking monitor feature will automatically turn on the dashcam and record a 31-second video if an impact is detected while your car is parked. For 24/7 parking monitoring, a separate hardwire kit is required.
5.5. išipopada erin
When motion detection is enabled, the dashcam will start recording automatically if it detects movement in front of the camera. It is recommended to set Motion Detection to OFF during normal driving to avoid unnecessary recordings.
5.6. Night Iran
The dashcam utilizes an F1.8 large aperture, 4 IR LEDs, and WDR (Wide Dynamic Range) + HDR (High Dynamic Range) technology to enhance low-light sensitivity, ensuring clear and vivid recordings during nighttime driving.

Image: Enhanced Night Vision features.
5.7. Sisisẹsẹhin
O le view recorded videos directly on the dashcam's 3-inch IPS screen or by connecting the memory card to a computer.
6. Eto Akojọ aṣyn
Press the 'M' button (short press) to enter the setup function. Navigate through the menu using the up/down buttons and confirm selections with the 'OK' button.
Niyanju Eto:
- Gravity Sensor Level: Kekere
- Gbigbasilẹ Loop: 3 iṣẹju
- Iwari išipopada: OFF (for normal driving)
- Atẹle paati: ON
- Agbara Aifọwọyi Paa: PAA
7. Itọju
To ensure reliable performance, regularly format your Micro SD card (at least once a month). Use the provided cleaning cloth to keep the camera lenses and screen clear.
8. Laasigbotitusita
- Ẹrọ Didi tabi Aṣiṣe: Use a needle to insert into the small reset hole labeled 'R' on the device to restart it.
- Kamẹra ẹhin Ko han: Check all cable connections for the rear camera. Ensure the cable is not damaged.
- Recording Stops Unexpectedly: Ensure the Micro SD card is Class 10 or higher and has been formatted. The card may be full if loop recording is off or too many locked files tẹlẹ.
- Iran Alẹ Ko dara: Ensure the camera lens is clean. Check that WDR/HDR settings are enabled.
9. Awọn pato
| Ọja Mefa | 3.74 x 0.59 x 1.97 inches |
| Iwọn Nkan | 2.54 iwon |
| Nọmba Awoṣe Nkan | A88A Dash Cam |
| Asopọmọra Technology | USB |
| Pataki Awọn ẹya ara ẹrọ | Built-In Microphone, 1080P FHD, G-Sensor, Parking Monitor, Loop Recording, 170° Wide Angle, WDR, DVR Dashboard Camera, Motion Detection, 3 Inches IPS Screen |
| Ipinnu Yaworan fidio | 1080p |
| Iṣagbesori Iru | Afẹfẹ afẹfẹ |
| Aaye Ti View | Awọn iwọn 170 |
| Àwọ̀ | Dudu |
10. Atilẹyin ọja ati Support
Yansoo offers lifetime after-sales support and a 1-year warranty for the Dual Dashcam A88A. For technical assistance or any questions regarding your dashcam, please contact our customer service team via Amazon or the after-sales email provided in the manual.

Image: Yansoo customer support.


