1. Ifihan
This manual provides essential information for setting up, operating, and maintaining your Intel NUC 11 NUC11PAHi7 Mini PC. Please read this manual thoroughly before using the product to ensure proper functionality and safety.
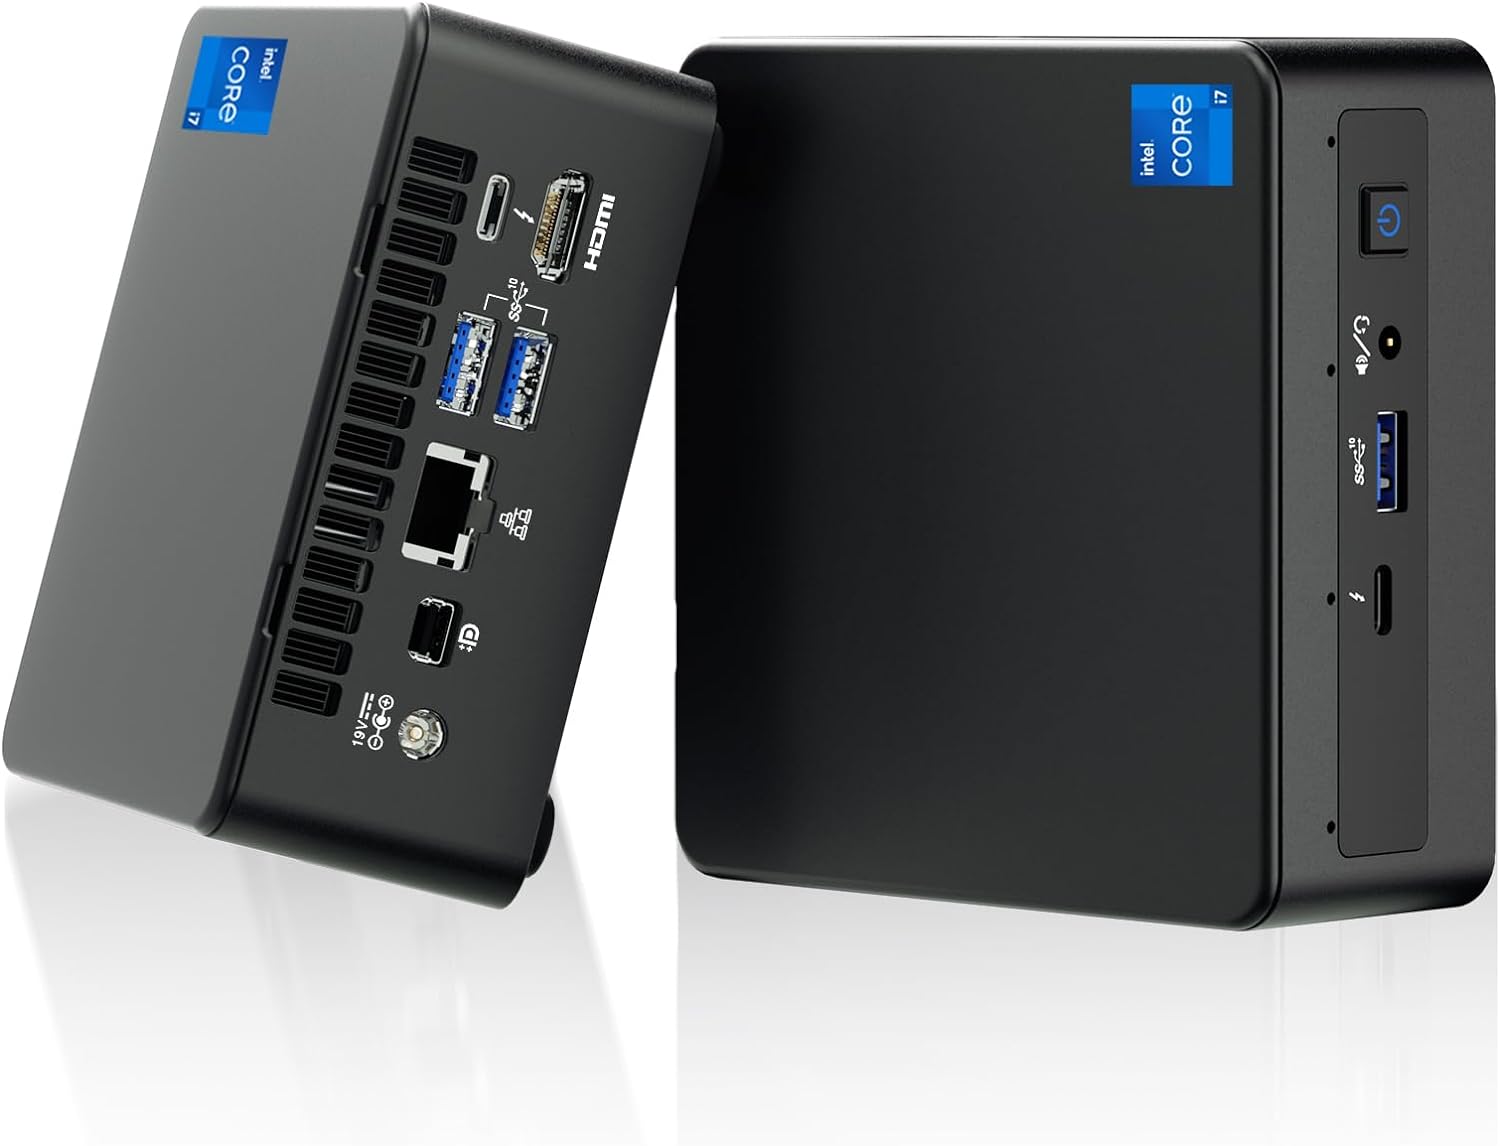
olusin 1: Iwaju ati ki o ru view of the Intel NUC 11 Mini PC, showcasing apẹrẹ kekere rẹ ati awọn ibudo oriṣiriṣi.
2. Ohun ti o wa ninu Apoti
Rí i dájú pé gbogbo àwọn èròjà wà nínú àpótí náà kí o tó tẹ̀síwájú pẹ̀lú ìṣètò náà.
- Intel NUC 11 Mini PC
- Adapter agbara
- US AC Cord
- Oke VESA
- Mounting Screws and M.2 Screws (10 pieces)
- Ilana itọnisọna
- Safety Information Documents (2 pieces)

Figure 2: All items included in the Intel NUC 11 Mini PC packaging, including the mini PC, power adapter, VESA mount, and documentation.
3. Awọn ẹya Ọja
The Intel NUC 11 NUC11PAHi7 Mini PC offers a range of advanced features for various computing needs.
- Olupilẹṣẹ: 11th Gen Intel Core i7-1165G7 (12M Cache, up to 4.70 GHz)
- Awọn aworan: Intel Iris Xe Graphics, supporting 4K UHD and quad-screen display.
- Iranti: 16GB SODIMM DDR4 (3200MHz), dual-channel, upgradeable to 64GB.
- Ibi ipamọ: 512GB M.2 PCIe 2280 SSD, with support for external 2.5-inch 7mm HDD expansion.
- Asopọmọra:
- Meji Thunderbolt 3 ebute oko
- HDMI 2.0b ibudo
- Mini DisplayPort 1.4 port
- Three USB 3.1 Gen2 ports
- Intel Ethernet Controller i225-V (Gigabit 2500Mb/s)
- Intel Wi-Fi 6
- Bluetooth 5.2
- SDXC iho pẹlu UHS-II support
- Jack agbekọri sitẹrio iwaju 3.5mm
- Front consumer infrared port
- Eto isesise: Preinstalled with Windows 11 Pro.
- Awọn ẹya afikun: Beam-forming, far-field, quad-mic array with Alexa support, Kensington Lock Ready.

Olusin 3: Pariview of the Intel NUC 11's core specifications, highlighting the i7 processor, Iris Xe graphics, memory, storage, and network capabilities.

Figure 4: Illustration of the various input/output ports available on the Intel NUC 11, including Thunderbolt 3, HDMI, Mini DisplayPort, USB, LAN, and an SD Card slot.
4. Eto Itọsọna
4.1 Ibẹrẹ Asopọ
- Asopọmọra Ifihan: Connect your monitor(s) to the HDMI, Mini DisplayPort, or Thunderbolt 3 ports using appropriate cables. The NUC supports up to four displays.
- Awọn Agbeegbe Sopọ: Plug in your keyboard, mouse, and any other USB devices into the available USB 3.1 Gen2 ports.
- Isopọ nẹtiwọki: Fún ìsopọ̀ oníwáyà, so okùn Ethernet mọ́ ibudo LAN. Fún alailowaya, ríi dájú pé nẹ́tíwọ́ọ̀kì Wi-Fi rẹ wà.
- Asopọ agbara: Connect the power adapter to the DC-in port on the NUC and then plug the AC cord into a power outlet.
4.2 Agbara Lori
Press the power button located on the front of the unit. The system will boot into Windows 11 Pro. Follow the on-screen instructions for initial Windows setup if this is the first time powering on.
5. Awọn ilana Iṣiṣẹ
5.1 Ipilẹ isẹ
- Eto isesise: Your Intel NUC comes preinstalled with Windows 11 Pro. Familiarize yourself with the Windows interface for daily tasks.
- Ètò Ìfihàn Púpọ̀: Utilize the multiple display outputs (HDMI, Mini DisplayPort, Thunderbolt 3) to extend your desktop across several monitors for enhanced productivity.
- Asopọ Alailowaya: Connect to Wi-Fi 6 networks for high-speed wireless internet access. Use Bluetooth 5.2 for connecting wireless peripherals like headphones or keyboards.
- USB and Thunderbolt Ports: Use the USB 3.1 Gen2 ports for high-speed data transfer with external drives and peripherals. The Thunderbolt 3 ports offer even faster data transfer, video output, and power delivery capabilities.

Figure 5: The Intel NUC 11 connected to a monitor, illustrating its advanced networking capabilities with WiFi 6 and Bluetooth 5.2.
6. Itọju ati awọn iṣagbega
6.1 Gbogbogbo Itọju
- Jeki ẹrọ naa ni agbegbe ti o ni afẹfẹ daradara lati ṣe idiwọ igbona.
- Regularly clean the exterior with a soft, dry cloth. Avoid liquid cleaners.
- Ensure software and drivers are updated for optimal performance and security.
6.2 Memory and Storage Upgrades
The Intel NUC 11 allows for memory and storage expansion:
- Ramu: The device supports dual-channel DDR4 SODIMM memory, upgradeable to a maximum of 64GB (2 x 32GB, up to 3200MHz).
- SSD: The preinstalled 512GB M.2 PCIe 2280 SSD can be upgraded. Additionally, the unit supports an external 2.5-inch 7mm HDD expansion (not included) for increased storage capacity.
Caution: Before performing any internal upgrades, ensure the device is powered off and unplugged. Refer to the detailed instructions in the Intel NUC technical documentation for proper installation procedures. Removing memory and SSD before aftermarket service is recommended for privacy and security.

Figure 6: Illustration of the internal components, specifically the 512GB M.2 SSD and 16GB DDR4 RAM modules, indicating upgrade potential.
7. Laasigbotitusita
Abala yii n pese awọn ojutu si awọn ọran ti o wọpọ ti o le ba pade.
- Ko si Agbara:
- Ensure the power adapter is securely connected to both the NUC and a working power outlet.
- Rii daju pe iṣan agbara n ṣiṣẹ nipa idanwo rẹ pẹlu ẹrọ miiran.
- Ko si Ifihan:
- Check all display cable connections (HDMI, Mini DisplayPort, Thunderbolt 3) between the NUC and the monitor.
- Rii daju pe atẹle naa wa ni titan ati ṣeto si orisun titẹ sii to tọ.
- Gbiyanju lati so mọ ifihan miiran tabi lo okun waya miiran.
- Ko si Asopọ Ayelujara:
- For wired connections, ensure the Ethernet cable is properly connected and your router is working.
- For Wi-Fi, check if Wi-Fi is enabled in Windows settings and if you are connected to the correct network with the right password.
- Restart your router and the NUC.
- Ilọkuro eto:
- Pa awọn ohun elo ti ko wulo ti nṣiṣẹ ni abẹlẹ.
- Ṣayẹwo Oluṣakoso Iṣẹ-ṣiṣe fun awọn ilana ti n gba Sipiyu giga tabi Ramu.
- Rii daju pe Windows ati awọn awakọ ti wa ni imudojuiwọn.
- Consider performing a disk cleanup or defragmentation (for HDDs, not SSDs).
8. Awọn pato
| Ẹya ara ẹrọ | Ẹ̀kúnrẹ́rẹ́ |
|---|---|
| isise | 11th Gen Intel Core i7-1165G7 (2.8 GHz, up to 4.7 GHz Turbo, 4 cores, 8 threads, 12 MB Cache) |
| Awọn aworan | Intel Iris Xe Graphics (Iṣepọ) |
| Àgbo | 16 GB DDR4 (3200MHz), expandable to 64 GB |
| Ibi ipamọ | 512 GB M.2 PCIe SSD (NVMe PCIe Gen4) |
| Eto isesise | Windows 11 Pro |
| Alailowaya Asopọmọra | Intel Wi-Fi 6, Bluetooth 5.2 |
| Ti firanṣẹ Asopọmọra | Intel Ethernet Controller i225-V (2.5 Gigabit) |
| Awọn ibudo (Iwaju) | 1x USB 3.1 Gen2, 1x Thunderbolt 3, 3.5mm Headset Jack, Power Button |
| Awọn ibudo (Ẹhin) | 2x USB 3.1 Gen2, 1x Thunderbolt 3, HDMI 2.0b, Mini DisplayPort 1.4, LAN, DC-in |
| Other Ports/Slots | SDXC slot with UHS-II support, Kensington Security Slot, Front Consumer Infrared Port |
| Awọn iwọn (LxWxH) | 4.6 x 4.4 x 2 inches |
| Iwọn | 3.1 poun (isunmọ 1.4 kg) |
| Àwọ̀ | Dudu |

Figure 7: A detailed comparison table outlining the specifications for different Intel NUC 11 Performance Mini PC and Kit configurations, including processor, graphics, memory, and storage options.
9. Alaye Aabo
Please observe the following safety guidelines to prevent damage to the device or personal injury.
- Use only the provided power adapter and AC cord.
- Ma ṣe fi ẹrọ naa han si awọn iwọn otutu to gaju, ọriniinitutu, tabi imọlẹ orun taara.
- Yẹra fún gbígbé ẹ̀rọ náà sí ibi tí ooru ti ń gbóná tàbí sí àwọn ibi tí afẹ́fẹ́ kò ti ń fẹ́ dáadáa.
- Do not open the chassis unless performing authorized upgrades (RAM/SSD) and always disconnect power first.
- Jeki ẹrọ naa kuro ninu awọn olomi.
- If you encounter any issues, refer to the troubleshooting section or contact support before attempting repairs.

Figure 8: Important safety warnings and precautions provided in multiple languages, covering electrical safety, environmental conditions, and proper usage.
10. Atilẹyin ọja ati Support
Your Intel NUC 11 Mini PC comes with a comprehensive warranty and support:
- Atilẹyin ọja: A 3-year global warranty from Intel and GEEK+ is provided. This includes a 3-year free Warranty Service from Intel for the NUC Barebone part. RAM, SSD, and OS are covered by a three-year warranty provided by GEEK+.
- Atilẹyin: For issues with the NUC Barebone part, you can contact local Intel NUC after-sales locations directly. For other inquiries or assistance, send a message to GEEK+ for help.
- Asiri ati Aabo: To ensure your privacy and security, it is recommended to remove the Memory and SSD before sending the unit for aftermarket service.
For further assistance, please refer to the official Intel NUC support webojula tabi kan si alagbata rẹ.


