1. Ti pariview
This instruction manual provides essential information for the proper installation and maintenance of your Aries Front Hub Wheel Bearing Kit. This kit is a high-quality replacement part designed to meet OEM standards for various JCB models, specifically the front hub assembly.
The kit includes all necessary components for replacing the front wheel bearing, ensuring smooth and reliable operation of your machinery's wheel assembly. Please verify the part number against your equipment's manual for compatibility before proceeding with installation.
2. Alaye Aabo
Ikilọ: Installation of automotive or heavy machinery parts can be complex and dangerous if not performed correctly. It is highly recommended that installation be performed by a qualified professional or experienced mechanic.
- Nigbagbogbo wọ ohun elo aabo ti ara ẹni ti o yẹ (PPE), pẹlu awọn gilaasi aabo, awọn ibọwọ, ati bata bata to lagbara.
- Ensure the vehicle or machinery is securely supported on jack stands or a lift before beginning any work. Never rely solely on a jack.
- Disconnect the battery if working near electrical components.
- Lo awọn irinṣẹ to tọ fun igbesẹ kọọkan ti ilana fifi sori ẹrọ.
- Refer to your specific machinery's service manual for detailed torque specifications and additional safety procedures.
- Pa awọn ọmọde ati awọn ohun ọsin kuro ni agbegbe iṣẹ.
3. Awọn akoonu Kit
Your Aries Front Hub Wheel Bearing Kit (Part No. 993/03300) typically includes the following components. Please inspect all parts upon receipt to ensure everything is present and undamaged.
- Tapered Roller Bearings (Inner and Outer)
- Bearing Races (Inner and Outer)
- Wheel Seal
- Hub Cap / Dust Cap
- Retaining Nut / Castle Nut
- Ifoso

Figure 3.1: Complete Aries Front Hub Wheel Bearing Kit components, including bearings, races, seal, hub cap, nut, and washer.
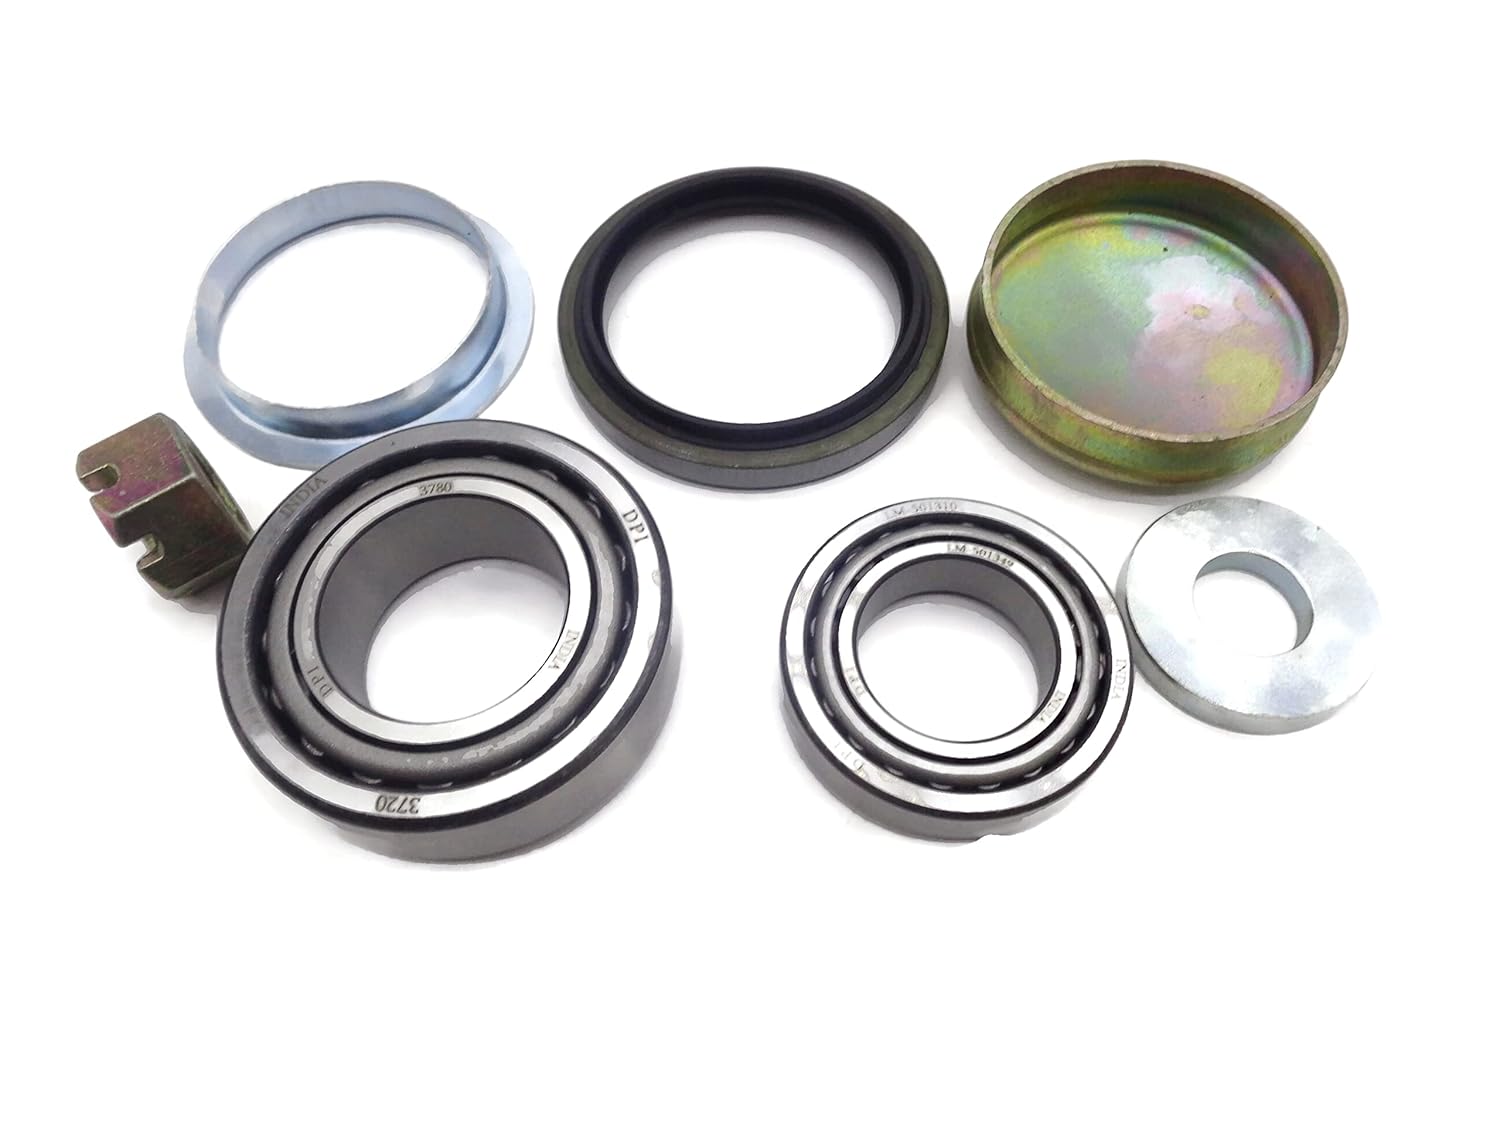
Figure 3.2: A closer look at the individual components of the bearing kit, highlighting the tapered roller bearings and their corresponding races.

Figure 3.3: Another perspective of the Aries Front Hub Wheel Bearing Kit, showing the arrangement of parts.

olusin 3.4: Overhead view of the Aries Front Hub Wheel Bearing Kit components, providing a clear layout of all included items.
4. Itọsọna fifi sori ẹrọ
This section provides a general guide for the installation of the front hub wheel bearing kit. Specific steps and torque values may vary depending on your JCB model. Always consult your machinery's official service manual for precise instructions.
- Igbaradi:
- Park the machinery on a level surface and engage the parking brake.
- Loosen the lug nuts on the wheel to be serviced.
- Raise the front of the machinery using a suitable jack and secure it with jack stands.
- Yọ àkójọ kẹ̀kẹ́ àti taya kúrò.
- Disas Karo:
- Remove the brake caliper and rotor (if applicable) and secure them out of the way without straining the brake hose.
- Remove the dust cap, cotter pin, and castle nut from the spindle.
- Carefully slide the hub assembly off the spindle.
- Remove the old inner and outer bearings, seal, and races from the hub. Clean the hub thoroughly, removing all old grease and debris.
- Bearing Race Installation:
- Using a bearing race driver or a suitable socket, carefully tap the new inner and outer bearing races into the clean hub until they are fully seated. Ensure they are not cocked.
- Bearing and Seal Installation:
- Pack the new inner and outer bearings thoroughly with high-quality wheel bearing grease. Ensure grease is forced into all voids of the bearing.
- Place the packed inner bearing into the hub.
- Install the new wheel seal using a seal driver or a block of wood and hammer, ensuring it is seated flush.
- Hub Assembly Installation:
- Carefully slide the hub assembly onto the spindle.
- Install the packed outer bearing, washer, and castle nut.
- Bearing Adjustment: Tighten the castle nut to the manufacturer's specified torque, then back it off slightly (typically 1/4 to 1/2 turn) to align the cotter pin hole. Insert a new cotter pin. This step is critical for proper bearing life and function.
- Install the new dust cap.
- Atunjọ:
- Reinstall the brake rotor and caliper.
- Mount the wheel and tire assembly, hand-tighten the lug nuts.
- Lower the machinery to the ground and torque the lug nuts to the manufacturer's specifications in a star pattern.
- Ṣayẹwo Ipari:
- Test drive the machinery at low speeds to ensure proper function and listen for any unusual noises.
- Recheck lug nut torque after 50-100 miles of operation.
5. Post-Installation & Maintenance
Proper maintenance ensures the longevity and performance of your new wheel bearing kit.
- Ayẹwo igbagbogbo: Periodically inspect the wheel hub area for any signs of grease leakage, unusual wear, or looseness.
- Noise Monitoring: Pay attention to any new noises coming from the wheel area, such as grinding, humming, or roaring sounds, which could indicate bearing issues.
- Ṣayẹwo iwọn otutu: After extended operation, carefully check the temperature of the hub. Excessive heat can be a sign of bearing problems.
- Lubrication: Depending on your machinery's service schedule, wheel bearings may require periodic re-greasing. Consult your machinery's manual for recommended intervals and grease types.
6. Laasigbotitusita wọpọ oran
If you experience issues after installation, consider the following common problems and potential causes:
| Aisan | Owun to le Fa |
|---|---|
| Grinding or roaring noise from wheel | Improper bearing preload (too tight or too loose), lack of lubrication, or damaged bearing. |
| Excessive wheel play/wobble | Loose castle nut, worn bearings, or improper installation. |
| Hub overheating | Bearings too tight, insufficient lubrication, or incorrect bearing type. |
| Grease leakage from hub cap/seal | Damaged or improperly installed seal, excessive grease packing. |
If troubleshooting does not resolve the issue, or if you are unsure, it is best to consult a professional mechanic.
7. Awọn alaye ọja
| Sipesifikesonu | Ẹ̀kúnrẹ́rẹ́ |
|---|---|
| Brand | Aries |
| Part Number (Primary) | 993/03300 |
| Associated Part Numbers | 907/04100, 907/05700, 904/06200, 904/06201, 1340/0905Z, 120/30006, 120/30009 |
| Ohun elo | Alloy Irin |
| Fastener Iru | Kẹkẹ |
| Olupese | Aries |
| Idiyele Ipele | Aerospace (as per product specifications) |
8. Atilẹyin & Atilẹyin ọja
Didara ọja: This Aries Front Hub Wheel Bearing Kit is manufactured to OEM standards. We source our stock from Top Quality Manufacturers (TQM) with OEM contracts, ensuring you receive an OEM specification product.
Ṣayẹwo ibamu: If you are unsure about the suitability of this part for your specific machinery, it is highly recommended to message the seller with your JCB Machine Serial Number (VIN) before purchase. The seller can assist in verifying compatibility.
Awọn ibeere Gbogbogbo: For any questions regarding the product, its application, or if you are looking for other JCB parts not listed, please contact the seller directly through the platform where the purchase was made. They are JCB specialty super stockists and can assist with a wide range of parts.


