1. Ifihan
This manual provides detailed instructions for the setup, operation, and maintenance of your Alecto WS5200 Professional 6-in-1 Wireless Weather Station. Please read this manual thoroughly before using the device to ensure correct installation and optimal performance.
The Alecto WS5200 is designed to provide comprehensive local weather data, including temperature, humidity, atmospheric pressure, wind speed, wind direction, and rainfall. It features Wi-Fi connectivity for app control and integration with online weather services.
2. Package Awọn akoonu
Daju pe gbogbo awọn nkan ti a ṣe akojọ rẹ si isalẹ wa ninu package rẹ:
- Weather Station Indoor Display Unit
- Wireless Outdoor Sensor (integrated 6-in-1 sensor)
- Adapter agbara
- Okun Ngba agbara USB
- Mounting Brackets (2x) with Nuts (4x)
- Ẹya iho Socket
- AA Batteries (2 for indoor unit included, 2 for outdoor sensor not included - please purchase separately)
- User Manual (multi-language)
- Aabo Alaye Dì
3. Ọja Ipariview
3.1. Indoor Display Unit
The indoor unit features a clear 4.9-inch (12.5 cm) backlit display. It shows current and historical weather data, date, and time. It can be powered by the included power adapter or two AA batteries.

Image: The Alecto WS5200 indoor display unit showing current weather data, time, and forecast, alongside icons for App Store, Google Play, Wi-Fi, and smart home integration.

Image: The Alecto WS5200 indoor display unit mounted on a light-colored wall, showing its clear, backlit screen with weather information.

Image: A hand holding the Alecto WS5200 indoor display unit, demonstrating its portable size and clear screen readability.

Aworan: Ẹyin view of the Alecto WS5200 indoor display unit, showing the battery compartment, stand, and control buttons on the side.
3.2. Wireless Outdoor Sensor
The outdoor sensor is a 6-in-1 unit that wirelessly transmits data to the indoor display and your connected app. It measures temperature, humidity, atmospheric pressure, wind speed, wind direction, and rainfall. It requires two AA batteries (not included).

Image: The complete Alecto WS5200 weather station, showing the outdoor sensor assembly (anemometer, wind vane, rain gauge, temperature/humidity sensor) and the indoor display unit.
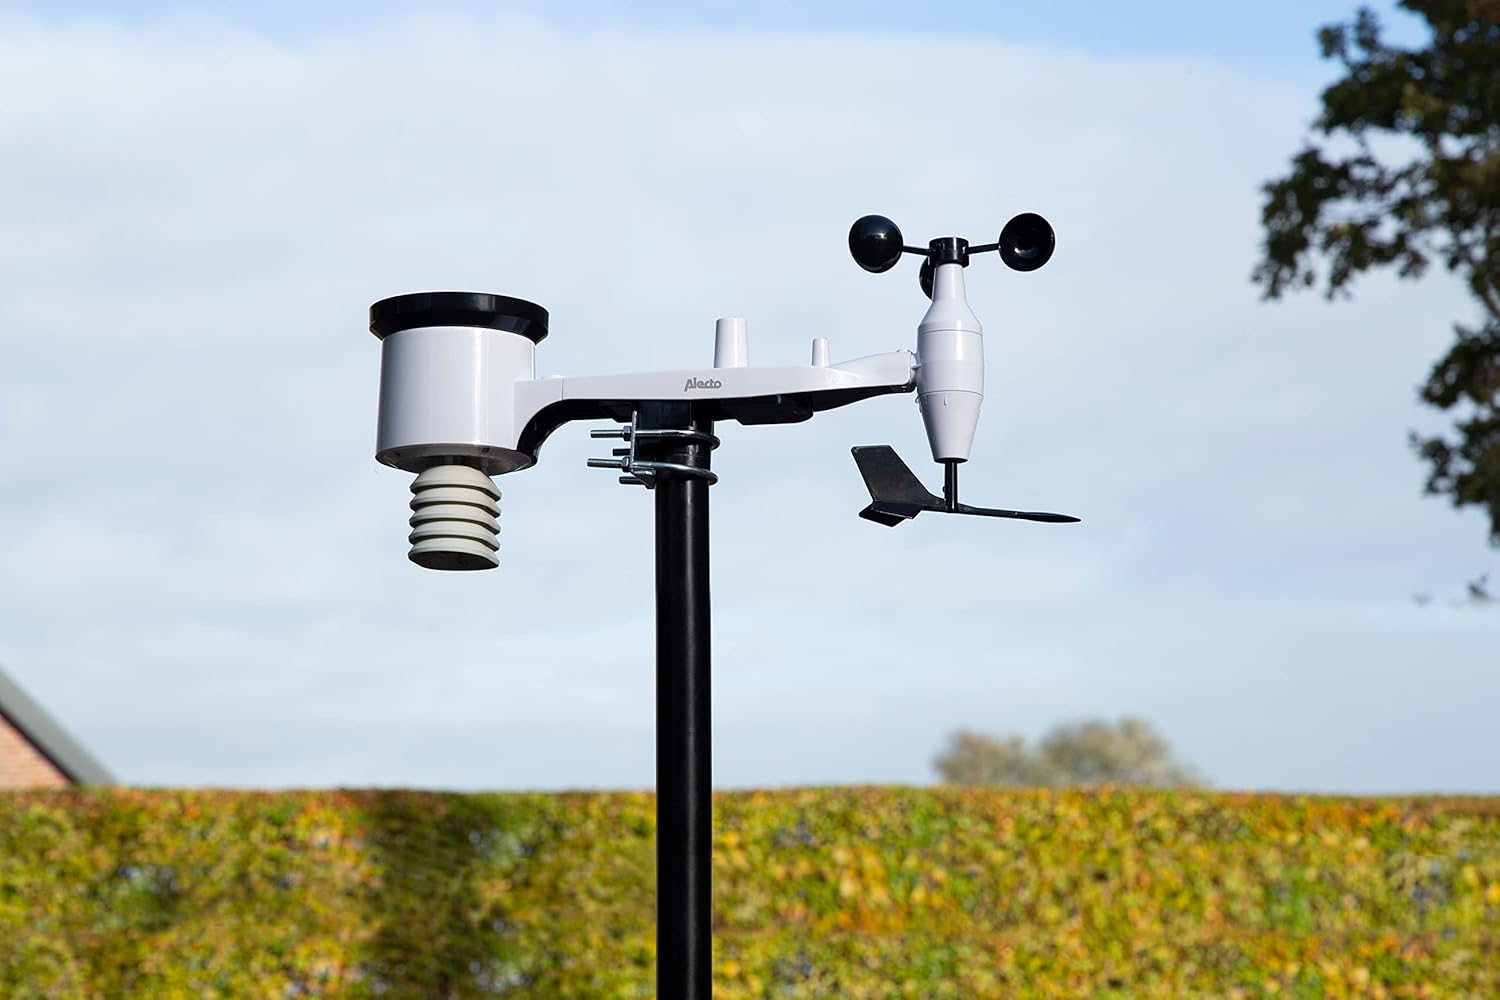
Image: The Alecto WS5200 outdoor sensor assembly mounted on a pole in a garden setting, demonstrating its typical installation.

Image: Close-up of the anemometer cups on the Alecto WS5200 outdoor sensor, used for measuring wind speed.

Image: Close-up of the wind vane on the Alecto WS5200 outdoor sensor, indicating wind direction.

Image: Close-up of the rain gauge funnel on the Alecto WS5200 outdoor sensor, designed to collect and measure rainfall.
4. Eto
4.1. Powering the Indoor Display Unit
- Connect the included power adapter to the indoor display unit and plug it into a wall outlet.
- Alternatively, insert two AA batteries (included) into the battery compartment on the back of the unit. The unit can operate on battery power, but the power adapter is recommended for continuous operation and backlight functionality.
4.2. Fifi awọn batiri ni Ita gbangba sensọ
- Locate the battery compartment on the outdoor sensor.
- Insert two AA batteries (not included) into the compartment, ensuring correct polarity.
- Securely close the battery compartment to protect against weather elements.
4.3. Mounting the Outdoor Sensor
For accurate readings, the outdoor sensor should be installed in an open area, free from obstructions that could affect wind, rain, or temperature measurements. Avoid placing it directly against a wall.
- Assemble the mounting pole and brackets using the provided socket wrench and nuts.
- Attach the outdoor sensor to the assembled pole.
- Mount the pole in a suitable outdoor location, ensuring it is stable and level. The wireless range between the outdoor sensor and indoor unit is approximately 30 meters in an unobstructed line of sight.
4.4. Wi-Fi Connection and App Setup
- Ensure your indoor display unit is powered on.
- Follow the on-screen instructions or refer to the dedicated app manual (if provided) to connect the weather station to your local Wi-Fi network.
- Download the companion app (e.g., WS View) from your smartphone's app store (App Store for iOS, Google Play for Android).
- Open the app and follow the instructions to pair your weather station. This will allow you to view data, configure settings, and connect to online weather platforms like Weather-Underground, ECOWITT, Weather-Cloud, and WOW.
- The internet connection ensures automatic time and date synchronization and firmware updates.
5. Ṣiṣẹ Ibusọ Oju-ọjọ
5.1. Indoor Display Unit Functions
The indoor display unit provides real-time and historical data. Use the buttons on the unit (refer to the diagram in the full manual for button layout) to navigate through different displays:
- Current Readings: Displays live temperature (indoor/outdoor), humidity (indoor/outdoor), atmospheric pressure, wind speed, wind direction, and daily rainfall.
- Data Itan: Access minimum and maximum recorded values for various parameters.
- Asọtẹlẹ: Provides a general weather forecast based on atmospheric pressure trends.
- Akoko ati Ọjọ: Automatically synchronized via Wi-Fi.
5.2. Iṣakoso ati Awọn ẹya ara ẹrọ ti Ohun elo
The dedicated app extends the functionality of your weather station:
- Abojuto latọna jijin: View all weather data from your smartphone or tablet, anywhere with an internet connection.
- Gbigba data: Access detailed historical data and trends.
- Àwọn Ìkìlọ̀ Àṣà: Set up alerts for specific high or low temperature, humidity, or rainfall values.
- Platform Integration: Connect to popular online weather networks to share your data and access data from other stations globally.
- Iṣiro Awọn iye: The system calculates additional data such as wind chill, heat index, and dew point for the next 24 hours based on real-time and historical data.
6. Itọju
6.1. Batiri Rirọpo
- Unit ninu ile: If using batteries, replace them when the low battery indicator appears on the display.
- Sensọ ita gbangba: Replace the two AA batteries in the outdoor sensor annually or when the low battery indicator for the outdoor sensor appears. Ensure the battery compartment is sealed properly after replacement.
6.2. Ninu
- Unit ninu ile: Nu iboju naa ki o si casing pẹlu asọ, damp asọ. Yago fun abrasive ose.
- Sensọ ita gbangba: Periodically check the rain gauge funnel, anemometer cups, and wind vane for debris (leaves, dirt, insects) and clean gently to ensure accurate readings.
7. Laasigbotitusita
- No Display on Indoor Unit:
Ensure the power adapter is securely connected or that the AA batteries are correctly inserted and not depleted.
- Ko si data sensọ ita gbangba:
Check if the outdoor sensor batteries are installed correctly and are not depleted. Ensure the outdoor sensor is within the 30-meter wireless range of the indoor unit and there are no major obstructions. Try re-pairing the sensor with the indoor unit (refer to the full manual for specific re-pairing instructions).
- Awọn ọran Isopọ Wi-Fi:
Verify your Wi-Fi network is active and the password is correct. Ensure the weather station is within range of your Wi-Fi router. Restart both the weather station and your router if issues persist.
- Awọn kika ti ko pe:
Ensure the outdoor sensor is mounted in an unobstructed location, away from heat sources or direct sunlight that could skew temperature readings. Clean the rain gauge and ensure the anemometer and wind vane spin freely.
- Àkókò/Ọjọ́ Àìtọ́:
Confirm the weather station is successfully connected to Wi-Fi, as time and date synchronization occur automatically via the internet.
8. Awọn pato
| Ẹya ara ẹrọ | Ẹ̀kúnrẹ́rẹ́ |
|---|---|
| Awoṣe | WS5200 |
| Àwọn Ìwọ̀n Ẹyọ Inú Ilé (H x W x D) | 109 x 104 x 27 mm |
| Àwọn Ìwọ̀n Ẹ̀yà Ìta gbangba (H x W x D) | 200 x 460 x 115 mm |
| Abe ile Unit Power | Power adapter (included) or 2x AA batteries (included) |
| Ita gbangba Sensọ Power | 2x AA batiri (ko si) |
| Wireless Range (Outdoor Sensor) | Titi di awọn mita 30 (laisi idilọwọ) |
| Asopọmọra | Wi-Fi |
| Idiwon Parameters | Temperature (indoor/outdoor), Humidity (indoor/outdoor), Atmospheric Pressure, Wind Speed, Wind Direction, Rainfall |
| Pataki Awọn ẹya ara ẹrọ | Alarm, Clock, Wireless, App Control, Online Weather Platform Integration |
9. Atilẹyin ọja ati Support
Warranty information for the Alecto WS5200 is typically provided with your purchase documentation or can be found on the official Alecto webojula. Jọwọ ṣe idaduro ẹri rira rẹ fun awọn iṣeduro atilẹyin ọja.
For technical support, troubleshooting assistance beyond this manual, or to inquire about replacement parts, please visit the official Alecto support webojú-òpó wẹ́ẹ̀bù tàbí kí o kàn sí ẹ̀ka iṣẹ́ ìtọ́jú oníbàárà wọn. Àwọn àlàyé ìbánisọ̀rọ̀ sábà máa ń wà lórí ilé iṣẹ́ olùpèsè webaaye tabi ni apoti ọja.


