Ọrọ Iṣaaju
Thank you for choosing the Oasser Tyre Inflator Air Compressor. This portable and versatile air compressor is designed for efficient inflation of car tyres, motorcycle tyres, bicycle tyres, and various inflatable items such as balls. Featuring dual power supply options (12V DC for car and 240V AC for home), a digital display, automatic shut-off, and an integrated LED light, it provides a convenient and reliable solution for your inflation needs.
Please read this manual thoroughly before operation to ensure safe and optimal performance of your device. Keep this manual for future reference.
Alaye Aabo
- Máa lo inflator náà ní agbègbè tí afẹ́fẹ́ lè máa tàn kálẹ̀ dáadáa.
- Ma ṣe lọ kuro ni inflator laini abojuto lakoko iṣẹ.
- Jeki kuro ni arọwọto awọn ọmọde.
- Avoid over-inflating. Always refer to the recommended pressure for the item being inflated.
- It is recommended to turn off the compressor and allow it to cool for 5-10 minutes after every 8 minutes of continuous use to extend its lifespan.
- Ma ṣe fi ẹrọ fifun sita si ojo tabi awọn ipo tutu.
- Ensure the power source matches the inflator's voltage requirements (12V DC or 240V AC).
- Má ṣe gbìyànjú láti tú tàbí tún ẹ̀rọ náà ṣe fúnra rẹ. Pe àwọn òṣìṣẹ́ tó mọ̀ nípa iṣẹ́ náà fún iṣẹ́ náà.
Package Awọn akoonu
Jẹrisi pe gbogbo awọn ohun kan wa ninu package:
- Oasser Tyre Inflator Air Compressor (Model: ATJ-6488)
- 60cm Compressed Air Hose
- 3m Car Charger (12V DC)
- 1.6m AC Charger (240V AC)
- 4 Nozzle Adaptors (for cars, bicycles, balls, etc.)
- Apoju Fiusi
- Apo ipamọ

Image: The Oasser Tyre Inflator Air Compressor shown with its various components including the main unit, power cables, and nozzle adaptors.

Image: A closer look at the Oasser inflator unit, highlighting the digital display, control buttons, and the various nozzle adaptors included for different inflation needs.
Ọja Pariview
Familiarize yourself with the main parts of your Oasser Tyre Inflator:
- Ifihan Digital: Shows current pressure and allows setting target pressure.
- Awọn bọtini Iṣakoso: Power, unit selection (PSI, BAR, KPA, Kg/cm²), and pressure adjustment (+/-).
- Isopọ Air Hose: Point for attaching the compressed air hose.
- Imọlẹ LED: Provides illumination for night use or low-light conditions.
- Iṣawọle DC 12V: Fun sisopọ ṣaja ọkọ ayọkẹlẹ.
- AC 240V Input: For connecting the home charger.
- Hose Storage Slot: Integrated storage for the air hose.
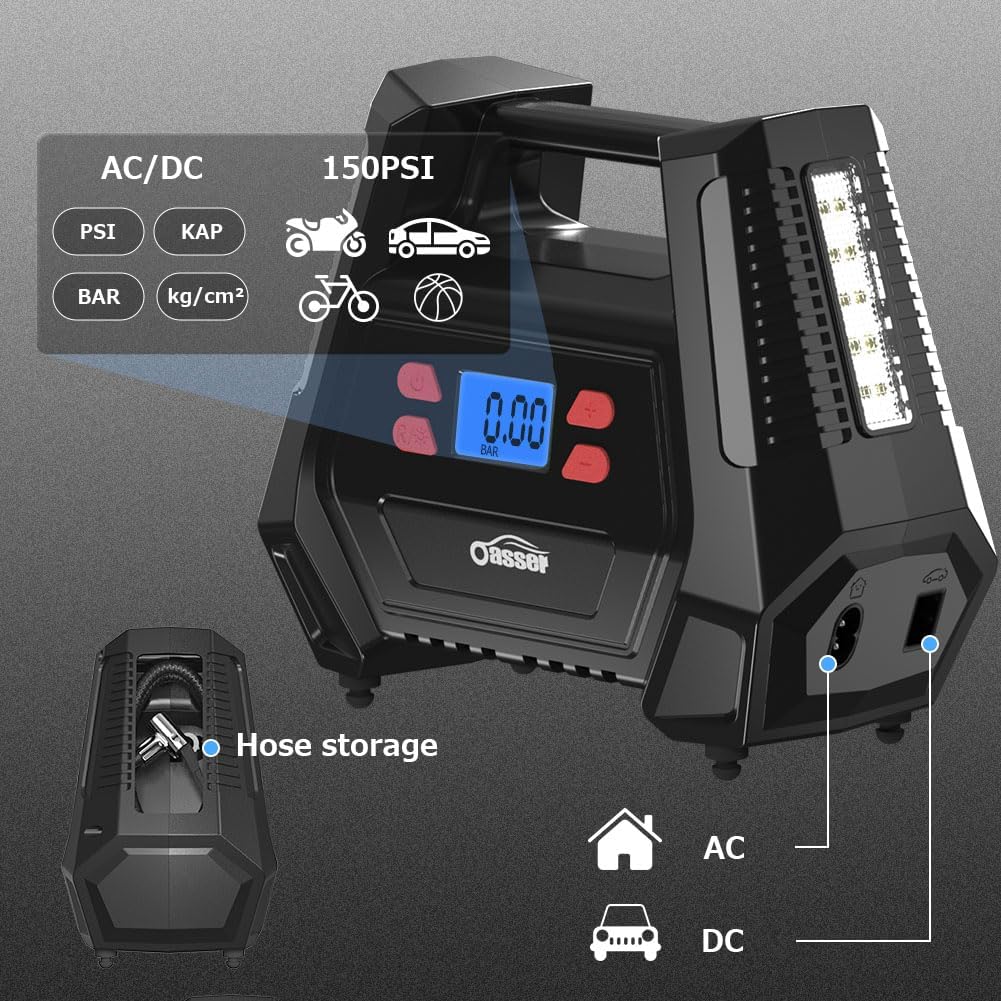
Image: The Oasser inflator highlighting its dual AC/DC power inputs and the convenient hose storage compartment on the side.
Ṣeto
- Yan Orisun Agbara:
- For car use: Connect the 3m car charger to the 12V DC input on the inflator and plug the other end into your vehicle's 12V socket.
- For home use: Connect the 1.6m AC charger to the 240V AC input on the inflator and plug the other end into a standard wall outlet.

Image: Illustration of connecting the Oasser inflator to both a car's 12V DC socket and a home's 240V AC outlet, demonstrating its dual power capability.
- So Air Hose: Screw the compressed air hose securely onto the inflator's air hose connection port.
Awọn ilana Iṣiṣẹ
General Inflation Steps:
- Agbara Tan: Tẹ bọtini agbara (⏻) to turn on the inflator. The digital display will light up.
- Yan Ẹka: Press the 'R' button to cycle through desired pressure units: PSI, BAR, KPA, or Kg/cm².
- Ṣeto Ipa Ibi-afẹde: Use the '+' and '-' buttons to set your desired target pressure. The display will show the set value.
- Sopọ si Nkan: Remove the valve cap from the item you wish to inflate. Securely attach the air hose nozzle to the valve stem. For different items (bicycles, balls), use the appropriate nozzle adaptor.
- Ibẹrẹ Iṣeduro: Press the inflation button (▶) to begin inflation. The compressor will automatically stop once the preset pressure is reached.
- Atẹle Ipa: The digital display will show the current pressure during inflation.
- Ge asopọ: Once inflation is complete, quickly disconnect the nozzle from the valve stem and replace the valve cap.
- Agbara Pa: Tẹ bọtini agbara (⏻) to turn off the inflator.

Image: A visual guide demonstrating the four key steps for operating the inflator: connecting power, attaching to tire valve, setting pressure, and starting inflation.
Lilo Imọlẹ LED:
The integrated LED light can be activated independently for illumination in dark environments. Refer to the product's specific button for the LED light (often a separate button or a long press of the power button).

Image: The Oasser inflator demonstrating its LED light feature, useful for operating in low-light conditions or at night.
Inflation for Specific Items:
- Car Tyres:
Connect the air hose directly to the car tyre valve. Set the pressure according to your vehicle's manufacturer recommendations (usually found on a sticker inside the driver's door jamb or in the owner's manual). Inflation time for a standard 195 tyre from 0 to 36 PSI is approximately 5-6 minutes.

Image: The Oasser inflator in use, connected to a car tire, demonstrating its primary function for vehicle maintenance.
- Motorcycle Tyres:
Use the standard nozzle or a suitable adaptor if required. Refer to your motorcycle's manual for recommended tyre pressures.
- Bicycle Tyres:
Select the appropriate nozzle adaptor for your bicycle valve type (Presta or Schrader). Inflate to the pressure indicated on the tyre sidewall.
- Balls and Other Inflatables:
Attach the needle adaptor for sports balls or the cone adaptor for other inflatables (e.g., swimming rings). Inflate until firm, avoiding over-inflation.

Image: The Oasser inflator demonstrating its versatility by inflating a basketball using the specialized needle adaptor.
Itoju
- Ninu: Mu ese ita ti inflator pẹlu asọ, damp asọ. Maṣe lo awọn kẹmika ti o lewu tabi awọn afọmọ abrasive.
- Ibi ipamọ: Store the inflator in a cool, dry place, away from direct sunlight and extreme temperatures. Utilize the built-in hose storage slot and the included storage bag for organized keeping.
- Itutu: To prolong the life of the motor, allow the compressor to cool down for 5-10 minutes after every 8 minutes of continuous operation.
- Rirọpo Fuse: If the inflator stops working, check the fuse in the 12V car charger plug. Replace it with the provided spare fuse if necessary.
Laasigbotitusita
| Isoro | Owun to le Fa | Ojutu |
|---|---|---|
| Inflator ko ni tan-an. | No power supply; Blown fuse in car charger; Loose connection. | Ensure power cable is securely plugged in. Check and replace fuse if blown. Verify connections. |
| Inflator náà ń ṣiṣẹ́ ṣùgbọ́n afẹ́fẹ́ kò jáde. | Air hose not properly connected; Nozzle blocked; Internal issue. | Ensure air hose is tightly screwed. Check nozzle for obstructions. If problem persists, contact support. |
| Inflator stops before reaching preset pressure. | Overheating Idaabobo mu ṣiṣẹ. | Jẹ́ kí ẹ̀rọ náà tutù fún ìṣẹ́jú 5-10 kí o tó bẹ̀rẹ̀ iṣẹ́. |
| Kika titẹ ti ko pe. | Loose connection to valve stem; Sensor calibration. | Ensure nozzle is firmly attached to the valve. Compare with a known accurate gauge. |
Awọn pato
| Ẹya ara ẹrọ | Ẹ̀kúnrẹ́rẹ́ |
|---|---|
| Nọmba awoṣe | ATJ-6488 |
| Orisun agbara | 12V DC (Car) / 240V AC (Home) |
| Ipa ti o pọju | 150 PSI |
| Air Sisan Agbara | 35 L/min |
| Wattage | 120 Wattis |
| Silinda Iwon | 22mm |
| Hose Gigun | 60 cm |
| Car Charger Cable Length | 3 m |
| AC Charger Cable Length | 1.6 m |
| Awọn iwọn | 22 x 13 x 19 cm |
| Iwọn | 1.15 kg |
| Pataki Awọn ẹya ara ẹrọ | AC & DC Adaptable, Memory Function, Digital Display, Automatic Shut-Off, LED Light |
Atilẹyin ọja ati Support
Oasser products are manufactured to high-quality standards and are warranted against defects in materials and workmanship. For specific warranty terms and conditions, please refer to the warranty card included with your purchase or visit the official Oasser webojula.
If you encounter any issues or have questions regarding your Oasser Tyre Inflator, please contact our customer support team:
- Imeeli: support@oasser.com
- Webojula: www.oasser.com
- Itaja Amazon: Oasser Store on Amazon UK
Please have your model number (ATJ-6488) and purchase details ready when contacting support.


