1. Ifihan
Thank you for choosing the DOOMAY Rechargeable Digital Kitchen Timer. This versatile device combines a large LED display timer with an alarm clock function, designed for various time management needs in the kitchen, classroom, office, and more. Its key features include adjustable brightness and volume, sound activation, and a magnetic back for convenient placement.

Figure 1: DOOMAY Rechargeable Digital Kitchen Timer

Figure 2: Key features of the DOOMAY Digital Timer
2. Eto
2.1 Charging the Timer
The DOOMAY Digital Timer comes with a built-in rechargeable battery. Before first use, or when the low power icon appears on the display, charge the device using the provided USB-C cable.
- Connect the USB-C end of the cable to the timer's charging port (DC 5V).
- Connect the USB-A end to a standard USB power adapter (output 5V/1A recommended, not included) or a computer USB port.
- A charging indicator may appear on the screen. The timer is fully charged when the indicator changes or disappears.

Figure 3: Charging the timer and low battery indicator
2.2 Àwọn Àṣàyàn Ìgbékalẹ̀
Aago naa n pese awọn aṣayan ipo ti o rọrun:
- Asomọ oofa: The timer features strong magnets on its back, allowing it to be securely attached to metallic surfaces like refrigerators or whiteboards. Two rubber pads are included to prevent slipping.
- Ibi tabili: The timer can also be placed on any flat surface, such as a kitchen counter, desk, or bedside table.

Figure 4: Magnetic attachment feature
3. Awọn ilana Iṣiṣẹ
3.1 Ipariview ti Awọn iṣakoso
The timer features intuitive buttons on its top surface for easy operation. Refer to Figure 5 for button identification.
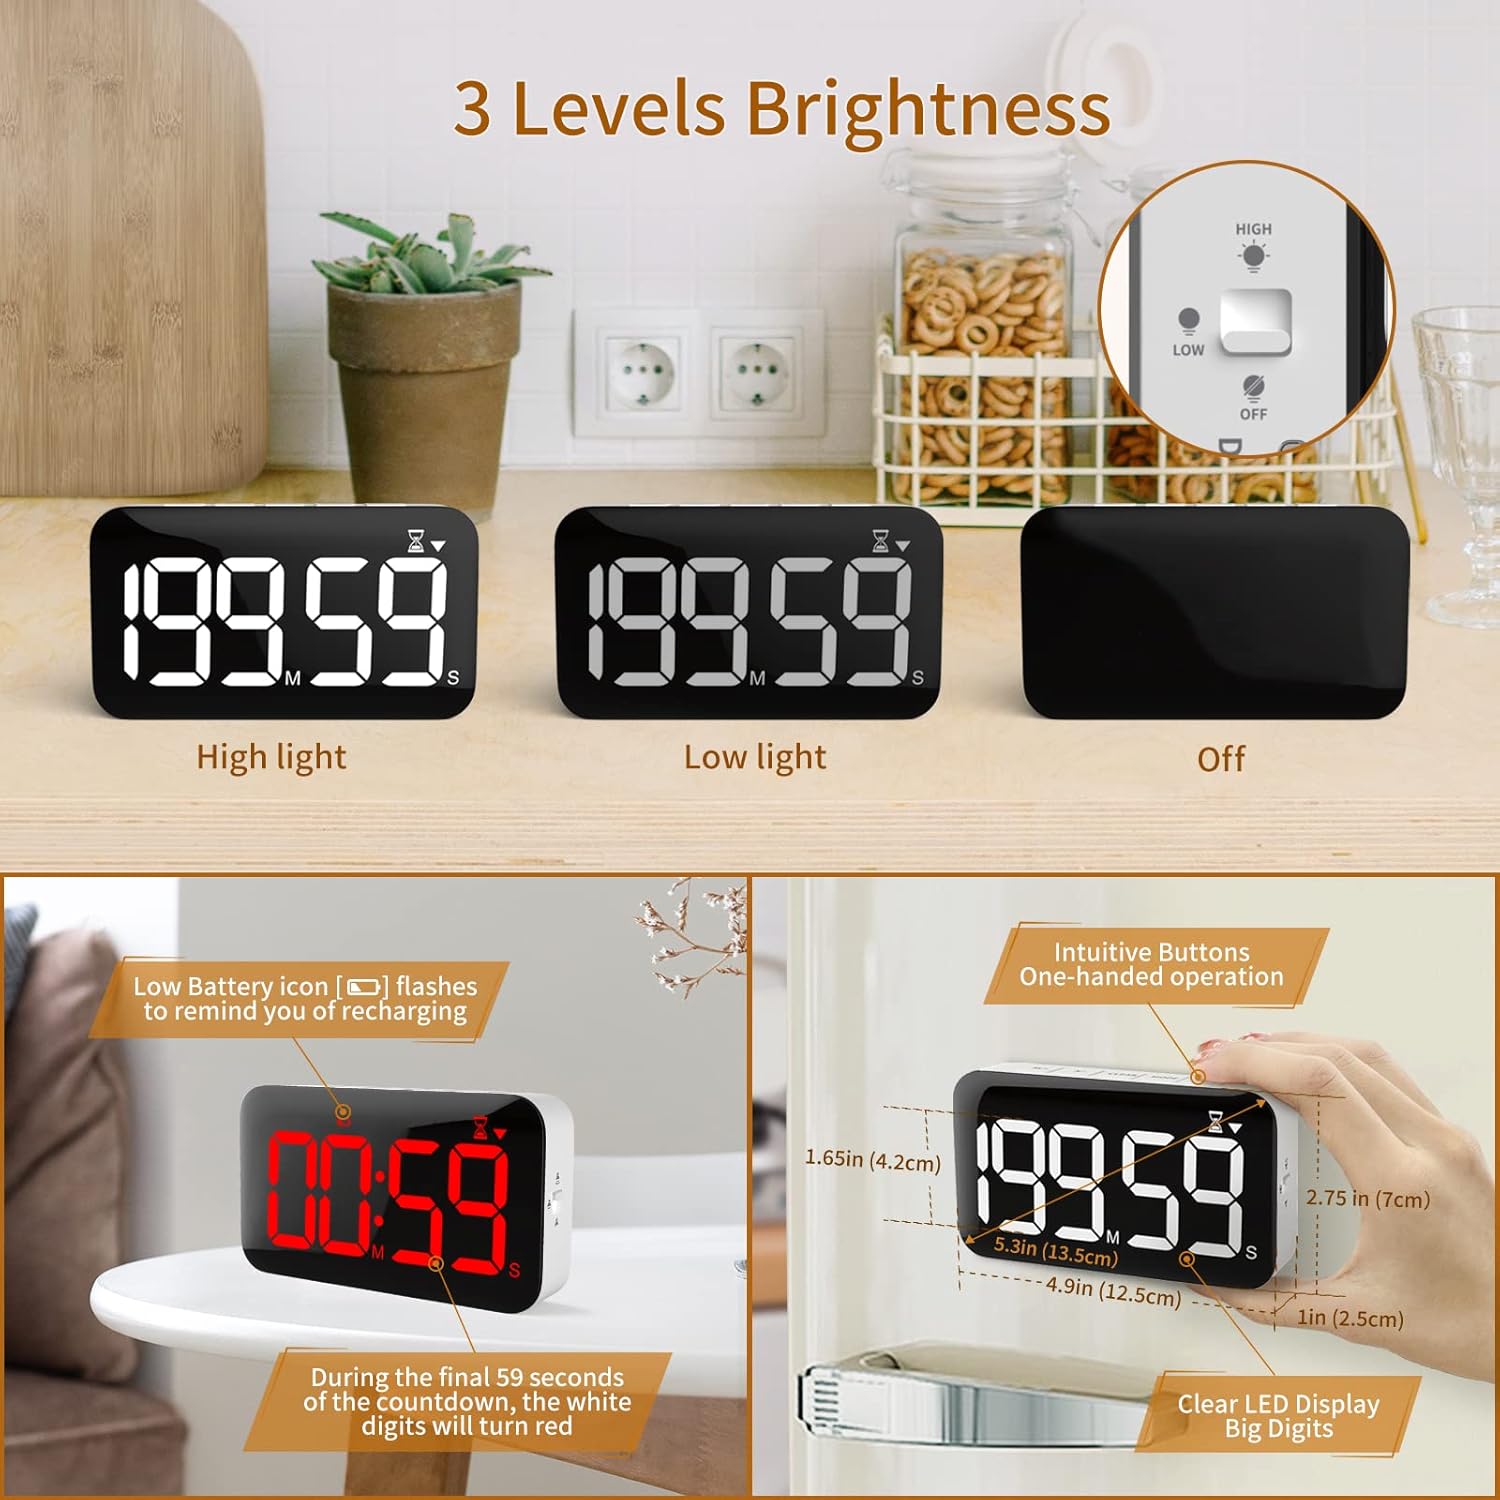
Figure 5: Timer controls and display features
- M/+ Button: Increases minutes or digits.
- S/- Button: Decreases seconds or digits.
- Bọtini MO: Clears the set time to 00:00.
- Bọtini MODE: Switches between Timer, Clock, and Alarm modes.
- ST/SP Button: Starts or pauses the timer/alarm.
3.2 Timer Function (Countdown/Count Up)
The timer supports both countdown and count-up functions, up to 199 minutes and 59 seconds.
- Setting Countdown Time: In Timer mode, use the M/+ and S/- buttons to set the desired time. Press CLEAR to reset.
- Starting/Pausing: Press ST/SP to start the countdown. Press again to pause.
- Iṣe Iṣiro: When the timer is at 00:00, press ST/SP to start counting up.
- Last Minute Indication: During countdown, all digits will turn red when less than 1 minute remains, providing a clear visual alert.
- Atunto itaniji: When the alarm rings, press any button to stop it and return to your last set time.

Figure 6: Countdown and Count-up functions

Figure 7: Digits turn red during the last minute of countdown
3.3 Awọn iṣẹ Aago ati Itaniji
The timer can also function as a digital clock and a single alarm.
- Awọn ọna Yipada: Press the MODE button to cycle through Timer, Clock, and Alarm modes.
- Eto aago: In Clock mode, use M/+ and S/- to adjust hours and minutes.
- Eto Itaniji: In Alarm mode, use M/+ and S/- to set the alarm time. Press ST/SP to activate/deactivate the alarm.

Figure 8: Timer used as an alarm clock
3.4 Brightness and Volume Adjustment
Customize the display brightness and alarm volume to suit your environment.
- Imọlẹ: Use the switch on the side of the timer to select between High, Low, or Off display brightness.
- Iwọn didun: Use the switch on the side of the timer to select between Loud (80-90dB), Soft (60-70dB), or Mute alarm volume. When set to Mute, the time will flash without an audible alarm.

Figure 9: Three levels of display brightness

Figure 10: Three levels of alarm volume
3.5 Sound-Activated Display (Power Saving)
To conserve battery, the display will automatically go into sleep mode after 30 seconds of quiet when powered by battery. It can be reactivated by sound (e.g., a clap) or by pressing any button.
Akiyesi: When the timer is actively running a countdown or count-up, the display will remain on for continuous visibility. If using the device primarily as a clock, it is recommended to keep it plugged in to ensure the display remains continuously active.

Figure 11: Sound-activated display for power saving
3.6 Iṣẹ iranti
The timer has a memory function that recalls the last set time. If you stop a timer and then press the CLEAR button, it will return to the previously set time, allowing for quick reuse of common intervals.

Figure 12: Memory function for recalling last set time
3.7 Osise Video ọja
Fidio 1: Pariview of the DOOMAY Rechargeable Digital Timer, demonstrating its features including time display, countdown, alarm, sound activation, adjustable volume, brightness, and magnetic attachment. (Source: DOOMAY Seller)
4. Itọju
4.1 Ninu
To clean the timer, gently wipe the surface with a soft, dry cloth. For stubborn marks, a slightly damp cloth can be used, followed by immediate drying. Do not use abrasive cleaners or immerse the device in water.
4.2 batiri Itọju
To prolong battery life, avoid fully discharging the timer frequently. Charge the device when the low power icon appears. If storing the timer for an extended period, ensure it is fully charged before storage and recharge it every few months.
5. Laasigbotitusita
| Isoro | Owun to le Fa | Ojutu |
|---|---|---|
| Ifihan naa ti pa tabi ti di dudu. | Power-saving mode activated (on battery power) or battery is low. Brightness set to 'Off'. | Tap the timer or make a sound to activate the display. Charge the timer if the low battery icon is visible. Check the brightness switch on the side and set it to 'Low' or 'High'. |
| Itaniji ko dun. | Volume set to 'Mute'. Alarm not activated. | Check the volume switch on the side and set it to 'Soft' or 'Loud'. Ensure the alarm icon is displayed in Alarm mode. |
| Aago naa ko dahun si titẹ bọtini. | Device may be frozen or battery is completely depleted. | Connect the charger to see if it powers on. If unresponsive, locate the small reset button (often a pinhole) and press it gently with a paperclip to reset the device. |
| Digits turn red before 1 minute. | This is an intended feature. | No action required. This visual cue indicates the final minute of the countdown. |
6. Awọn pato
| Ẹya ara ẹrọ | Ẹ̀kúnrẹ́rẹ́ |
|---|---|
| Nọmba awoṣe | 5299 |
| Iwọn (D x W x H) | 1.14"D x 4.92"W x 2.75"H |
| Iwon iboju | 5.3 inches |
| Iwọn | 6.3 iwon |
| Ohun elo | Acrylonitrile Butadiene Styrene |
| Orisun agbara | Batiri Litiumu Polymer ti a le gba agbara (pẹlu) |
| Gbigba agbara Input | 5V/1A (USB-C) |
| Max Timer Duration | 199 iṣẹju 59 Aaya |
| Awọn ipele iwọn didun | Ariwo gíga (80-90dB), Rírọ̀ (60-70dB), Adití |
| Awọn ipele Imọlẹ | Ga, Low, Paa |
7. Atilẹyin ọja ati Support
DOOMAY is committed to providing quality products. For any questions, concerns, or support needs regarding your DOOMAY Rechargeable Digital Kitchen Timer, please contact our customer service. You can find contact information and additional resources by visiting the official DOOMAY store on Amazon:
Visit the DOOMAY Store on Amazon
Jọwọ pa ìwé ẹ̀rí ìrajà rẹ mọ́ fún ìdí àtìlẹ́yìn.


