Ọrọ Iṣaaju
Thank you for choosing the MAHANCRIS CTHB112E01 Console Table. This narrow sofa table is designed for versatility and convenience, featuring a built-in power station with AC outlets and USB ports. It is suitable for various spaces such as living rooms, hallways, entryways, and foyers. This manual provides comprehensive instructions for safe assembly, proper operation, and effective maintenance to ensure the longevity and optimal performance of your console table.
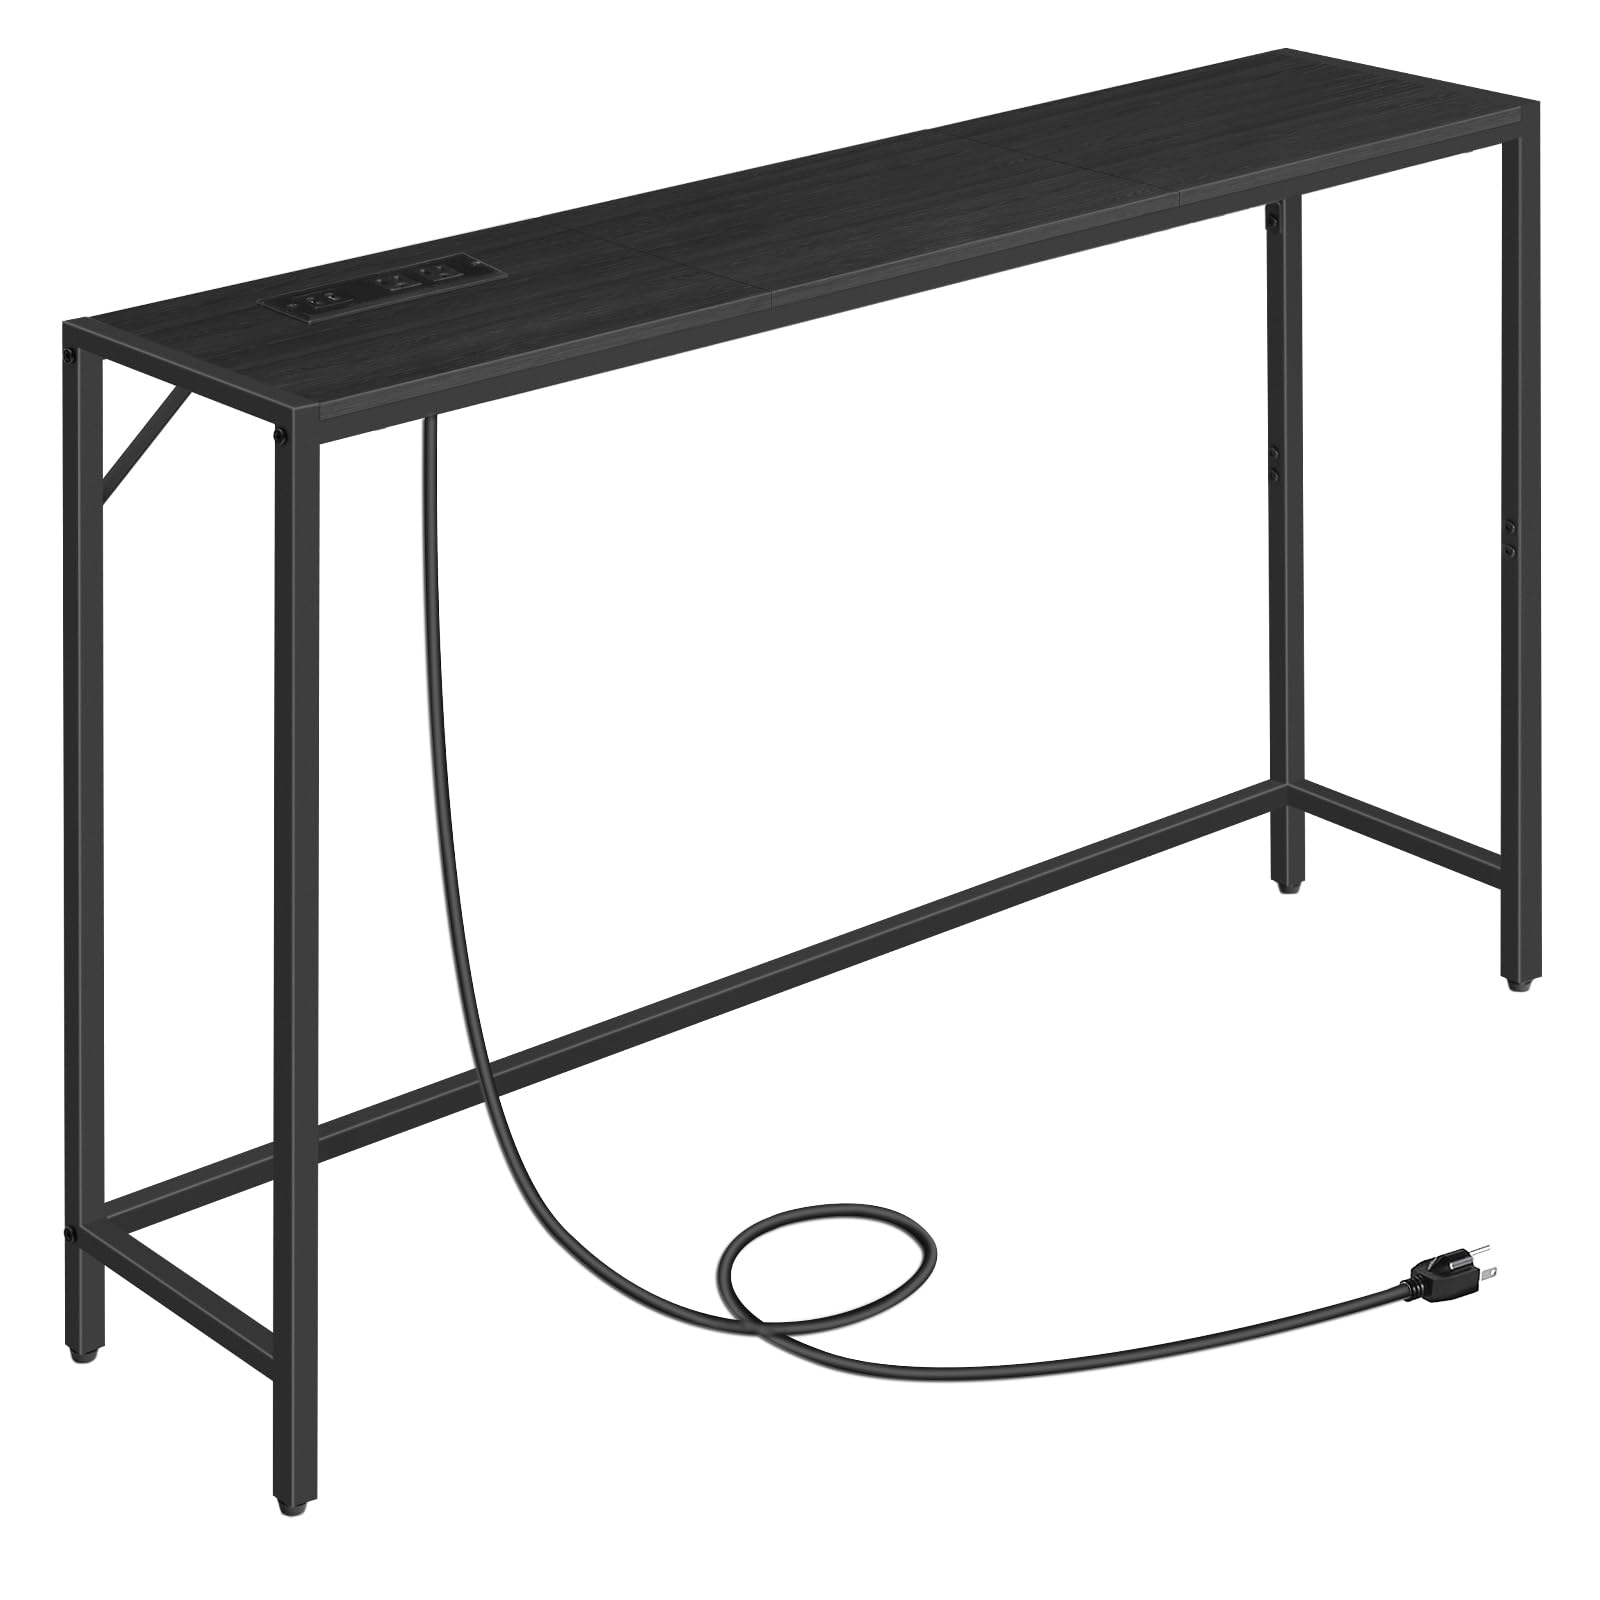
Image: The MAHANCRIS CTHB112E01 Console Table, showcasing its sleek design and integrated power station in an entryway setting.
Alaye Aabo
Jọwọ ka ati loye gbogbo awọn ilana ṣaaju apejọ ati lilo. Ikuna lati tẹle awọn ilana wọnyi le ja si ipalara tabi ibajẹ ọja naa.
- Nigbagbogbo tẹle awọn ilana apejọ ni pẹkipẹki.
- Use the adjustable feet to level the table and prevent wobbling on uneven surfaces.
- Secure the table to the wall using the anti-tip kit to prevent tipping, especially in households with children or pets.
- Do not place heavy items on the table that could exceed its maximum weight recommendation of 20 kilograms or cause it to tip over.
- Rii daju pe gbogbo awọn skru ati awọn fasteners ti wa ni wiwọ ni aabo ṣaaju lilo. Lorekore ṣayẹwo ki o tun-mu bi o ṣe pataki.
- Jeki awọn ẹya kekere ati awọn ohun elo iṣakojọpọ kuro lọdọ awọn ọmọde lati ṣe idiwọ awọn eewu gige.

Aworan: Alaye view of the adjustable feet for leveling and the anti-tip accessory for wall mounting, highlighting key safety features.
Awọn ẹya Akojọ
Before beginning assembly, ensure all parts and hardware are present and undamaged. Refer to the diagram below for identification.

Image: A visual guide to all components and fasteners required for assembly.
Awọn eroja:
- Apa 1 (x2): Fireemu ẹsẹ osi
- Apa 2 (x2): Fireemu Ẹsẹ Ọtun
- Apa 3 (x4): Kukuru Side Rail
- Apa 4 (x2): Long Side Rail
- Apa 5 (x2): Bottom Support Rod
- Apa 6 (x1): Power Station Panel
- Apa 7 (x2): Iron Sheet (Cross Brace)
- Apa 8 (x1): Power Station Unit
- Apa 9 (x2): Tabletop Panel
Hardware:
- A (x1): Allen Wrench
- B (x24): Awọn skru kukuru
- C (x18): Awọn skru gigun
- D (x4): Awọn Ẹsẹ Atunṣe
- E (x2): Power Station Screws
- F (x1): Anti-Tip Kit
- G (x1): Wall Plugs and Screws for Anti-Tip Kit
Awọn ilana Apejọ
Follow these steps carefully for proper assembly. A screwdriver (not included) is recommended in addition to the provided Allen wrench.
Step 1: Assemble the Long Side Rails
Connect the short side rails (Part 3) to form the long side rails (Part 4). Use 8 short screws (B) to secure these connections. Ensure they are tightly fastened.
Video: Assembly of the long side rails, showing how to connect the shorter segments with screws.
Step 2: Attach Side Rails to Tabletop Panels
Place the tabletop panels (Part 9) face down. Position the assembled long side rails (Part 4) along the edges of the tabletop panels. Use 12 long screws (C) to attach the side rails to the tabletop. Before tightening, align the panels to prevent gaps.
Image: A frame from the assembly video demonstrating the attachment of side rails to the tabletop panels.
Step 3: Attach the Short Leg Frames
Attach the adjustable feet (Part D) to the bottom of the short leg frames (Part 1 and Part 2). Then, attach the short leg frames to the tabletop assembly using 4 long screws (C).
Image: A frame from the assembly video illustrating the attachment of the short leg frames.
Step 4: Install Iron Sheets (Cross Braces)
Install the iron sheets (Part 7) on the rear side of the product for added stability. Use 4 short screws (B) to secure them to the leg frames.
Image: A frame from the assembly video demonstrating the installation of the iron cross braces.
Step 5: Attach the Long Leg Frames
Attach the long leg frames (Part 2) to the tabletop assembly. Use 8 short screws (B) to secure these connections.
Image: A frame from the assembly video illustrating the attachment of the long leg frames.
Step 6: Assemble the Bottom Support Rod
Connect the segments of the bottom support rod (Part 5) using 4 short screws (B). This forms a single long rod.
Image: A frame from the assembly video showing the connection of bottom support rod segments.
Step 7: Install the Bottom Support Rod
Install the assembled bottom support rod (Part 5) on the rear side of the product, connecting it between the leg frames. Use 2 long screws (C) to secure it.
Image: A frame from the assembly video demonstrating the installation of the bottom support rod.
Step 8: Install the Power Station
Insert the power station unit (Part 8) into the designated cutout on the power station panel (Part 6). Secure it with 2 power station screws (E). The power station panel can be placed in three positions: left, middle, or right, according to your preference.

Image: Visual representation of the two assembly options for the charging station, allowing flexible placement.
Full Assembly Video
For a complete visual guide, please watch the official assembly video:
Video: Official MAHANCRIS assembly guide for the console table, demonstrating each step from unboxing to completion.
Awọn ilana Iṣiṣẹ
The MAHANCRIS CTHB112E01 Console Table is equipped with a convenient power station to charge your electronic devices.
- Asopọ agbara: Plug the 59-inch power cord from the power station into a standard 120V/12A wall outlet.
- Awọn iṣan AC: Use the two (2) AC outlets to power devices such as lamps, diffusers, or other small appliances.
- Awọn ibudo USB: Lo awọn ibudo USB meji (2) (5V/2A) lati gba agbara si awọn fonutologbolori, awọn tabulẹti, ati awọn ẹrọ miiran ti o ni agbara USB.
- Ibi: The power station can be positioned on the left, middle, or right section of the tabletop during assembly to best suit your needs.
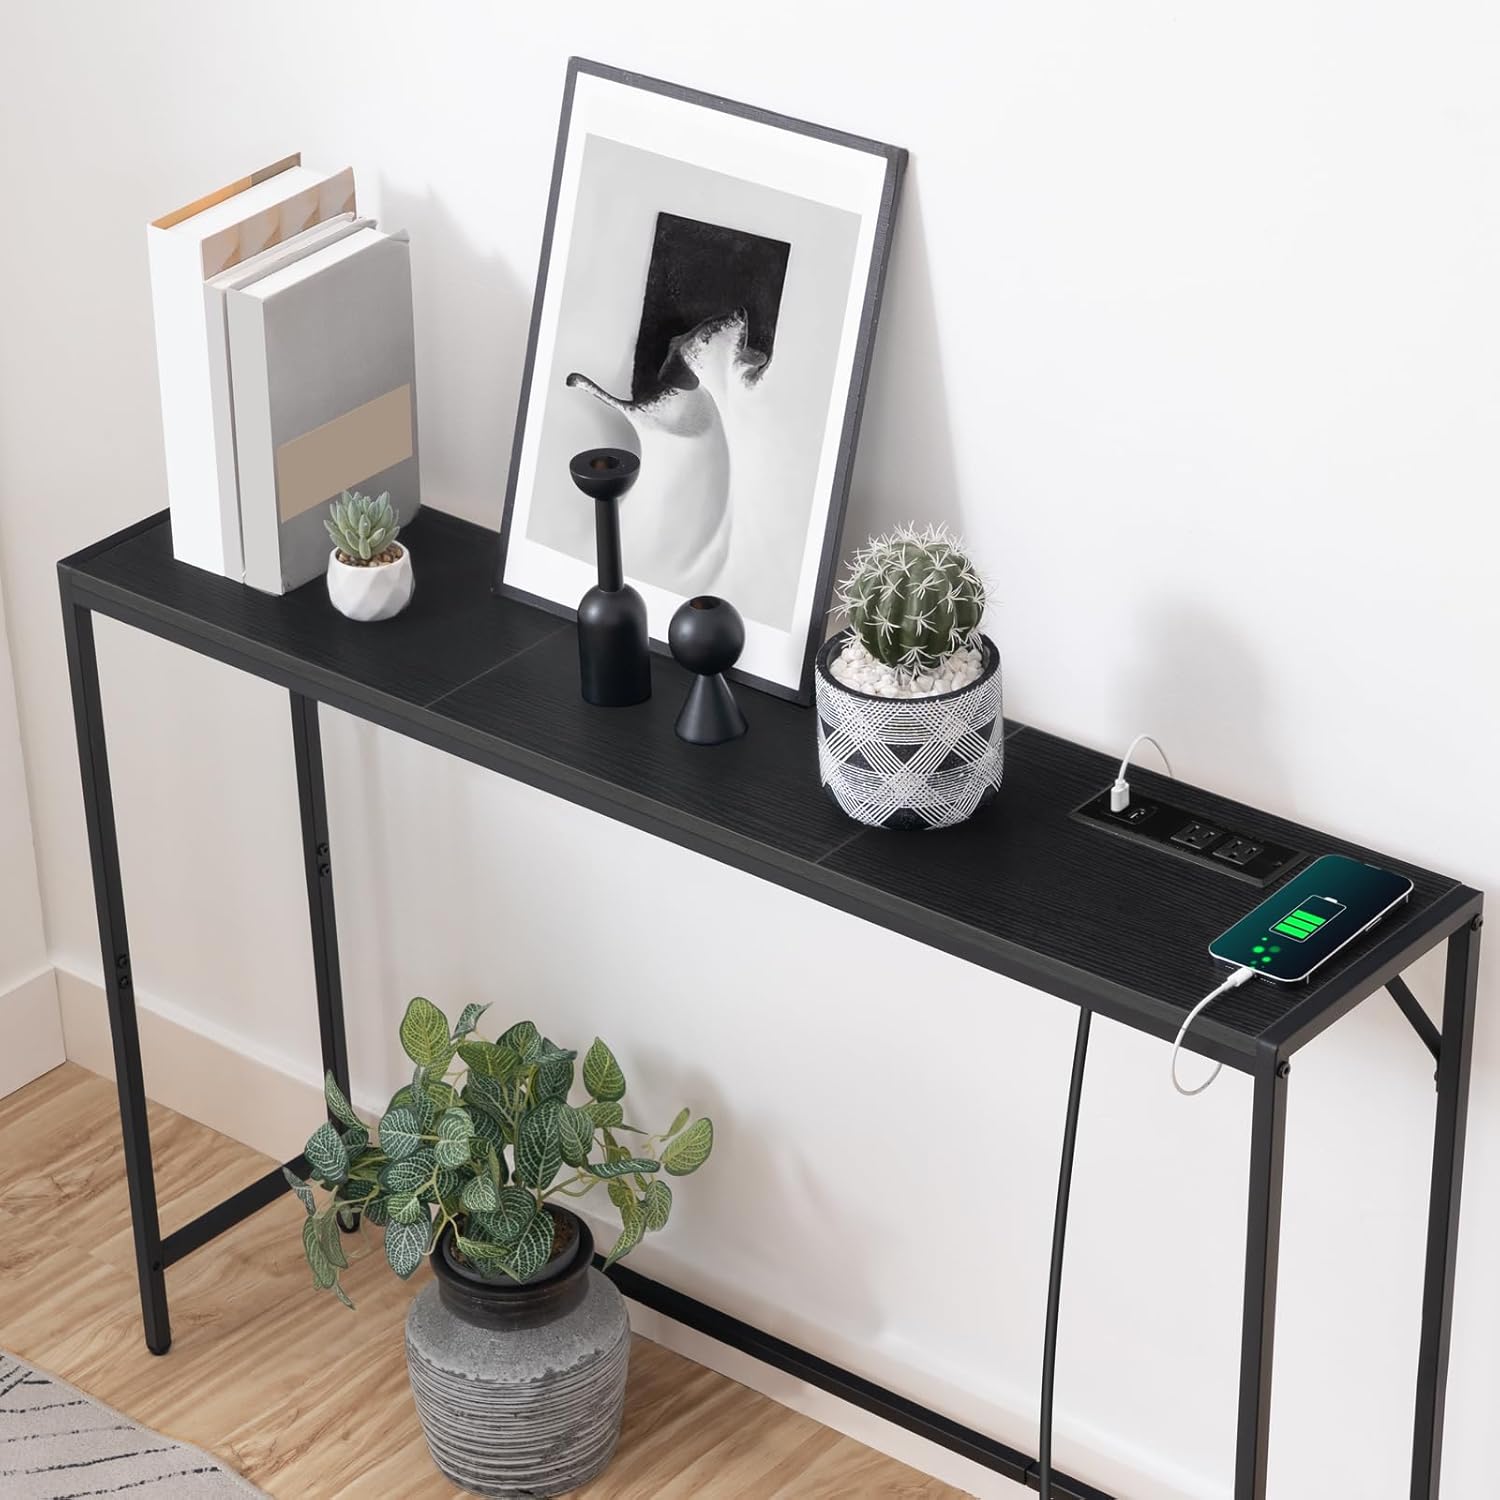
Aworan: A alaye view of the integrated power station, showing the AC outlets and USB charging ports.
Itoju
Itọju to dara yoo ṣe iranlọwọ lati ṣetọju irisi ati fa igbesi aye tabili console rẹ gun.
- Ninu: Nu awọn oju tabili naa pẹlu ipolowoamp asọ. Yẹra fun lilo awọn kẹmika lile tabi awọn afọmọ abrasive, nitori iwọnyi le ba ipari jẹ.
- Idasonu: Clean up spills immediately to prevent staining, especially on the engineered wood top.
- Ayewo: Periodically check all fasteners and connections to ensure they remain tight. Re-tighten if necessary.
- Ayika: Avoid exposing the table to extreme temperatures, direct sunlight, or high humidity, which can cause warping or discoloration.
Laasigbotitusita
Ti o ba pade awọn ọran eyikeyi pẹlu tabili console rẹ, tọka si awọn solusan ti o wọpọ wọnyi:
- Tabili Wobbling: Adjust the leveling feet (Part D) at the bottom of the legs until the table is stable on an even surface. Ensure all assembly screws are tightened.
- Power Station Not Working: Check if the power cord is securely plugged into both the table's power station and the wall outlet. Verify that the wall outlet is functional by testing it with another device.
- Awọn ẹya alaimuṣinṣin: If any parts feel loose, re-tighten the corresponding screws using the provided Allen wrench or a screwdriver.
- Awọn ẹya ti o padanu: If you find any parts missing upon unboxing, please contact customer support for assistance.
Awọn pato
| Brand | MAHANCRIS |
| Nọmba awoṣe | CTHB112E01 |
| Ọja Mefa | 9.4"D x 43.3"W x 29.2"H (23.9cm D x 109.9cm W x 74.2cm H) |
| Iwọn Nkan | 12.68 iwon (5.75 kg) |
| Iṣeduro iwuwo ti o pọju | 20 kilo |
| Ohun elo fireemu | Irin |
| Top elo Iru | Onigi Igi |
| Àwọ̀ | Dudu |
| Ibudo agbara | 2 AC Outlets (120V/12A), 2 USB Ports (5V/2A), 59" Power Cord |
| Niyanju Nọmba ti Eniyan fun Apejọ | 2 |
| Irinṣẹ Niyanju Fun Apejọ | Screw Driver (Allen Wrench included) |
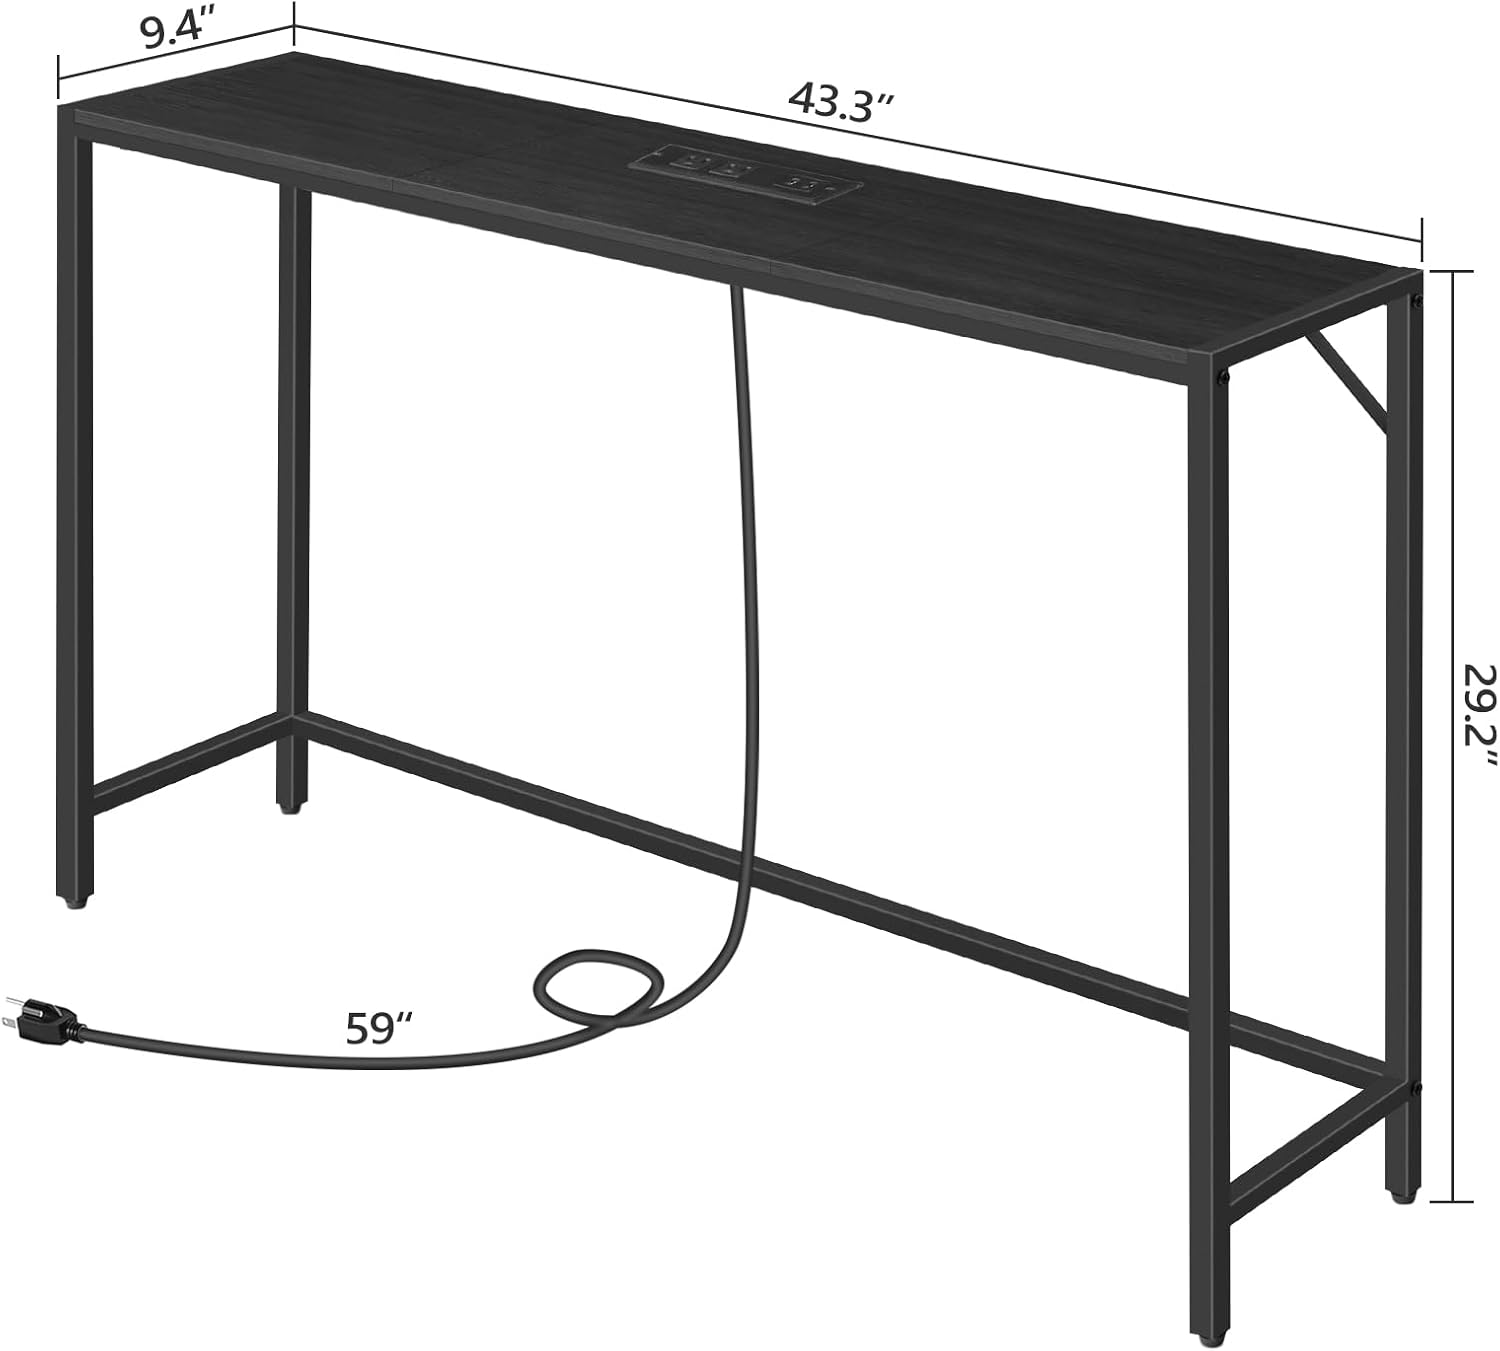
Image: Detailed dimensions of the console table, including depth, width, and height.
Atilẹyin ọja ati Support
For any warranty claims, missing parts, or technical support, please contact MAHANCRIS customer service. Refer to your purchase documentation for specific warranty details and contact information.
A ti pinnu lati pese awọn ọja didara giga ati iṣẹ alabara ti o tayọ.


