1. Ifihan
The dreame R20 Cordless Stick Vacuum Cleaner is designed to provide efficient and versatile cleaning for your home. Featuring powerful suction, intelligent dirt detection, and a long-lasting battery, it simplifies your cleaning routine. This manual provides essential information on how to set up, operate, maintain, and troubleshoot your R20 vacuum cleaner.
- Enhanced Cleaning with Brush Head Lighting: The dreame R20 Cordless Vacuum Cleaner features blue LEDs that illuminate dark areas, ensuring thorough cleaning even in hard-to-reach spots.
- Smart and Unique Features: Experience the innovation of the R20 with its powerful 190AW suction, intelligent dust recognition, and interchangeable brush heads and accessories, allowing for efficient and versatile surface cleaning.
- Iṣe Ti o tọ: Enjoy 90 minutes of autonomy thanks to the R20's powerful battery and lightweight motorized mini-brush, designed to eliminate pet hair and dust from every corner of your home.
- Cleaning Versatility: With the wide combination tool, foldable flat nozzle, flexible adapter, and motorized mini-brush, cleaning large surfaces and confined spaces is simple.
- Apẹrẹ iwuwo fẹẹrẹ: The lightweight carbon fiber material reduces weight and inconvenience, making cleaning more practical and comfortable. Additionally, storage is simple for effortless organization.
2. Ohun ti o wa ninu Apoti
Carefully unpack all components and ensure all items are present. Refer to the image below for a visual guide to the included accessories.

Image: A visual representation of all accessories included with the dreame R20 Cordless Stick Vacuum Cleaner. This includes the main unit, extension wand, various brush heads, and charging accessories.
- Main igbale Unit
- Multi-surface Brush with Lights
- Asọ Roller fẹlẹ
- Ifaagun Ifaagun
- Rọ Adapter
- Wide Apapo Ọpa
- Motorized Mini-fẹlẹ
- Ògiri Ògiri
- Ọpa Crevice
- Batiri Pack
- Ṣaja
- Afowoyi Olumulo (iwe-ipamọ yii)
3. Eto ati Ibẹrẹ Lilo
3.1 Nto Isenkanjade Igbale
Follow these steps to assemble your dreame R20 vacuum cleaner:
So ọ̀pá ìfàgùn mọ́: Connect the extension wand to the main vacuum unit until it clicks securely into place.
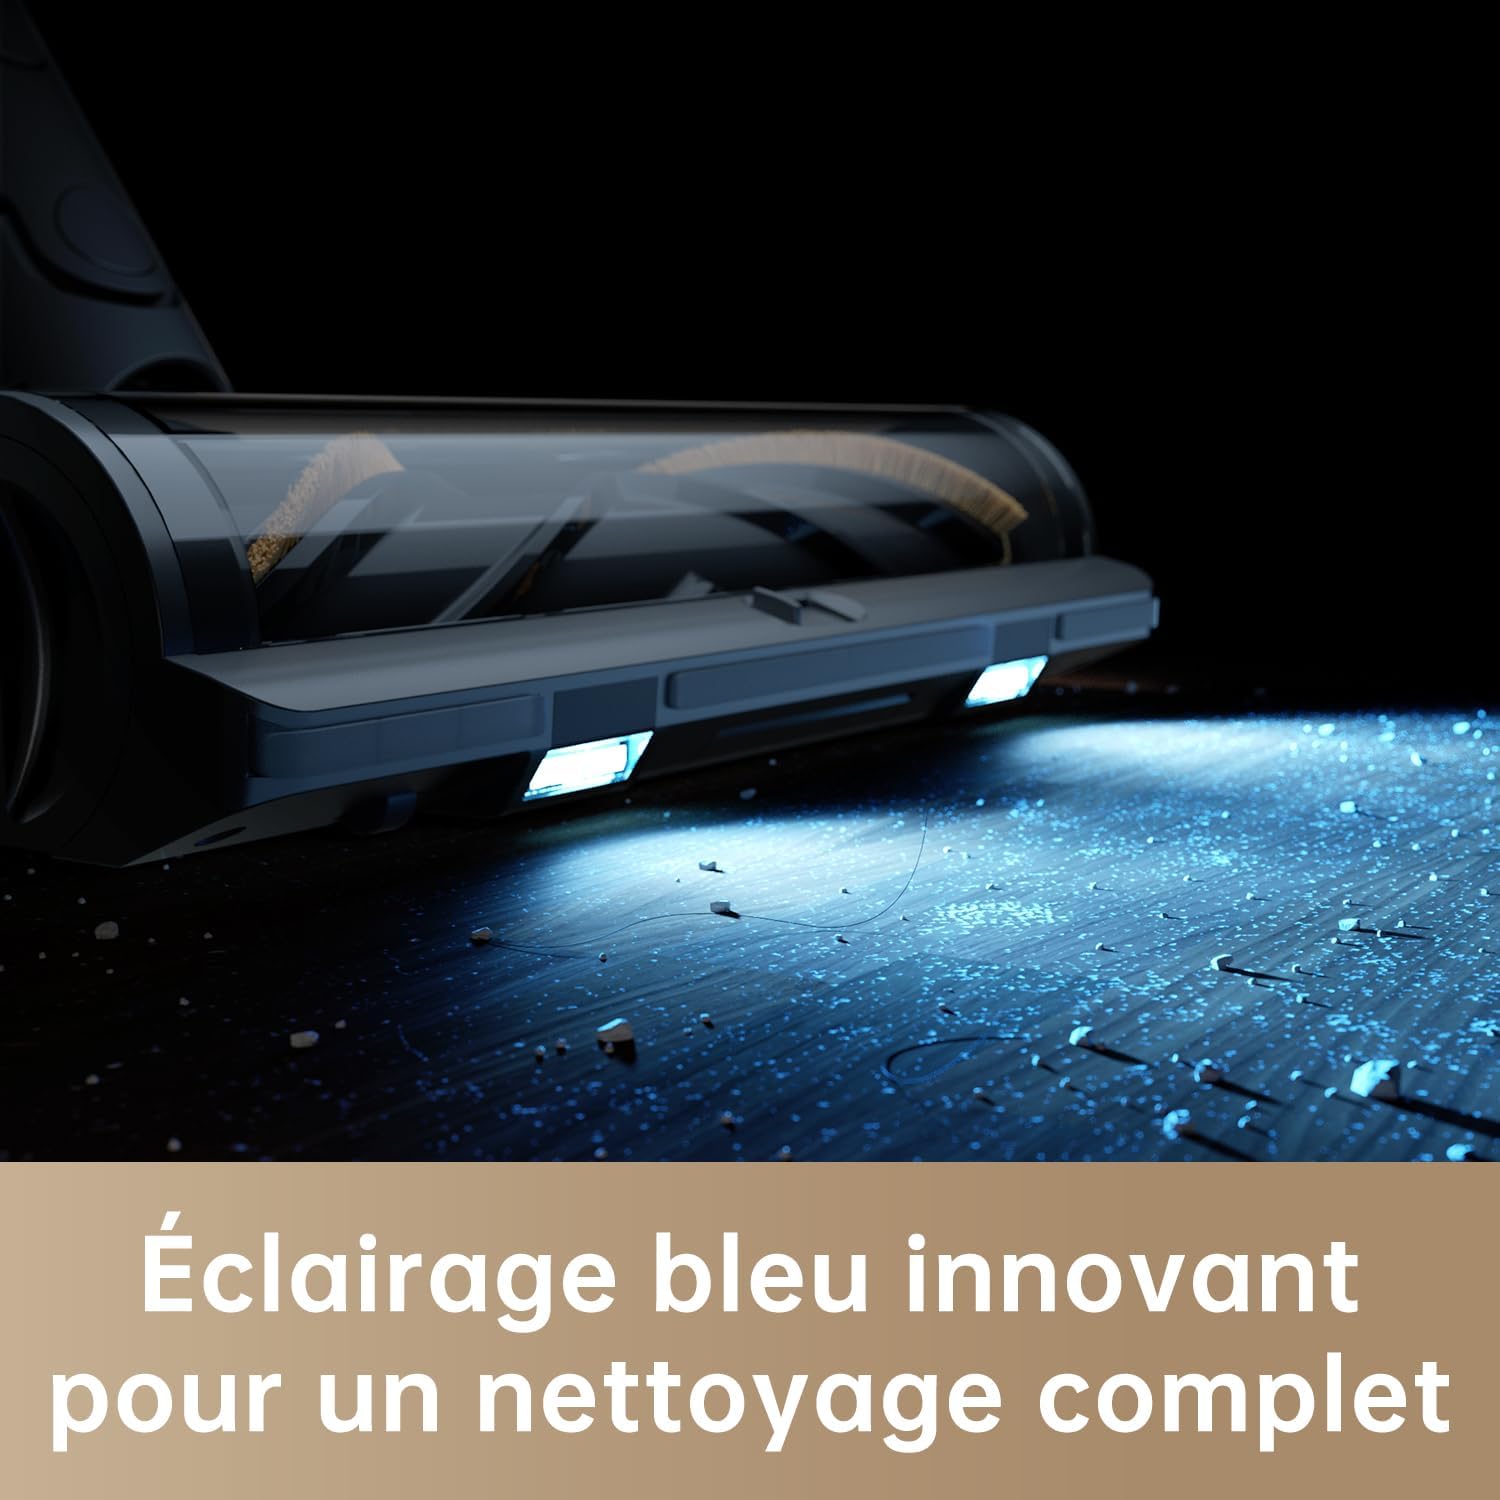
Image: A hand attaching the extension wand to the main body of the dreame R20 vacuum cleaner, showing the secure connection point.
So Ori Fẹlẹ naa: Connect your desired brush head (multi-surface or soft roller) to the other end of the extension wand until it clicks.

Image: A close-up of the brush head being attached to the extension wand of the dreame R20, ready for use.
Fi sori ẹrọ Odi (Aṣayan): Use the provided mounting template to mark drill holes. Drill 8mm holes, insert wall plugs, and secure the wall mount with screws. Ensure the bottom edge of the template is at least 115 cm from the ground.

Image: A person installing the wall-mounted charging and storage dock for the dreame R20 vacuum cleaner, showing the drilling and mounting process.
3.2 Ngba agbara si Batiri naa
Fully charge the vacuum cleaner before first use and after each use. Charging takes approximately 4 hours. If the vacuum is used in Turbo mode for an extended period, the battery may heat up, increasing charging time. Allow the vacuum to cool for 30 minutes before recharging.
- Method 1: Direct Charging
Connect the charger directly to the vacuum cleaner's charging port and plug it into a power outlet. - Method 2: Charging with Wall Mount
Place the vacuum cleaner onto the installed wall mount. Ensure the charger is connected to the wall mount and plugged into a power outlet.

Image: The dreame R20 vacuum cleaner docked on its wall mount, with the charging cable connected, indicating it is charging.
The battery status indicator will blink white during charging and turn solid white when fully charged. It will turn off after 5 minutes of full charge to enter energy-saving mode.
4. Awọn ilana Iṣiṣẹ
4.1 Àwọn Ìgbésẹ̀ Títan/Pápá àti Fífàmọ́ra
Press and hold the power button to turn the vacuum on or off. Use the mode selection button to switch between different suction modes: Eco, Auto, and Turbo.

Image: The LED display of the dreame R20 showing different suction modes (Eco, Auto, Turbo) and battery level. The fan icon changes color to indicate the level of dirt detected in Auto mode.
- Ipo Eco: For light cleaning and maximum battery life.
- Ipo Aifọwọyi: Intelligently adjusts suction power based on dirt detection. The fan icon on the display changes color (green for light dust, orange for medium, red for heavy) to indicate the amount of dust.
- Ipò Turbo: Provides maximum suction for stubborn dirt and deep cleaning. All fan icons on the display light up white.
4.2 Using Different Accessories
The dreame R20 comes with various accessories for different cleaning needs:
- Multi-surface Brush with Lights: Ideal for both carpets and hard floors. The integrated blue LEDs help reveal hidden dust and debris.

Image: The multi-surface brush head of the dreame R20 in action, showing its blue LED lights illuminating dust on a hard floor.
- Fẹlẹ Roller Rirọ: Specifically designed for delicate hard floors like wood and tile to prevent scratches.

Image: A close-up of the soft roller brush head, designed for gentle cleaning on hard floors.
- Adapta Rọrun: Allows the extension wand to bend, making it easy to clean under low furniture like beds and sofas without bending over.

Image: The dreame R20 with its flexible adapter extended, demonstrating its ability to reach under low furniture for thorough cleaning.
- Fọlẹ Kekere Amuti: Excellent for removing pet hair, dust mites, and stubborn debris from upholstery, bedding, and other fabric surfaces.
Image: The motorized mini-brush attachment of the dreame R20, effectively cleaning pet hair and debris from a sofa.
- Wide Combination Tool & Crevice Tool: Use these for cleaning tight spaces, corners, curtains, keyboards, ceilings, and car interiors.

Image: The dreame R20 being used with various attachments, including the crevice tool for tight spaces and the combination tool for delicate surfaces like shelves.
5. Itọju ati Itọju
Regular maintenance ensures optimal performance and extends the lifespan of your dreame R20 vacuum cleaner.
5.1 Fífọ Ife Eruku ati Awọn Ajọ
Ṣofo Ife Eruku: Press the dust cup release button to open the bottom cover and empty the contents. The cleaning capacity will be reduced if the dust cup is filled to the MAX mark. Empty it promptly.
Note: Ensure the vacuum is unplugged and the power button is off before emptying or cleaning.
Remove Pre-Filter and Cyclone Unit: Twist and pull to remove the pre-filter and cyclone unit from the dust cup.

Image: A hand removing the pre-filter from the dust cup of the dreame R20 vacuum cleaner.
Awọn ohun elo fifọ: Rinse the pre-filter and cyclone unit under running water until clean. Wipe the dust cup with a soft, damp cloth. Ensure all parts are completely dry for at least 24 hours before reassembly.
Note: Do not wash the dust cup directly with water to reduce the risk of electric shock. Only use clean water for filters; do not use detergents.

Image: A person rinsing the pre-filter of the dreame R20 under running water to clean it.
Ṣe atunto: Once dry, reassemble the cyclone unit, pre-filter, and dust cup in reverse order of disassembly. Ensure they are securely locked.
5.2 Ninu awọn ori fẹlẹ
Remove Roller Brush: Turn the lock on the side of the brush head counter-clockwise to release and remove the roller brush.

Image: A hand removing the roller brush from the multi-surface brush head of the dreame R20.
Remove Tangled Hair/Fibers: Use scissors to cut and remove any tangled hair or fibers from the roller brush and wheels.
Fọ ati Gbẹ: Rinse the roller brush under running water until clean. Place it vertically in a well-ventilated area for at least 24 hours until completely dry before reinstallation.

Image: A person rinsing the roller brush of the dreame R20 under running water to clean it.
6. Batiri Rirọpo
The vacuum cleaner contains a removable lithium-ion rechargeable battery with a limited number of charge cycles. After prolonged use, the battery may no longer hold a charge. If this occurs, it means the battery has reached the end of its life cycle and needs to be replaced.
Yọ Batiri atijọ kuro: Press and hold the battery release button, then slide the battery to the left to remove it.
Fi Batiri Tuntun sori ẹrọ: Slide a new battery into the slot until it clicks securely into place.
7. Awọn pato
| Ẹya ara ẹrọ | Ẹ̀kúnrẹ́rẹ́ |
|---|---|
| Brand | ala |
| Nọmba awoṣe | R20 |
| Àwọ̀ | Dudu |
| Awọn iwọn Ọja (L x W x H) | 50 x 50 x 28 cm |
| Iwọn Nkan | 1.65 kilo |
| Agbara | 190 Wattis |
| Ariwo Ipele | 70 Decibels |
| Igbesi aye batiri | Wakati 1 ati iṣẹju 30 (iṣẹju 90) |
| Pataki Ẹya | Laser Detection Technology |
| Àlẹmọ Iru | Anti-Allergen |
| Dada iṣeduro | Gbogbo pakà orisi |
| Orisun agbara | Agbara Batiri |
| Voltage | 25.0 V |
| Awọn irinše to wa | Accessory Kit, Charging Station |
8. Laasigbotitusita
If you encounter any issues with your dreame R20, refer to the following common problems and solutions:
- Kò sí ìfàmọ́ra:
- Rii daju pe batiri ti gba agbara ni kikun.
- Check if the battery is properly installed.
- Agbara mimu ti o dinku:
- Empty the dust cup if it's full.
- Clean the pre-filter and cyclone unit.
- Check for blockages in the brush head or extension wand.
- Brush head not rotating:
- Check for tangled hair or debris on the roller brush and clear it.
- Ensure the brush head is securely attached.
- Batiri n ṣan ni kiakia:
- Ensure the vacuum is not continuously used in Turbo mode, which consumes more power.
- Batiri naa le ti n sunmo opin aye re ati pe o nilo rirọpo.
- Igbóná púpọ̀:
- If the vacuum stops due to overheating, allow it to cool down for at least 30 minutes before resuming use. Check for any blockages that might cause the motor to overwork.
9. Atilẹyin ọja ati Support
For warranty information and customer support, please refer to the documentation included in your product packaging or visit the official dreame website. Always use original dreame parts to avoid voiding your warranty.
Fun siwaju iranlowo, o le ṣàbẹwò awọn dreame store on Amazon.
If the vacuum is not used for a long period, charge it completely, unplug the power cord, remove the battery, and store it in a cool, dry place away from direct sunlight. To prevent over-discharging the battery, recharge it at least once every three months.


