1. Ifihan
Thank you for choosing a Whirlpool appliance. This instruction manual provides essential information for the safe and efficient use of your new Whirlpool WHC18 T574 P built-in refrigerator with freezer. Please read this manual carefully before installation, operation, and maintenance to ensure optimal performance and longevity of your appliance. Keep this manual for future reference.
2. Alaye Aabo
Your safety and the safety of others are paramount. This manual contains important safety messages. Read all instructions before using the appliance.
- Aabo Itanna: Ensure the appliance is properly grounded. Do not use extension cords or multiple adapters. Disconnect the power supply before any cleaning or maintenance.
- Afẹfẹ: Ensure adequate ventilation around the appliance as specified in the installation instructions to prevent overheating.
- Awọn ọmọde: Ohun elo yii kii ṣe ipinnu fun lilo nipasẹ awọn eniyan (pẹlu awọn ọmọde) pẹlu idinku ti ara, imọlara tabi awọn agbara ọpọlọ, tabi aini iriri ati imọ, ayafi ti wọn ba ti fun wọn ni abojuto tabi itọnisọna nipa lilo ohun elo nipasẹ eniyan ti o ni iduro fun aabo wọn. Awọn ọmọde yẹ ki o wa ni abojuto lati rii daju pe wọn ko ṣere pẹlu ohun elo naa.
- Awọn ohun elo ina: Ma ṣe fi awọn nkan ibẹjadi pamọ gẹgẹbi awọn agolo aerosol pẹlu itọka ina ninu ohun elo yii.
- Idasonu: Dispose of the appliance according to local regulations for proper recycling of refrigerants and insulation materials.
3. Eto ati fifi sori
3.1 Ṣiṣii silẹ
Remove all packaging materials. Inspect the appliance for any damage during transit. Report any damage to your retailer immediately.
3.2 Ibi ati Fentilesonu
This is a built-in appliance. Ensure the installation cavity meets the specified dimensions. Proper ventilation is crucial for efficient operation. Refer to the installation diagram for required clearances.

Nọmba 1: Installation dimensions diagram. This image illustrates the precise measurements required for the built-in installation of the refrigerator, including height, width, depth, and ventilation clearances.
3.3 Itanna Asopọ
So ohun elo naa pọ mọ iṣan itanna ti o ni ilẹ daradara. Rii daju pe voltage and frequency match the specifications on the rating plate. Do not use adapters or extension cords.
3.4 Iyipada ilekun
The door hinge is factory-set to the right. The doors are reversible, allowing you to change the opening direction to suit your kitchen layout. Consult a qualified technician or refer to the detailed installation guide for instructions on reversing the doors.
4. Awọn ilana Iṣiṣẹ
4.1 First Lo
After installation, wait at least 4 hours before connecting the appliance to the power supply to allow the refrigerant to settle. Clean the interior with a damp cloth. Set the temperature controls and allow the appliance to cool for several hours before loading food.
4.2 Iṣakoso igbimo
The appliance features an internal display and control panel for managing temperature settings and functions.
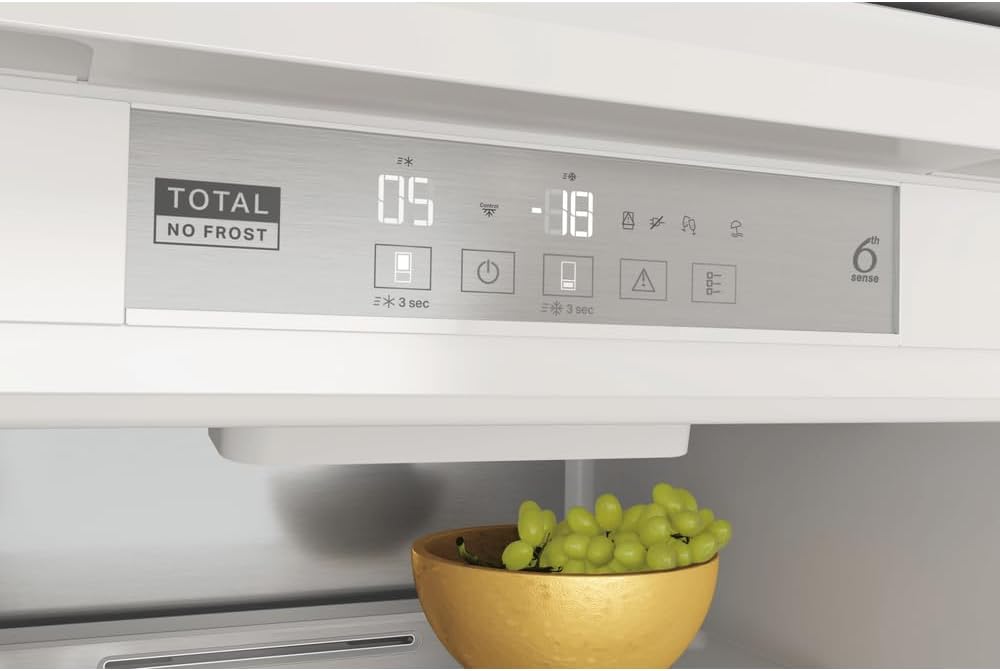
Nọmba 2: Internal control panel. This image shows the digital display indicating current temperatures for the refrigerator and freezer compartments, along with various function buttons such as 'Total No Frost' and '6th Sense'.
4.3 Eto iwọn otutu
Adjust the temperature for the refrigerator and freezer compartments using the control panel. Recommended settings are typically 4°C for the refrigerator and -18°C for the freezer. The 6th Sense sensors automatically adjust the internal temperature when new food is introduced, optimizing energy consumption and preserving food quality.
4.4 ti abẹnu Awọn ẹya ara ẹrọ
The refrigerator compartment includes robust glass shelves, a vegetable drawer, and door balconies. A convenient bottle rack is provided for secure storage of bottles.

Nọmba 3: Refrigerator interior. This image displays the spacious interior of the refrigerator, featuring multiple glass shelves, door storage, and a bottom drawer, with various food items arranged.

Nọmba 4: Refrigerator drawers. A detailed view of the refrigerator's lower section, showing the 'Multi Fresh Box' and other drawers designed for optimal storage of fruits and vegetables.

Nọmba 5: Freezer interior. This image shows the freezer compartment with its drawers, providing organized storage for frozen goods.
5. Itọju ati Cleaning
5.1 Ninu ilohunsoke
Before cleaning, unplug the appliance. Clean the interior regularly with a solution of warm water and mild detergent. Rinse and dry thoroughly. Do not use abrasive cleaners or harsh chemicals.
5.2 Ninu Ode
Mu ese ita gbangba pẹlu asọ, damp cloth. For stainless steel surfaces (if applicable), use a specialized cleaner. Keep the ventilation grilles clean and free from dust.
5.3 Ìyọ́kúrò Àìfọwọ́ṣe
The refrigerator compartment features automatic defrosting (No Frost). The freezer compartment also has an automatic defrosting system. This eliminates the need for manual defrosting under normal operating conditions.
6. Laasigbotitusita
Ṣaaju ki o to kan si iṣẹ alabara, ṣayẹwo awọn ọran ti o wọpọ wọnyi:
- Ohun elo ko ṣiṣẹ: Ṣayẹwo boya okun agbara ti wa ni edidi ni deede ati ti agbara ba wa si iṣan.
- Igba otutu ko tutu to: Ensure the door is closed properly. Check if the temperature settings are correct. Avoid overloading the appliance. Ensure proper ventilation.
- Awọn ariwo ti ko wọpọ: Some noises are normal (e.g., refrigerant circulation, compressor operation). Check if the appliance is level.
- Omi lori isalẹ ti yara firiji: This is usually due to a blocked drain hole. Clean the drain hole with a small tool.
7. Awọn pato
| Ẹya ara ẹrọ | Sipesifikesonu |
|---|---|
| Brand | Whirlpool |
| Nọmba awoṣe | WHC18 T574 P (859991635750) |
| Iru | Firiji ti a ṣe sinu firisa |
| Apapọ Apapọ Agbara | 250 liters |
| Firiji Net Agbara | 182 liters |
| Awọn iwọn (H x W x D) | 177 x 54 x 54.5 cm |
| Iwọn | 65 kg |
| Defrost Eto | Aifọwọyi (Ko si Frost) |
| Kilasi afefe | SN-T |
| Noise Njade lara | B (32 dB) |
| Shelves Material | Gilasi |
| Pataki Awọn ẹya ara ẹrọ | 6th Sense Sensors, Bottle Rack |
| Ilekun Mita | Ọtun (Yiyipada) |
| Ifihan | Ti abẹnu |
8. Idasonu Ayika
This appliance is manufactured with recyclable or reusable materials. Dispose of it according to local waste disposal regulations. For detailed information on the treatment, recovery, and recycling of electrical and electronic products, contact your local city office, your household waste disposal service, or the shop where you purchased the appliance. Ensure that the refrigerant circuit is not damaged during disposal.


