Ọrọ Iṣaaju
Welcome to the user manual for your new Cecotec DrumFit Indoor Bike. This manual provides essential information for the safe assembly, operation, maintenance, and troubleshooting of your indoor cycling equipment. Please read this manual thoroughly before using the product to ensure proper function and longevity.
The DrumFit Indoor Bike is designed for effective indoor cardio training, featuring a 6 kg inertia flywheel, variable resistance, and an LCD display to track your progress. Its robust carbon steel construction ensures stability for users up to 120 kg.

Image: The Cecotec DrumFit Indoor Bike, showcasing its sleek black design, flywheel, and adjustable components.
Alaye Aabo
- Kan si alagbawo nigbagbogbo pẹlu alamọdaju ilera ṣaaju ki o to bẹrẹ eyikeyi eto adaṣe tuntun.
- Rí i dájú pé gbogbo àwọn boluti àti èso ni a ti mú dáadáa kí a tó lo wọ́n.
- Place the bike on a flat, stable surface. Use a mat underneath to protect flooring and reduce noise.
- Jeki awọn ọmọde ati awọn ohun ọsin kuro lati keke nigba isẹ.
- Wọ bata elere idaraya ati aṣọ.
- Maṣe kọja iwuwo olumulo ti o pọju ti 120 kg.
- Use the emergency stop button (red knob) to quickly halt the flywheel if needed.
Eto ati Apejọ
The DrumFit Indoor Bike requires some assembly. Follow these steps carefully:
- Ṣii silẹ: Carefully remove all components from the packaging. Verify all parts are present against the included parts list.
- Base Stabilizers: Attach the front and rear stabilizer bars to the main frame using the provided bolts and tools. Ensure they are firmly secured for stability.
- Awọn atẹsẹ: Identify the left (L) and right (R) pedals. Thread the left pedal counter-clockwise and the right pedal clockwise into the crank arms. Tighten securely.
- Fifi sori Saddle: Insert the saddle post into the main frame. Adjust the height and horizontal position of the ergonomic saddle for comfort, then tighten the adjustment knob.
- Fifi sori ẹrọ amudani: Insert the handlebar post into the main frame. Adjust the height of the handlebars to your preferred position and secure with the adjustment knob.
- LCD Display and Device Holder: Mount the LCD display onto the handlebar assembly. Connect any necessary sensor cables. Attach the device holder to the handlebars, ensuring it is stable for your smartphone or tablet.
- Dimu igo: Attach the bottle holder to the frame in the designated location.

Aworan: Isunmọ view of the adjustable saddle and handlebars, highlighting the comfort-fit design and adjustment points.
Awọn ilana Iṣiṣẹ
Adjusting Your Riding Position
- Gíga gàárì: Adjust the saddle so that your leg has a slight bend at the knee when the pedal is at its lowest point.
- Saddle Fore/Aft: Position the saddle so your knee is directly above the pedal spindle when the pedals are horizontal.
- Giga Handlebar: Adjust handlebars for a comfortable upper body posture, avoiding excessive strain on your back or wrists.
Lilo Eto Resistance
The DrumFit Indoor Bike features variable manual resistance. The resistance is controlled by a knob located on the frame, typically near the handlebars.
- Mu Atako pọ si: Turn the resistance knob clockwise to increase the intensity of your workout.
- Din resistance: Turn the resistance knob counter-clockwise to decrease the intensity.
- Iduro Pajawiri: Push down firmly on the resistance knob to engage the emergency brake and quickly stop the flywheel.

Image: A hand demonstrating the use of the red "PUSH TO STOP" emergency brake knob, located on the bike's frame.
Oye LCD Ifihan
The LCD display provides real-time feedback on your workout. It typically shows:
- Àkókò: Àkókò tí ìdánrawò rẹ yóò gbà lọ́wọ́lọ́wọ́.
- SPD (Speed): Your current cycling speed.
- DST (Distance): Lapapọ ijinna ti a bo lakoko adaṣe lọwọlọwọ.
- CAL (Awọn kalori): Awọn kalori ifoju sun.
- ODO (Odometer): Total accumulated distance (resets only when battery is removed).
- YII: Laifọwọyi yiyi nipasẹ gbogbo awọn iṣẹ ifihan.
Use the button on the display to switch between modes or to reset values (hold the button for a few seconds to reset current workout data).

Image: A close-up of the LCD display panel, showing the digital readouts for workout metrics and the control button.
Using the Device Holder
The integrated device holder allows you to place your smartphone, tablet, or book for entertainment or guided workouts during your session.

Image: A user engaging with a tablet placed on the bike's device holder, demonstrating its hands-free functionality.

Image: A man actively exercising on the DrumFit Indoor Bike in a modern home environment, showcasing the bike in use.
Itoju
Regular maintenance ensures the longevity and safe operation of your DrumFit Indoor Bike.
- Ninu: Pa keke naa kuro pẹlu ipolowoamp aṣọ lẹ́yìn lílo kọ̀ọ̀kan láti mú òógùn àti eruku kúrò. Má ṣe lo àwọn ohun ìfọṣọ tàbí àwọn ohun èlò ìfọṣọ.
- Inspecting Bolts and Nuts: Periodically check all bolts, nuts, and moving parts for tightness. Retighten as necessary.
- Ètò Ìwakọ̀ Bẹ́lítì: The BeltRide system is designed for low maintenance. Keep the area around the flywheel and belt clean and free of debris.
- Awọn atẹsẹ: Ensure pedals are securely attached and spin freely.
- Ibi ipamọ: Store the bike in a dry, cool place away from direct sunlight and extreme temperatures. The integrated wheels allow for easy transport.
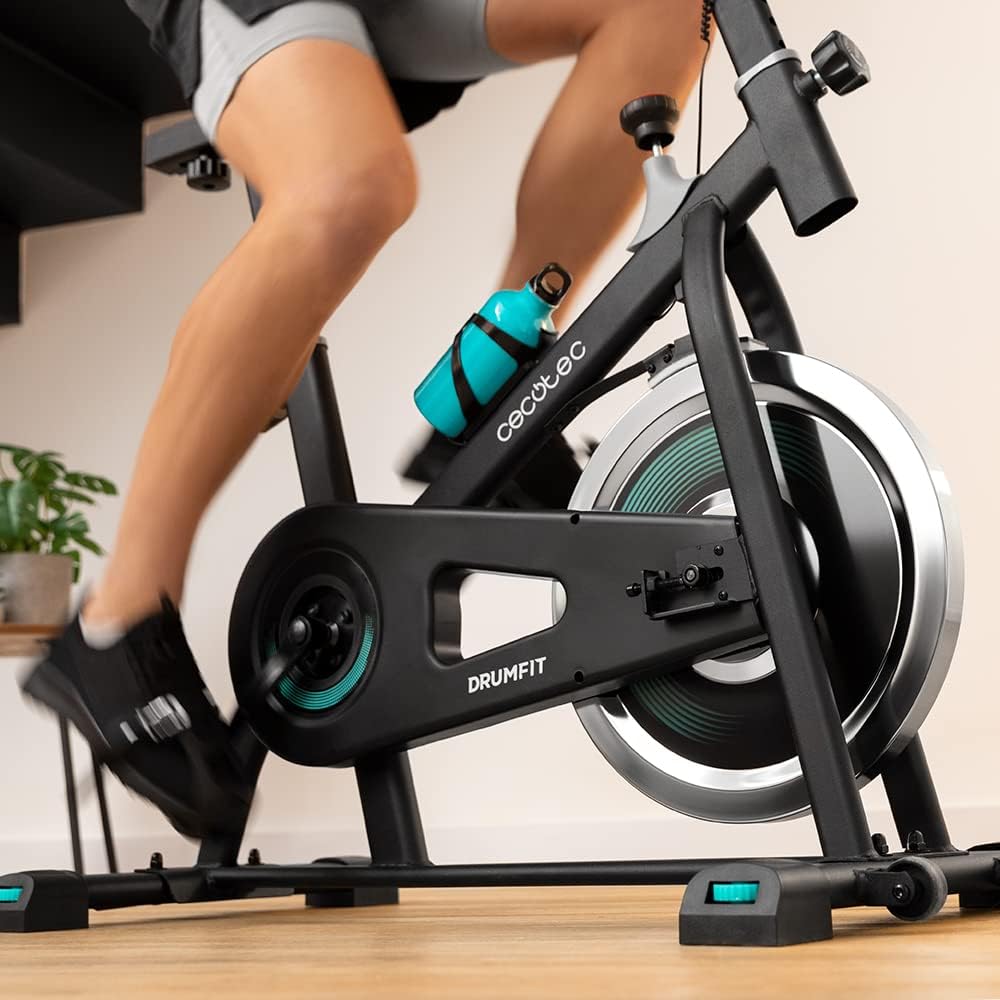
Aworan: Alaye view of the bike's pedals and the 6 kg inertia flywheel, highlighting the belt drive system.
Laasigbotitusita
| Isoro | Owun to le Fa | Ojutu |
|---|---|---|
| Ifihan LCD ko ṣiṣẹ | Low or dead battery; Loose sensor connection. | Replace batteries (if applicable). Check and secure all sensor cables. |
| Ariwo dani nigbati isẹ | Loose bolts; Friction from resistance pads; Debris in flywheel area. | Check and tighten all assembly bolts. Inspect resistance pads for wear. Clean any debris from around the flywheel. |
| Resistance ko yi pada | Resistance knob mechanism issue; Worn resistance pads. | Ensure the resistance knob is properly engaged. Contact customer support if the mechanism feels faulty or pads are worn. |
| Kẹ̀kẹ́ náà dà bí ohun tí kò dúró ṣinṣin | Uneven floor; Loose stabilizer bolts. | Ensure the bike is on a flat, level surface. Check and tighten all bolts on the stabilizer bars. |
Awọn pato
- Brand: Cecotec
- Orukọ awoṣe: DrumFit Indoor 6000 Forcis
- Nọmba awoṣe: 07094
- Ìwúwo Flywheel: 6 kilo
- Ilana Atako: Manual Fluid Resistance
- Eto Wakọ: Belt Drive (BeltRide)
- Awọn iwọn Ọja (LxWxH): 28.82"D x 8.11"W x 36.22"H (73.2 x 20.6 x 92 cm)
- Ìwọ̀n Nkan: 6 Kilograms (Package Weight: 23.8 Kilograms)
- Ohun elo: Erogba Irin
- Iwọn olumulo ti o pọju: 120 kilo
- Giga olumulo ti o pọju: 185 centimita
- Ẹya Pataki: Distance Travelled Monitor, Device Holder, Bottle Holder
- Àwọ̀: Dudu/funfun
Atilẹyin ọja ati Support
Cecotec products are manufactured to high-quality standards. For information regarding warranty coverage, please refer to the warranty card included with your product or visit the official Cecotec webojula.
For technical support, spare parts, or any inquiries not covered in this manual, please contact Cecotec customer service through their official channels. Have your model number (07094) and purchase details ready when contacting support.
O le wa alaye olubasọrọ atilẹyin ni igbagbogbo lori olupese webojula: www.cecotec.com


