1. Ifihan
Thank you for choosing the LAPOND Hydroponics Growing System Kit. This deluxe version kit is designed for efficient and clean cultivation of vegetables, flowers, fruits, and herbs, suitable for both indoor and outdoor environments. Its innovative block light design helps prevent algae growth, ensuring a healthier growing environment for your plants. This manual provides detailed instructions for assembly, operation, and maintenance to help you achieve optimal results with your hydroponic garden.
2. Kini To wa
Your LAPOND Hydroponics Growing System Kit (Deluxe Version) includes the following components:
- Hydroponics shelf x 1
- Ogbo x1
- Inlet hose x 1
- Outlet hose x 1
- Power supply hook x 2
- Fifọ omi x 1
- Aago x1
- Ohun ti nmu badọgba x 1
- Planting basket x 108
- Grow sponge x 108
- Tweezers x 1
- Leak sealing tape x 1
- Instructions x 3 (This manual and other guides)

Image: All components of the LAPOND Hydroponics Growing System Kit, including the blue PVC pipes, frame, pump, timer, hoses, planting baskets, and grow sponges.
3. Awọn ilana iṣeto
The LAPOND Hydroponics Growing System is designed for easy assembly. Follow these steps for proper setup:
- Ṣe akojọpọ fireemu naa: Connect the white frame components according to the included diagram. Ensure all connections are secure. The thick legs and silicone foot covers provide stability and floor protection.
- Attach the Blue PVC Pipes: Securely attach the blue PVC planting pipes to the assembled frame. These pipes are designed to block light, inhibiting algae growth.
- Connect Water Inlet and Outlet Hoses: Connect the black water inlet hose from the pump to the top layer of the system. Connect the black outlet hose from the bottom layer back to your water reservoir (not included, a ≥6 gallon bucket is recommended).
- Position the Water Pump: Place the 7W 12V submersible water pump into your water reservoir. Ensure the pump is fully submerged. The pump features anti-dry burning technology for enhanced durability.
- So Aago: Connect the water pump to the adjustable timer. The timer allows for manual or automatic settings, with a default work schedule of 5 minutes ON and 30 minutes OFF.
- Install Planting Baskets and Sponges: Insert the 108 planting baskets into the square holes of the PVC pipes. Place the natural peat grow sponges into the planting baskets. These sponges are designed to enhance germination directly within the system, eliminating the need for transplantation.
- Awọn okun to ni aabo: Use the provided power supply hooks to conveniently organize cables and hang power strips, keeping the setup tidy and safe.
- Initial Water Fill: Fill your reservoir with water and appropriate hydroponic nutrients. Run the pump briefly to ensure water circulates through all pipes and returns to the reservoir without leaks. Use the provided hammer to gently tap joints if any leaks are observed.

Image: A fully assembled LAPOND Hydroponics Growing System, showcasing its three layers of blue PVC pipes with plants growing in each site.

Aworan: A sunmọ-soke view demonstrating how the dark blue pipes effectively block light, suppressing algae growth and promoting healthy plant roots within the 2.5-inch diameter pipe.
4. Awọn ilana Iṣiṣẹ
Operating your hydroponics system involves managing water circulation, nutrient levels, and plant growth.
4.1. Water Circulation System
The system utilizes an optimized water circulation system with a 7W pump and adjustable timer for Nutrient Film Technique (NFT). This ensures continuous flow of nutrient-rich water to the plant roots.
- Eto Aago: Use the timer to set the pump's operating schedule. The default setting is 5 minutes ON and 30 minutes OFF, which is suitable for most plants. Adjust as needed based on plant type and growth stage.
- Ipele Omi: Ensure the water pump is always submerged in the reservoir. The pump has anti-dry burning technology, which will automatically stop if the water level is too low, protecting the pump.
- Nutrient Solution: Regularly check and replenish the nutrient solution in your reservoir. Maintain appropriate pH levels and nutrient concentrations as recommended for your specific plants.

Image: A diagram illustrating the water circulation path within the hydroponic system, showing the pump, timer, and water flow through the pipes.
4.2. Hydroponic Methods (Planting & Growth)
Follow these steps for successful planting and growth:
- Soak Sponge: Soak the natural peat grow sponges in water for approximately 2 minutes.
- Put Seed: Place seeds in the round hole of the soaked grow sponge.
- Gbingbin: Put the grow sponge with seeds into the planting basket and then place the basket into the hole of the hydroponic pipe.
- Prepare Pump and Water: Ensure your water pump is correctly positioned in the reservoir with the appropriate water and nutrient solution.
- Grow Up: Plants typically grow and are ready for harvest after 30-60 days, depending on the plant type.
- Ikore: Enjoy your fresh vegetables or fruits grown directly from your system.
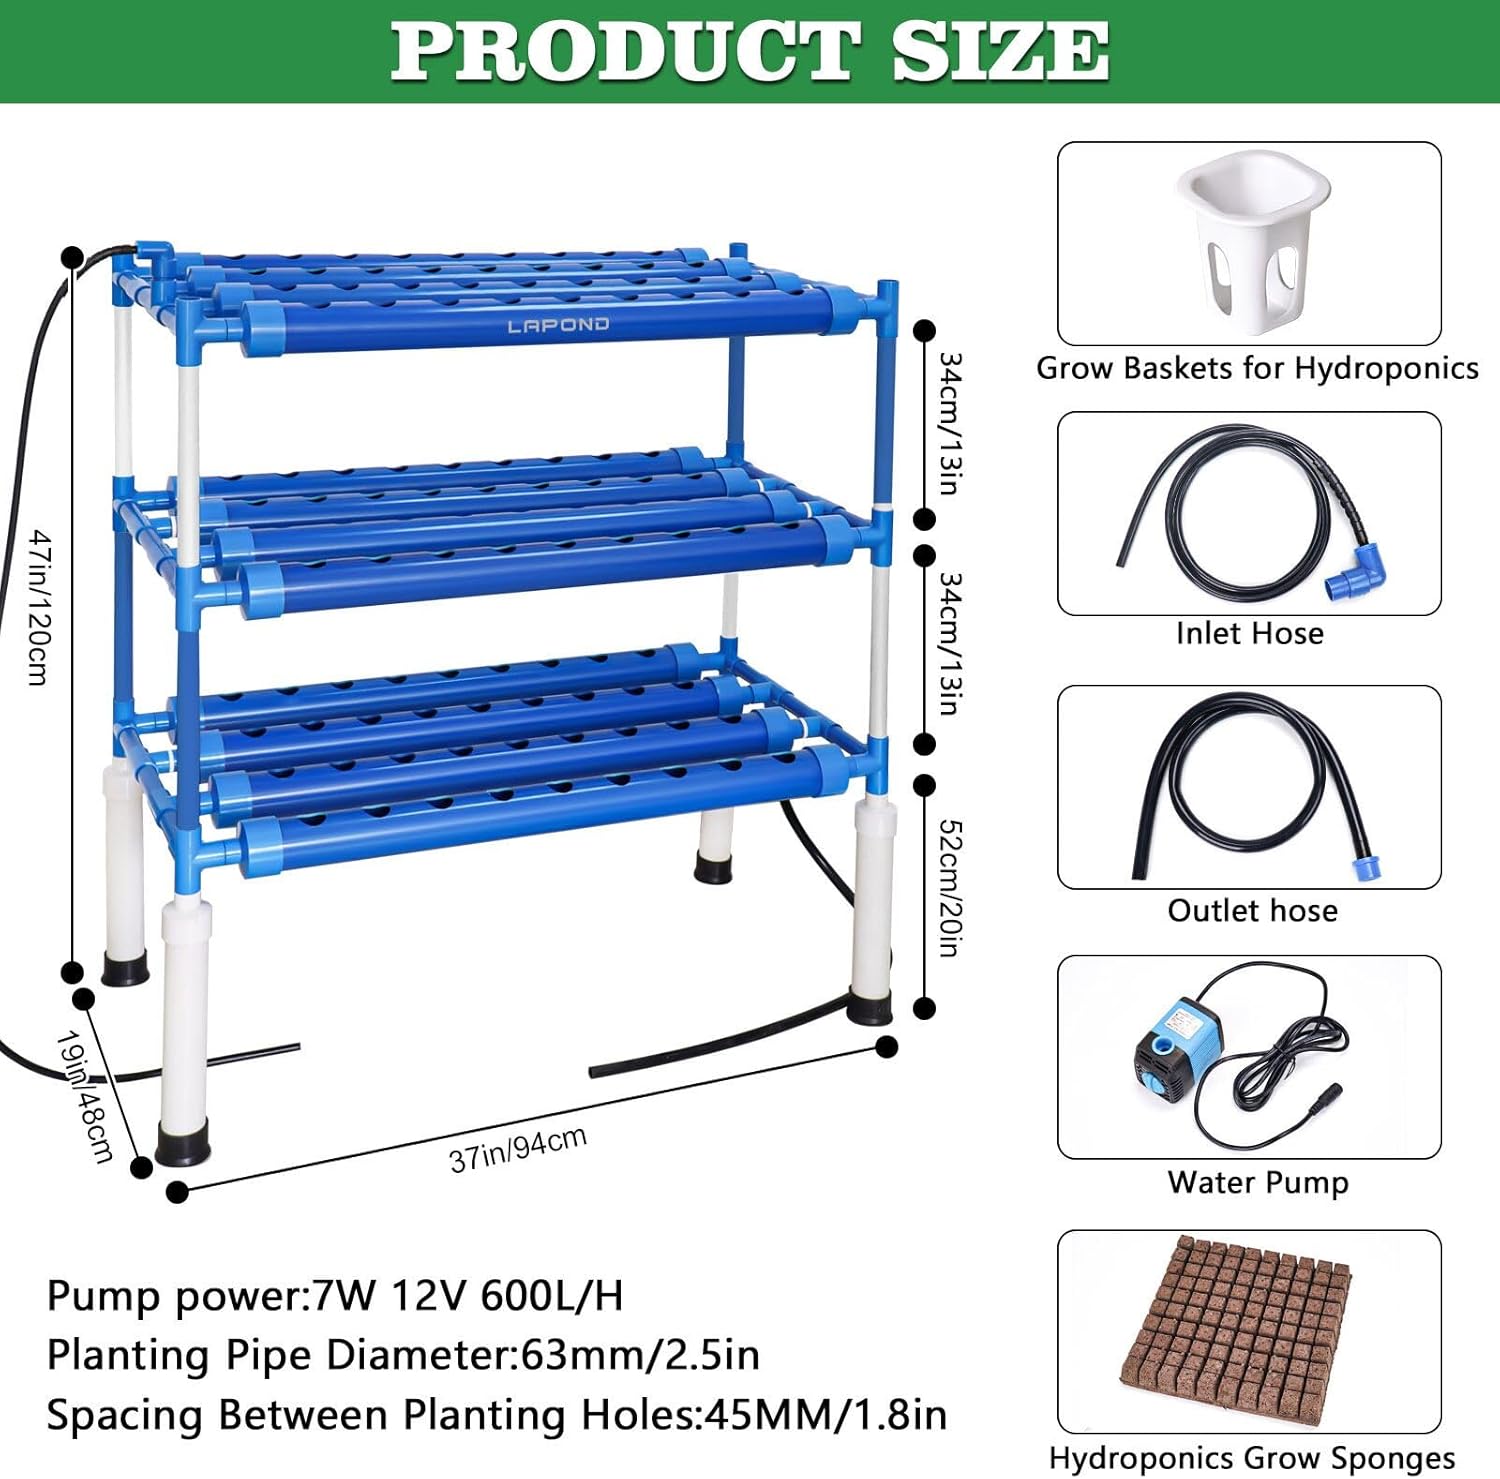
Image: A visual guide detailing the six steps of hydroponic planting, from soaking sponges to harvesting mature plants.
This system is ideal for leafy vegetables such as lettuce, rape, celery, beets, bell peppers, garlic seedlings, canola, and more. It offers no soil planting, no pesticide residues, and no heavy metal infections, ensuring clean and healthy produce.

Image: A comparison chart highlighting the benefits of the LAPOND hydroponic grow kit over traditional soil planting, such as no soil, no pests, automatic water circulation, and faster growth.
5. Itọju
Regular maintenance ensures the longevity and efficiency of your hydroponics system:
- Awọn iyipada omi: It is recommended to change the water in the reservoir weekly to maintain optimal nutrient levels and prevent nutrient imbalances.
- Ìdènà Ewéko: The dark blue pipes are designed to block light and effectively inhibit algae growth. However, regularly inspect the system for any signs of algae, especially in the reservoir or exposed areas. Clean as needed.
- Fifọ fifa: Periodically clean the water pump to prevent mineral buildup and ensure efficient operation. Refer to the pump's specific instructions for cleaning.
- Pipe Inspection: Check the PVC pipes and connections for any blockages or leaks. Use the provided leak sealing tape for minor repairs if necessary.
- Isọsọ eto: After each harvest cycle or as needed, thoroughly clean the entire system to remove any plant debris, nutrient residue, or algae buildup.
6. Laasigbotitusita
Eyi ni diẹ ninu awọn ọran ti o wọpọ ati awọn ojutu wọn:
| Isoro | Owun to le Fa | Ojutu |
|---|---|---|
| Omi Leaks | Loose connections or fittings. | Ensure all pipe connections are firmly seated. Use the provided hammer to gently tap joints. Apply leak sealing tape if needed. |
| Isan omi ti ko dara | Clogged pump or hoses; low water level in reservoir. | Clean the water pump and hoses. Ensure the reservoir has sufficient water to fully submerge the pump. |
| Idagbasoke Ewe | Excessive light exposure to water/pipes; high nutrient levels. | Ensure blue pipes are not damaged or exposed to direct light. Clean affected areas. Maintain proper nutrient concentrations. |
| Plants Not Growing Well | Incorrect nutrient balance; insufficient light; improper pH. | Check and adjust nutrient solution concentration and pH. Ensure plants receive adequate light (consider supplemental LED grow lights for indoor use). |
| Pump Ko ṣiṣẹ | Not plugged in; timer setting incorrect; dry burning protection activated. | Check power connection. Verify timer settings. Ensure pump is fully submerged in water. |
7. Awọn pato
- Awọn iwọn ọja: 31 x 11 x 11 inches
- Ìwọ̀n Nkan: 26 iwon
- Olupese: Siyan
- Nọmba awoṣe: HYD-3-P
- Plant Sites: 108 (3 layers)
- Iwọn ila opin Tube: 2.5 inches (63mm)
- Spacing Between Planting Holes: 1.8 inches (45mm)
- Adidi fifa: 7W 12V 600L/H
- Ohun elo: Food-grade PVC pipes
Image: A detailed diagram showing the product dimensions and key components like grow baskets, hoses, water pump, and grow sponges.
8. Atilẹyin ọja & Atilẹyin
For any questions, technical support, or warranty inquiries regarding your LAPOND Hydroponics Growing System Kit, please contact LAPOND customer service. While specific warranty details are not provided in this manual, extended protection plans may be available for purchase through your retailer. Please retain your proof of purchase for any warranty claims.
For additional resources, you may refer to the official installation manual available online: Ilana fifi sori ẹrọ (PDF).