1. Ifihan
Thank you for choosing the ONNAIS Iron PRO Biometric Fingerprint Gun Safe. This manual provides essential instructions for the safe and effective use of your new security device. Please read this manual thoroughly before installation and operation, and retain it for future reference.
The ONNAIS Iron PRO is designed to provide secure storage for handguns and other valuables, featuring advanced biometric and keypad access, along with emergency backup options.
2. Alaye Aabo
- Always store firearms unloaded and locked within the safe.
- Keep the safe keys in a secure location, separate from the safe, and inaccessible to unauthorized individuals.
- Do not store the emergency keys inside the safe.
- Ensure the safe is securely mounted or anchored to prevent unauthorized removal.
- Keep children and unauthorized persons away from the safe.
- Test all access methods (fingerprint, keypad, key) after initial setup and periodically.
3. Package Awọn akoonu
Daju pe gbogbo awọn nkan wa ninu apo rẹ:
- ONNAIS Iron PRO Biometric Fingerprint Gun Safe (Standard Model)
- Àwọn Kọ́kọ́rọ́ Àfikún Pajawiri (2)
- Okun Aabo
- Iṣagbesori Skru (4)
- Afowoyi Olumulo (iwe-ipamọ yii)
4. Awọn ẹya ara ẹrọ Ọja Loriview
The ONNAIS Iron PRO safe offers multiple security and convenience features:
- Sensọ Ìtẹ̀wé Ìka Onímọ̀-ẹ̀rọ: High-resolution sensor for rapid access.
- Bọtini oni-nọmba: For programmable passcode entry.
- Iwọle si Bọtini Pajawiri: Provides mechanical override in case of battery failure or forgotten codes.
- Emergency USB-C Power Supply: Allows temporary power for biometric/keypad access if internal batteries are depleted.
- Imọlẹ LED inu inu: Switchable light for visibility in low-light conditions.
- Aláyè gbígbòòrò: Accommodates up to two standard-sized pistols with protective padding.
- Alloy Steel Construction: Durable and robust material for enhanced security.
- Cable Aabo: For anchoring the safe to fixed objects.
- Awọn ihò Iṣagbesori ti a ti gbẹ tẹlẹ: For permanent installation to a wall or floor.

Image: The ONNAIS Iron PRO safe with its lid open, revealing two handguns, magazines, and bullets stored within. The interior is illuminated by a blue LED light, and the biometric fingerprint sensor and keypad are visible on the front panel.
5. Awọn ilana iṣeto
5.1. Fifi sori batiri
- Locate the battery compartment, typically on the underside or rear of the safe.
- Ṣii ideri iyẹwu batiri naa.
- Insert four (4) AA batteries, ensuring correct polarity (+/-). Batteries are not included.
- Pa ideri batiri naa ni aabo.
- The safe will emit a beep, indicating successful power-up.

Aworan: A sunmọ-soke view of the ONNAIS Iron PRO safe's side, highlighting the battery compartment for four AA batteries and the USB-C port for emergency power backup.
5.2. Programming Fingerprints
The safe can store up to 50 unique fingerprints.
- With the safe door open, locate the 'ADD' button on the control panel (usually near the keyhole or USB-C port).
- Press the 'ADD' button. The indicator light will flash, and the safe will beep.
- Place your finger firmly on the fingerprint sensor. Lift and repeat this action several times (typically 4-5 times) from different angles until the safe confirms successful registration with a long beep or green light.
- To add more fingerprints, repeat steps 2 and 3 for each finger.
- Test each registered fingerprint to ensure proper function before closing the safe.
5.3. Eto koodu iwọle
The safe supports a digital passcode for entry.
- With the safe door open, locate the 'ADD' button.
- Press the 'ADD' button. The indicator light will flash.
- Enter your desired passcode (e.g., 1-5 digits) on the keypad, then press 'OK'.
- Re-enter the same passcode and press 'OK' again to confirm.
- The safe will confirm successful registration with a long beep or green light.
- Test the passcode to ensure proper function before closing the safe.

Image: A composite image detailing the security features of the ONNAIS Iron PRO safe, including the high-strength lock core, the digital keypad, the high-resolution fingerprint sensor, and the control panel with 'ADD', 'DEL', and 'RESET' buttons.
6. Awọn ilana Iṣiṣẹ
6.1. Ṣíṣí pẹ̀lú ìka ọwọ́
- Place a registered finger firmly on the fingerprint sensor.
- If recognized, the safe will unlock, and the lid will open automatically.
6.2. Ṣíṣí pẹ̀lú Koodu Ìpamọ́
- Enter your registered passcode on the keypad.
- Tẹ bọtini 'O dara'.
- If the passcode is correct, the safe will unlock, and the lid will open automatically.
6.3. Nsii pẹlu bọtini pajawiri
- Locate the keyhole on the front panel of the safe.
- Insert one of the emergency keys into the keyhole.
- Turn the key to unlock the safe. The lid will open.
6.4. Using Emergency USB-C Power
If the internal batteries are depleted, you can use an external USB-C power source to temporarily power the safe for access.
- Connect a USB-C cable from a power bank or adapter to the USB-C port on the safe's front panel.
- Once powered, you can use your registered fingerprint or passcode to open the safe as usual.
- After opening, replace the internal AA batteries.
6.5. Interior Light Operation
The safe features a switchable interior LED light for improved visibility.
- The light typically activates automatically when the safe is opened.
- Some models may have a manual switch inside the safe to turn the light on or off, or it may be controlled by the opening mechanism. Refer to specific product details if a switch is not immediately apparent.

Image: A person in bed reaching for the ONNAIS Iron PRO safe on a nightstand. The safe is open, and its interior is lit by a blue LED, providing visibility in a dim room.
7. Fifi sori ẹrọ ati iṣagbesori
7.1. Using the Security Cable
The included security cable allows you to anchor the safe to a fixed object, such as a bed frame or desk leg, to deter theft.
- Loop the security cable around a sturdy, immovable object.
- Feed the end of the cable with the metal loop through the designated slot on the safe (usually on the side or back).
- Ensure the cable is taut and the safe is securely attached.
7.2. Wall or Floor Mounting
For maximum security, the safe can be permanently mounted to a wall or floor using the pre-drilled holes and included screws.
- Choose a suitable location for mounting, ensuring the surface is solid and can support the safe's weight and contents.
- Open the safe door to access the pre-drilled holes in the bottom or back panel.
- Position the safe and mark the drilling points through the holes onto the mounting surface.
- Drill pilot holes into the marked spots.
- Align the safe with the pilot holes and secure it using the provided mounting screws. Tighten firmly.

Image: A visual guide demonstrating two methods of securing the ONNAIS Iron PRO safe: using the included 31.5-inch security cable to anchor it to a piece of furniture, and mounting it to a wall using two screws through pre-drilled holes.
8. Itọju
8.1. Batiri Rirọpo
Replace the AA batteries when the low battery indicator light appears or when the safe fails to respond promptly. Always use fresh, high-quality alkaline batteries.
- Open the safe using the emergency key if the batteries are completely dead.
- Wa ki o ṣii yara batiri naa.
- Yọ awọn batiri atijọ kuro ki o si sọ wọn nù ni ifojusọna.
- Insert four new AA batteries, observing correct polarity.
- Close the compartment. Test the safe's electronic functions.
8.2. Ninu
Nu ita ti ailewu pẹlu asọ, damp cloth. Avoid abrasive cleaners or solvents that could damage the finish or electronic components. Regularly wipe the fingerprint sensor to ensure optimal performance.
9. Laasigbotitusita
- Safe does not open with fingerprint/passcode:
- Rí i dájú pé àwọn bátìrì kò ti tán. Rọpò rẹ̀ tí ó bá pọndandan.
- Clean the fingerprint sensor.
- Re-register your fingerprint or passcode.
- Use the emergency key or USB-C power for access.
- Safe makes a continuous beeping sound:
- This usually indicates low battery power. Replace batteries immediately.
- Lid does not open smoothly:
- Check for any obstructions around the lid or hinges.
- Ensure the safe is on a level surface if not mounted.
- Cannot register new fingerprints/passcodes:
- Ensure you are following the programming steps correctly.
- If the safe is full (50 fingerprints), you may need to delete existing ones. Refer to the full user manual for 'DEL' or 'RESET' instructions.
10. Awọn pato
| Brand | ONNAIS |
| Nọmba awoṣe | IRON PRO |
| Ọja Mefa | 2.91"D x 9.17"W x 3.07"H |
| Titiipa Iru | Electronic Combination Lock, Biometric Fingerprint |
| Àwọ̀ | Dudu |
| Ohun elo | Alloy Irin |
| Iṣagbesori Iru | Wall Mount, Floor Mount, Security Cable |
| Iwọn Nkan | 6.38 iwon |
| Orisun agbara | 4 x AA Batteries (not included), Emergency USB-C Power |
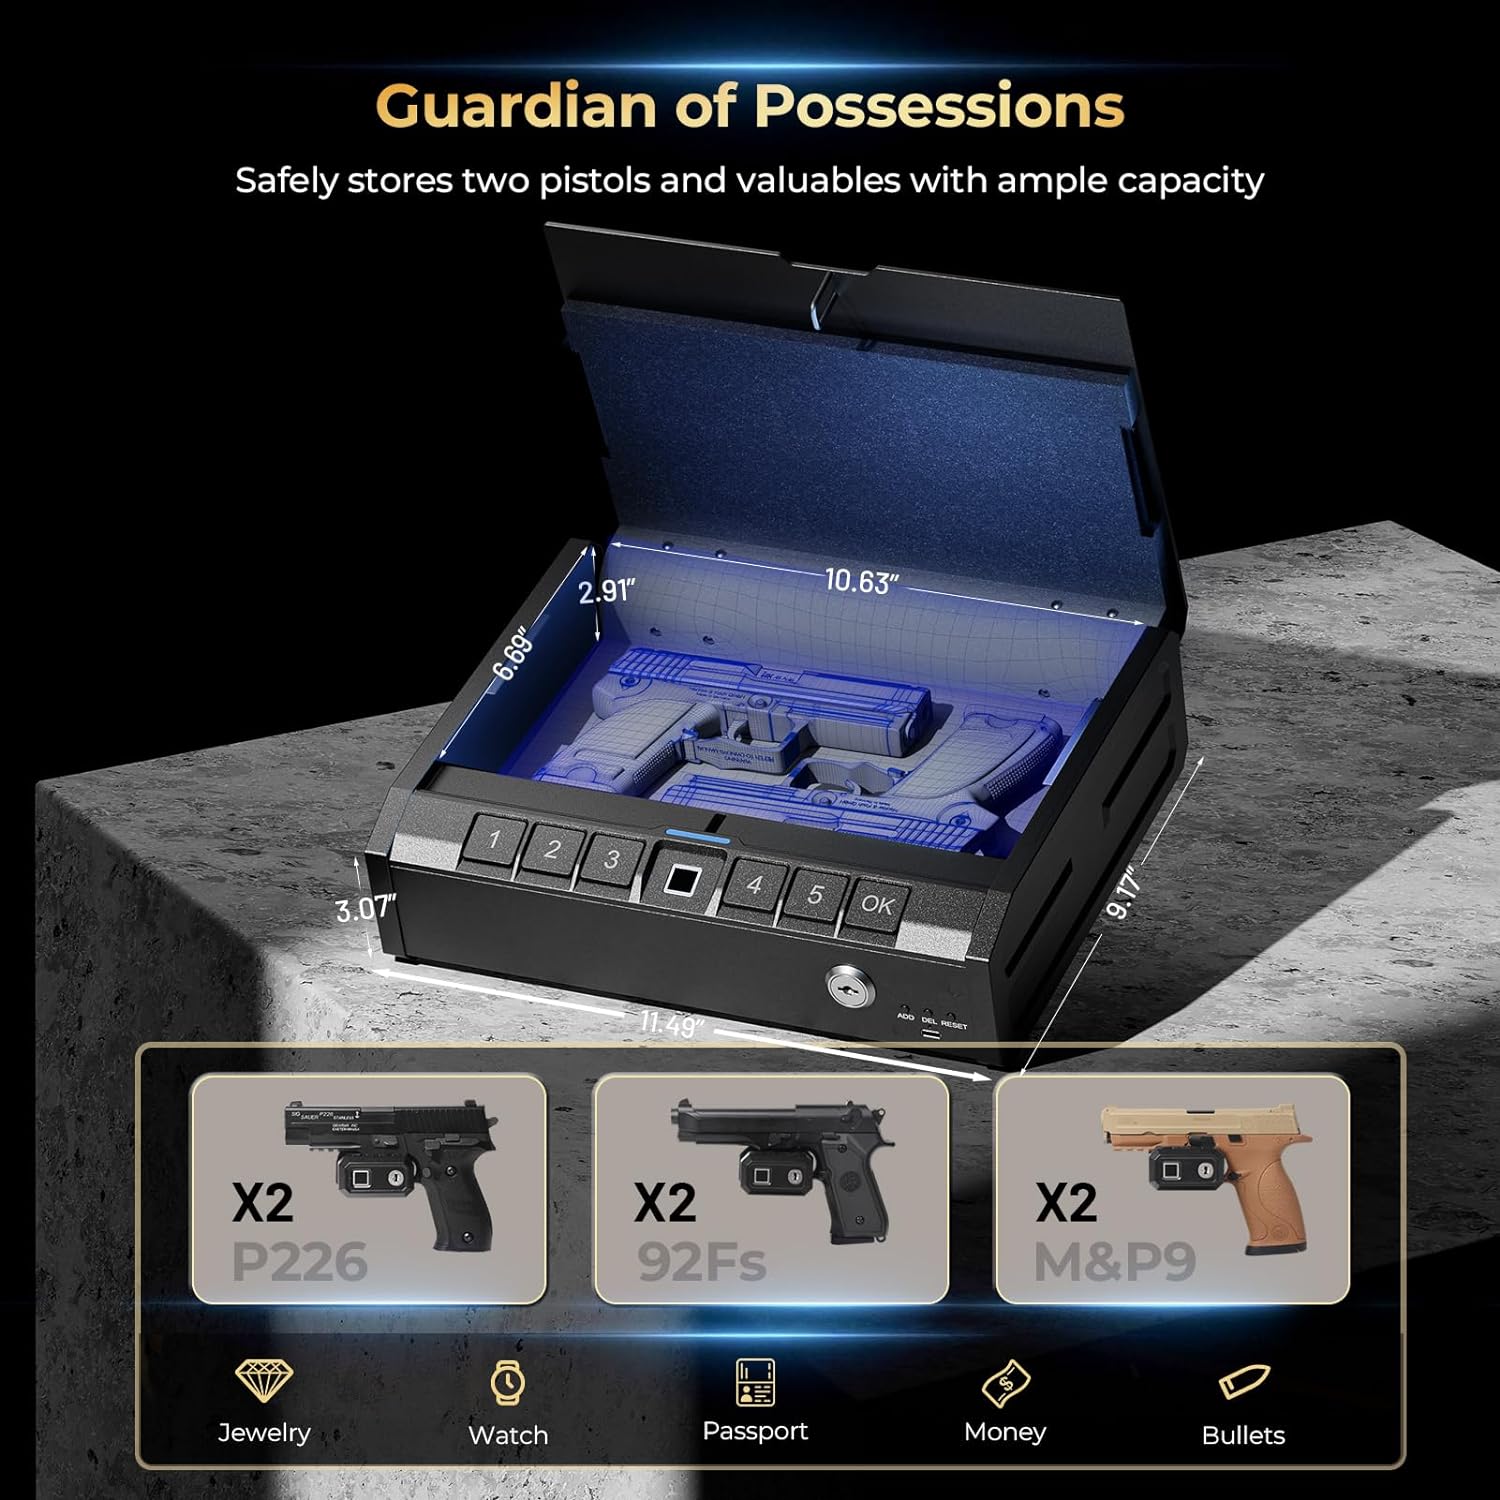
Image: An illustration of the ONNAIS Iron PRO safe with its key dimensions (2.91"D x 9.17"W x 3.07"H, 10.63" interior width, 11.48" exterior width) and examples of items it can store, including two pistols (P226, 92Fs, M&P9), jewelry, watches, passports, money, and bullets.
11. Atilẹyin ọja ati Support
The ONNAIS Iron PRO Biometric Fingerprint Gun Safe is backed by a 2-odun atilẹyin ọja.
For technical assistance, troubleshooting, or warranty claims, please contact ONNAIS customer service. Our support team is available 24 hours a day to assist you.
For the most up-to-date contact information, please visit the official ONNAIS webaaye tabi tọka si iwe rira rẹ.


