1. Ifihan
This manual provides comprehensive instructions for the installation, operation, and maintenance of your TP-Link VIGI NVR1004H 4 Channel Network Video Recorder. Please read this manual thoroughly before using the device to ensure proper setup and functionality. The VIGI NVR1004H is designed to manage and record video streams from up to 4 IP cameras, offering features such as 4K HDMI video output, H.265+ video compression, and remote monitoring capabilities.
2. Ọja Ipariview
2.1 Key Awọn ẹya ara ẹrọ
- 4-ikanni Live View and 4K HDMI Video Output: Ṣe atilẹyin igbakana viewing of up to 4 camera feeds and outputs video in up to 4K resolution via HDMI.
- 2-ch @ 8MP/ 4-ch @ 4MP Decoding Capability: Efficiently decodes high-resolution video streams.
- 4-Channel Synchronous Playback: Allows simultaneous playback of recorded footage from 4 channels.
- 80 Mbps Incoming Bandwidth and 60 Mbps Outgoing Bandwidth: Ensures smooth recording and remote access.
- 1 SATA Interface (up to 16 TB): Supports a single SATA hard drive for extensive video storage.
- H.265+ Fidio funmorawon: Advanced compression technology to save storage space and bandwidth.
- ONVIF and CGI Compatibility: Ensures broad compatibility with various IP cameras.
- Pulọọgi & Ṣiṣẹ: Simplifies camera setup and integration.
- Audio Ọna Meji: Supports audio communication through connected cameras.
- Abojuto latọna jijin: Access and manage your NVR via the VIGI app or web ni wiwo.
2.2 Package Awọn akoonu
Package yẹ ki o ni awọn nkan wọnyi:
- VIGI Network Video Recorder (NVR1004H)
- Adapter agbara
- HDD skru
- Asin
- Roba Ẹsẹ
- Awọn ọna fifi sori Itọsọna
2.3 Ifilelẹ ẹrọ

Figure 1: Front Panel of VIGI NVR1004H
This image displays the front panel of the TP-Link VIGI NVR1004H, showing the USB ports for mouse and external storage, and LED indicators for LAN, HDD, and Power status.
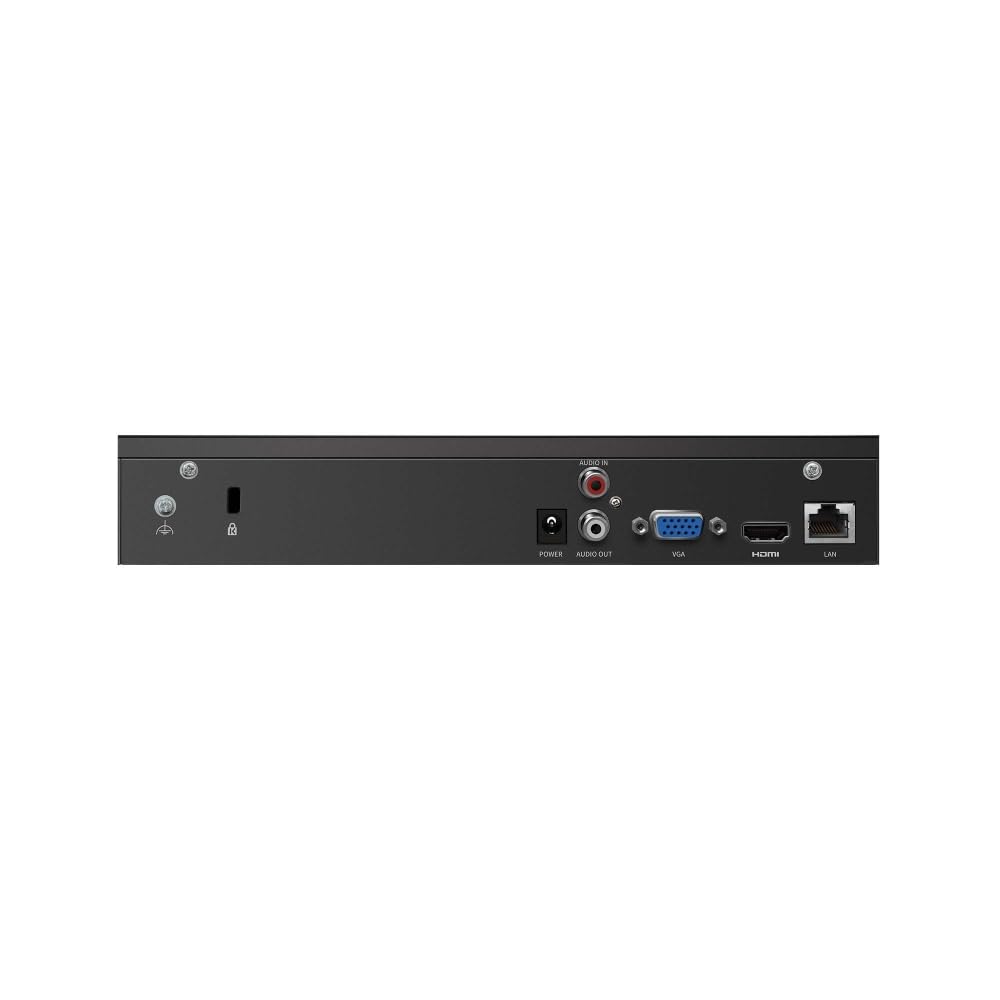
Figure 2: Rear Panel of VIGI NVR1004H
This image illustrates the rear panel connections of the TP-Link VIGI NVR1004H, including the power input, audio input/output, VGA port, HDMI port, and LAN port for network connectivity.
3. Eto
3.1 Fifi sori ẹrọ Hardware
- Fi Hard Disk Drive (HDD):
Unscrew the cover of the NVR. Connect a compatible SATA HDD (up to 16 TB) to the SATA data and power cables inside the NVR. Secure the HDD using the provided screws. Replace the cover.
- Awọn Agbeegbe Sopọ:
- Connect a monitor to the NVR's HDMI or VGA port.
- Connect the included mouse to a USB port on the NVR's front panel.
- Connect the NVR to your network router or switch using an Ethernet cable via the LAN port.
- Agbara Tan:
So ohun ti nmu badọgba agbara pọ si titẹ agbara NVR ati lẹhinna pulọọgi sinu iṣan agbara kan. NVR yoo ṣiṣẹ laifọwọyi.
3.2 Initial Configuration (Auto Initialize)
Upon the first boot, the NVR will guide you through an initial setup process. This includes setting up basic IPC (IP Camera) and hard disk parameters.

Figure 3: Auto Initialize Process
This image illustrates the three steps of the Auto Initialize process: "Click 'Auto Initialize'", "Initializing", and "Done", showing the on-screen prompts for quick configuration of devices and hard disk settings.
- Follow the on-screen prompts. Click "Auto Initialize" to begin the process.
- The NVR will detect connected devices and configure hard disk settings.
- Once complete, you can proceed to add cameras and further customize settings.
4. Awọn ilana Iṣiṣẹ
4.1 Live View
After successful setup, the NVR will display the live feeds from connected cameras on the monitor. You can switch between single-camera view ati olona-kamẹra akoj view nípa lílo àwọn ìṣàkóso lórí ìbòjú tàbí àsin.
4.2 Sisisẹsẹhin
Lati tunview foo ti o ti gbasilẹtage:
- Ọtun-tẹ lori ifiwe view screen to access the main menu.
- Select "Playback".
- Choose the desired camera(s), date, and time range for playback. The NVR supports 4-channel synchronous playback.
4.3 Latọna Abojuto
The VIGI NVR1004H supports remote monitoring via the VIGI app (available for smartphones) or a web kiri ayelujara.
- VIGI App: Download the TP-Link VIGI app from your device's app store. Follow the in-app instructions to add your NVR by scanning the QR code or manually entering device details.
- Web Aṣàwákiri: Access the NVR's web ni wiwo nipa titẹ awọn oniwe-IP adirẹsi sinu kan web kiri lori kọmputa kan ti a ti sopọ si kanna nẹtiwọki.
4.4 Meji-Ona Audio
If your connected cameras support two-way audio and you have an external speaker/microphone connected to the NVR's audio ports, you can enable two-way communication through the NVR interface or the VIGI app.
5. Itọju
5.1 Itọju Gbogbogbo
- Jeki NVR ni agbegbe ti o ni afẹfẹ daradara lati ṣe idiwọ igbona.
- Yago fun ṣiṣafihan ẹrọ naa si imọlẹ orun taara, ọrinrin, tabi awọn iwọn otutu to gaju.
- Mọ ode pẹlu asọ ti o gbẹ. Maṣe lo awọn olutọpa olomi.
5.2 famuwia imudojuiwọn
Regularly check the TP-Link VIGI website for firmware updates. Keeping your NVR's firmware up-to-date ensures optimal performance, security, and access to new features. Follow the instructions provided with the firmware update package carefully.
6. Laasigbotitusita
6.1 Wọpọ Oran ati Solusan
- NVR stuck on TP-Link screen during boot:
This can sometimes occur due to a minor software glitch. To resolve, power off the NVR, open the casing, locate the internal reset button (refer to the quick installation guide for exact location), press and hold it for a few seconds, then restart the device. This typically resolves the issue.
- No video output on monitor:
- Rii daju pe okun HDMI/VGA ti sopọ ni aabo si mejeeji NVR ati atẹle naa.
- Rí i dájú pé ẹ̀rọ ìṣiṣẹ́ náà ti ń ṣiṣẹ́, kí o sì ṣètò rẹ̀ sí orísun ìtẹ̀síwájú tó tọ́.
- Gbiyanju okun waya tabi iboju miiran ti o ba wa.
- Awọn kamẹra ko han ni laaye view:
- Check network connectivity for both the NVR and the cameras.
- Ensure cameras are powered on and properly configured.
- Verify that the cameras are compatible with the NVR (ONVIF/CGI).
- Attempt to re-add the cameras through the NVR's interface.
- Remote access not working:
- Ensure the NVR has an active internet connection.
- Verify that the VIGI app is updated to the latest version.
- Check network settings and port forwarding rules on your router if necessary.
7. Awọn pato
| Awoṣe | VIGI NVR1004H |
| Ọja Mefa | 24.6 x 14.8 x 4.5 centimeters |
| Iwọn Nkan | 590 g |
| Asopọmọra Technology | Ti firanṣẹ |
| Awọn ẹrọ ibaramu | Camera, Laptop, Personal Computers, Smartphone, Tablet |
| Agbara Ibi ipamọ Iranti | Up to 16 TB (1 SATA Interface) |
| Bandiwidi ti nwọle | 80 Mbps |
| Bandiwidi ti njade | 60 Mbps |
| Ijade fidio | 4K HDMI, VGA |
| Agbara Ipinnu | 2-ch @ 8MP / 4-ch @ 4MP |
| Fidio funmorawon | H.265 + |
| Awọn ajohunše | ONVIF, CGI |
| Olupese | TP-Link |
| Ilu isenbale | India |
8. Atilẹyin ọja ati Support
For warranty information and technical support, please contact TP-Link customer service. You can reach them via the following details:
- Olukowọle: TP-link India Private ltd.
- Adirẹsi: Office no 201, 2nd floor A-wing Time Square Building, Marol naka, Andheri Kurla Road, Andheri East, Mumbai, India
- Owo Ọfẹ: 1800 2094 168
- Imeeli: support.in@tp-link.com
Jọwọ ṣe idaduro iwe rira rẹ fun awọn iṣeduro atilẹyin ọja.


