1. Ifihan
The Pronomic DX-50 USB MKII is a professional 4-channel DJ mixer designed for a wide range of applications, including discos, parties, restaurants, and presentations. Its user-friendly design ensures that both experienced and less experienced users can fully utilize its features. This manual provides detailed instructions for setting up, operating, and maintaining your mixer.
Key features include a recording function, integrated Bluetooth interface, USB player with transport controls, and multiple input channels.
2. Awọn Ilana Aabo pataki
- Ka Awọn ilana: Ka gbogbo awọn ilana aabo ati iṣiṣẹ ṣaaju lilo ọja naa.
- Daduro Awọn ilana: Tọju aabo ati awọn ilana iṣiṣẹ fun itọkasi ọjọ iwaju.
- Awọn ikilọ Tẹtisi: Tẹmọ gbogbo awọn ikilọ lori ọja ati ninu awọn ilana ṣiṣe.
- Tẹle Awọn ilana: Tẹle gbogbo awọn ilana ṣiṣe ati lilo.
- Omi ati Ọrinrin: Do not use this apparatus near water (e.g., bathtub, washbowl, kitchen sink, laundry tub, wet basement, or swimming pool).
- Afẹfẹ: Ma ṣe dina eyikeyi awọn ṣiṣi atẹgun. Fi sori ẹrọ ni ibamu pẹlu awọn ilana ti olupese.
- Ooru: Maṣe fi sori ẹrọ nitosi awọn orisun ooru gẹgẹbi awọn imooru, awọn iforukọsilẹ ooru, awọn adiro, tabi awọn ohun elo miiran (pẹlu ampliifiers) ti o gbe ooru jade.
- Awọn orisun agbara: Use only power sources specified by the manufacturer.
- Aabo Agbara-Okun: Dabobo okun agbara lati ma rin lori tabi pin, ni pataki ni awọn pilogi, awọn ohun elo irọrun, ati aaye nibiti wọn ti jade kuro ninu ohun elo naa.
- Ninu: Mọ pẹlu asọ gbigbẹ nikan.
- Ṣiṣẹ: Ma ṣe gbiyanju lati ṣe iṣẹ ọja funrararẹ nitori ṣiṣi tabi yiyọ awọn ideri le fi ọ han si voltage tabi awọn ewu miiran. Tọkasi gbogbo iṣẹ si awọn oṣiṣẹ iṣẹ ti o peye.
3. Package Awọn akoonu
Please check that all items listed below are included in your package. If any items are missing or damaged, contact your dealer immediately.
- Pronomic DX-50 USB MKII DJ Mixer
- Adapter Agbara (AC 12V)
- USB Stick (32 GB, if included in your specific bundle)
- Afowoyi Olumulo (iwe-ipamọ yii)
4. Ọja Ipariview
Familiarize yourself with the various controls and connections on your DX-50 USB MKII mixer.
4.1 Iwaju Panel idari
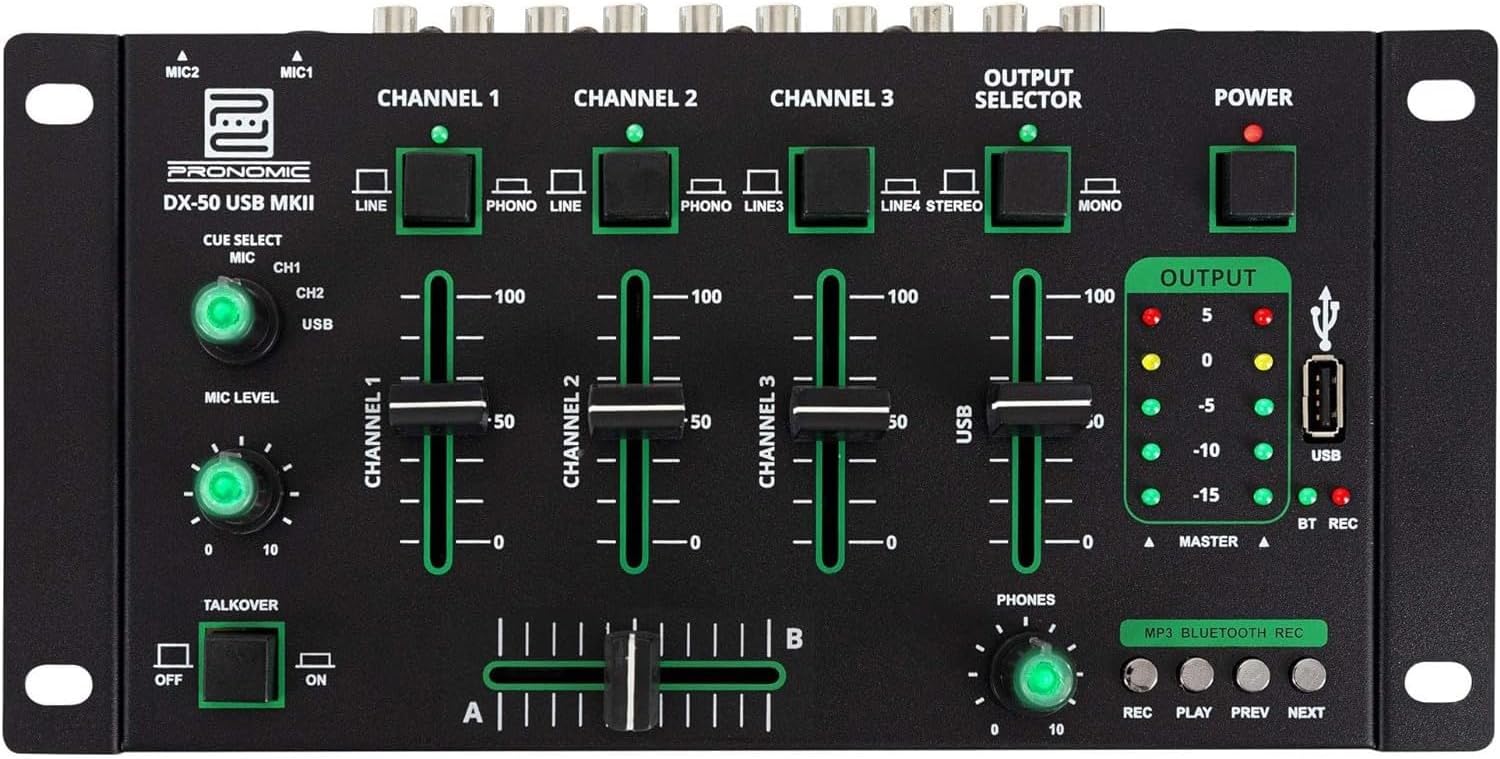
- MIC 1/2 Inputs: Connect microphones.
- Channel 1-4 Input Selectors: Switch between LINE, PHONO, or USB/Bluetooth inputs for each channel.
- Awọn Faders ikanni: Adjust the volume level for each channel.
- CUE Select Buttons: Route specific channels to the headphone output for monitoring.
- MIC Level Knob: Adjust the volume of the microphone inputs.
- Talkover Switch: Activates the talkover function, which automatically lowers music volume when speaking into the microphone.
- Output Selector: Choose between Stereo or Mono master output.
- Agbara Yi pada: Yipada alapọpo titan/pa.
- Awọn Mita Ipele Ijade: LED indicators showing the master output level.
- Ibudo USB: Connect a USB drive for MP3 playback and recording.
- MP3/Bluetooth/REC Player Controls: Buttons for Play/Pause, Previous, Next, and Record functions for the integrated player.
- Ipele Ipele Foonu: Ṣe atunṣe iwọn didun ti iṣelọpọ agbekọri.
- Crossfader (A/B): Blends between channels assigned to A and B.
4.2 Ru Panel Awọn isopọ

- Ìbáṣepọ̀ Agbára AC 12V: So ohun ti nmu badọgba agbara ti a pese nibi.
- Àgbéjáde FÓÒNÙ: Jack 6.3mm fun sisopọ awọn agbekọri.
- MASTER OUT L/R (RCA): Sopọ si akọkọ rẹ amplifier tabi agbara agbohunsoke.
- Channel 1 & 2 Inputs (RCA Line/Phono): Connect turntables (Phono) or other line-level devices (CD players, media players). Use the front panel selector to switch.
- Channel 3 & 4 Inputs (RCA Line): Connect line-level devices.
- MIC 1 & 2 Inputs (6.3mm Jack): Connect microphones.
5. Eto
Follow these steps to set up your Pronomic DX-50 USB MKII mixer:
- Asopọ agbara: Ensure the mixer's power switch is in the OFF position. Connect the supplied AC 12V power adapter to the "AC 12V" input on the rear panel of the mixer. Plug the adapter into a suitable power outlet.
- Master Output Connection: Connect the "MASTER OUT L/R" RCA outputs on the rear panel to the inputs of your amplifier tabi agbara agbohunsoke.
- Asopọmọra ẹrọ:
- Turntables: Connect turntables to the "CHANNEL 1" or "CHANNEL 2" RCA inputs. Set the corresponding input selector on the front panel to "PHONO".
- CD Players/Line Devices: Connect CD players, media players, or other line-level devices to "CHANNEL 1", "CHANNEL 2", "CHANNEL 3", or "CHANNEL 4" RCA inputs. Set the corresponding input selector on the front panel to "LINE".
- Awọn gbohungbohun: Connect microphones to the "MIC 1" or "MIC 2" 6.3mm jack inputs on the rear panel.
- Asopọ agbekọri: Connect your headphones to the "PHONES" 6.3mm jack on the rear panel.
- USB Drive (Optional): If using a USB drive for playback or recording, insert it into the "USB" port on the front panel.
- Agbara Tan: Once all connections are made, switch the mixer's power switch to the ON position. The power indicator LED will illuminate.
6. Awọn ilana Iṣiṣẹ
6.1 Ipilẹ dapọ
- Yan Igbewọle: For each channel, use the input selector switch (LINE/PHONO/USB/BT) to choose the desired audio source.
- Ṣàtúnṣe Ìwọ̀n Ìkànnì: Use the vertical faders for each channel to adjust its individual volume level.
- Ijade Ọga: Monitor the "OUTPUT" LED meters and adjust the master volume knob (if present, otherwise rely on channel faders and amplifier volume) to achieve a suitable overall output level without clipping.
- Agbelebu: Use the crossfader to smoothly transition between channels assigned to A and B. Channels 1 and 2 are typically assigned to the crossfader.
6.2 Gbohungbohun Lilo
- Connect your microphone to one of the MIC inputs on the rear panel.
- Adjust the "MIC LEVEL" knob on the front panel to control the microphone's volume.
- Talkover Function: Activate the "TALKOVER" switch to automatically reduce the volume of the music when you speak into the microphone. This is useful for announcements.
6.3 USB Sisisẹsẹhin ati Gbigbasilẹ
- Sisisẹsẹhin USB: Fi kọnputa USB ti o ni MP3 sii files into the "USB" port. Select "USB" as the input source for the dedicated USB channel. Use the "PLAY/PAUSE", "PREV", and "NEXT" buttons to control playback.
- Gbigbasilẹ USB: Press the "REC" button to start recording the master output to the connected USB drive. Press "REC" again to stop recording. Ensure your USB drive has sufficient free space and is formatted correctly (FAT32 is commonly supported).
6.4 Bluetooth Asopọmọra
- Mu Bluetooth ṣiṣẹ: Select "BT" as the input source for the dedicated Bluetooth channel. The mixer will enter pairing mode.
- Ohun elo Pàpọ: On your Bluetooth-enabled device (smartphone, tablet, etc.), search for available Bluetooth devices. Select "Pronomic DX-50 USB MKII" (or similar name) from the list to pair.
- Mu Ohun ṣiṣẹ: Once paired, you can play audio from your device through the mixer. Control playback from your device or using the mixer's transport controls (if supported by your device).
6.5 Monitoring with Headphones
- Connect headphones to the "PHONES" output.
- Use the "CUE SELECT" buttons to choose which channels you want to monitor in your headphones without affecting the main output.
- Adjust the "PHONES" level knob to set your desired headphone volume.
7. Itọju
- Ninu: Disconnect the power before cleaning. Use a soft, dry cloth to wipe the surface of the mixer. Do not use liquid cleaners, aerosols, or solvents.
- Ibi ipamọ: Tọju alapọpo ni itura, aye gbigbẹ kuro lati orun taara ati awọn iwọn otutu to gaju.
- Fader and Knob Care: Avoid excessive force when operating faders and knobs. Periodically check for dust or debris accumulation around moving parts.
- Iṣakoso USB: Ensure cables are not kinked or strained, which can lead to damage.
8. Laasigbotitusita
| Isoro | Owun to le Fa | Ojutu |
|---|---|---|
| Ko si agbara | Power adapter not connected; Power switch off; Faulty power outlet. | Check power adapter connection; Ensure power switch is ON; Try a different power outlet. |
| No sound from main output | Master volume too low; Amplifier/speakers off or disconnected; Incorrect input selection; Channel faders down. | Increase master volume; Check amplifier/speaker connections and power; Verify correct input selected for channels; Raise channel faders. |
| Ko si ohun lati olokun | Headphone volume too low; Headphones not connected; No CUE selected. | Increase PHONES level; Connect headphones properly; Press CUE button for desired channel. |
| Bluetooth ko so pọ | Mixer not in pairing mode; Device too far; Interference. | Ensure BT input is selected; Bring device closer; Restart mixer and device. |
| Sisisẹsẹhin USB ko ṣiṣẹ | USB drive not inserted correctly; Incorrect file format; USB drive not formatted correctly. | Re-insert USB drive; Ensure files are MP3; Format USB drive to FAT32. |
9. Awọn pato
| Awoṣe | Pronomic DX-50 USB MKII |
| Nọmba ti awọn ikanni | 4 |
| Asopọmọra Technology | Bluetooth, USB |
| Input Audio | RCA (line/phono), 6.3mm microphone, Bluetooth, USB |
| O wu Asopọmọra Iru | RCA (Master Out), 6.3mm (Phones) |
| Orisun agbara | Electric Cable (AC 12V adapter) |
| Dimensions (without corner brackets and controls) | 222 x 129 x 28 mm (Iwọn x Ijinle x Giga) |
| Total Dimensions (with corner brackets and controls) | 267 x 136 x 51 mm (Iwọn x Ijinle x Giga) |
| Iwọn | 790 g |
10. Atilẹyin ọja ati Support
For warranty information and technical support, please refer to the documentation provided with your purchase or contact your retailer. Keep your proof of purchase for any warranty claims.
For further assistance, you may also visit the official Pronomic webojula tabi kan si wọn onibara iṣẹ Eka.


