Ọrọ Iṣaaju
This manual provides detailed instructions for the setup, operation, and maintenance of your ARRIS Jumper T20S V2 Radio Controller. Please read this manual thoroughly before using the device to ensure proper function and safety.
Key Awọn ẹya ara ẹrọ
- RDC90 Sensor Gimbals: Experience precise and sensitive control for your RC devices.
- Vivid OLED Screen Display: Stay informed with crucial flight data, telemetry, and settings on a high-resolution screen.
- ELRS and EdgeTX Compatibility: Benefit from reliable, extended-range communication and advanced firmware capabilities.
- Atilẹyin Ọpọ Ilana: Connect effortlessly to a wide array of RC models and brands.
- Customization for Personalized Flying: Tailor your control setup with configurable switches, buttons, and functions via EdgeTX.
Ọja Pariview
Familiarize yourself with the components and design of your Jumper T20S V2 Radio Controller.

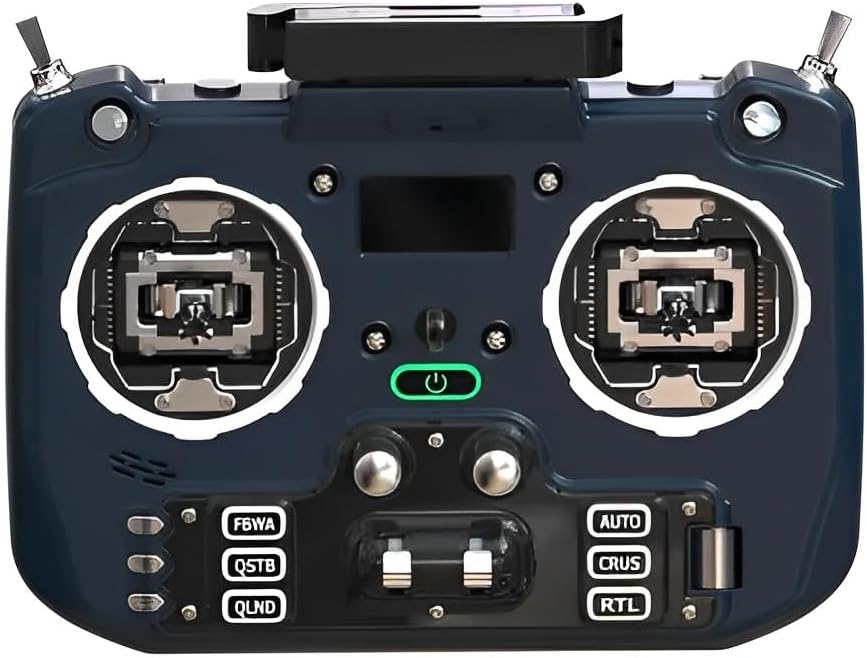
Aworan: Iwaju view of the Jumper T20S V2 Radio Controller, showing the gimbals, OLED screen, power button, and various control switches and buttons.
Aworan: iwaju igun view of the Jumper T20S V2 Radio Controller, highlighting the gimbals and control layout.

Aworan: Apa view of the Jumper T20S V2 Radio Controller, showing the foldable antenna in an extended position.

Aworan: Ẹyin view of the Jumper T20S V2 Radio Controller, displaying the external cooling fan and battery compartment area.

Image: Diagram illustrating the airflow and cooling fan system integrated into the Jumper T20S V2 for high-power ELRS operation.

Aworan: Isunmọ view of the omnidirectional foldable antenna, designed to provide stable signal support in all directions.
Ṣeto
1. Fifi sori batiri
- Open the battery compartment cover located on the rear of the controller.
- Insert two 21700 batteries, ensuring correct polarity.
- Pa ideri batiri naa ni aabo.
2. Agbara akọkọ Lori
- Press and hold the power button (located centrally on the front panel) until the OLED screen illuminates.
- Olùdarí náà yóò bẹ̀rẹ̀ sínú ẹ̀rọ ìṣiṣẹ́ EdgeTX.
3. Gimbal Calibration (Recommended)
For optimal performance, it is recommended to calibrate the gimbals after initial setup or if you experience inconsistent control. Refer to the EdgeTX documentation for detailed calibration procedures.
Awọn ilana Iṣiṣẹ
1. Navigation and Menu System
The Jumper T20S V2 utilizes the EdgeTX firmware. Navigation is primarily done using the scroll wheel and menu buttons. The OLED screen displays all relevant information.
- Yi lọ Kẹkẹ: Used to navigate through menus and adjust values.
- Awọn bọtini Akojọ: Access various settings and functions.
- Akojọ eto: Configure global settings, model setup, and radio calibration.
2. Model Setup and Binding
To control an RC model, you must first create a model profile and bind the controller to the receiver.
- Navigate to the Model Select screen in EdgeTX.
- Create a new model or select an existing one.
- Configure the internal or external RF module settings (e.g., ELRS, Multi-Protocol) to match your receiver.
- Initiate the binding process on both the controller and the receiver according to their respective manuals.
- Verify successful binding by checking receiver telemetry or control response.
3. Customizing Controls
The Jumper T20S V2 offers extensive customization. You can assign functions to switches, buttons, and sliders through the EdgeTX firmware.
- Access the Mixer and Special Functions menus within EdgeTX to configure control assignments.
- Adjust gimbal tension and stick settings by disassembling the radio, if desired (refer to advanced user guides for detailed instructions).
Itoju
- Ninu: Lo aṣọ rírọrùn tí ó gbẹ láti nu ìta ohun èlò ìdarí náà. Yẹra fún àwọn ohun èlò ìfọmọ́ tàbí àwọn ohun èlò ìfọ́mọ́.
- Ibi ipamọ: Store the controller in a cool, dry place, away from direct sunlight and extreme temperatures. Remove batteries if storing for extended periods.
- Awọn imudojuiwọn famuwia: Regularly check for and install the latest EdgeTX firmware updates to ensure optimal performance and access new features. Refer to the official EdgeTX webaaye fun awọn itọnisọna.
- Ìtọ́jú Gimbal: Keep gimbals free from dust and debris. Avoid applying excessive force.
Laasigbotitusita
- Controller does not power on:
- Ensure batteries are correctly installed and fully charged. Check battery polarity.
- No response from RC model:
- Verify that the controller is properly bound to the receiver. Check model settings in EdgeTX for correct RF protocol and channel assignments. Ensure the RC model's battery is charged and connected.
- OLED screen is blank or flickering:
- Restart the controller. If the issue persists, ensure firmware is up to date. Contact support if the problem continues.
- Gimbal movement is erratic:
- Perform a gimbal calibration through the EdgeTX system menu. Check for any physical obstructions or damage to the gimbals.
Awọn pato
| Ẹya ara ẹrọ | Ẹ̀kúnrẹ́rẹ́ |
|---|---|
| MCU | STM32F407ZGT6 |
| External Module Interface | Reserved (1.25mm-5P) |
| Iboju | 1.3" OLED (128*64) |
| External Module Power Supply | XT30 (2S2A output) |
| Kaadi SD | Chip-based internal (officially recommended by EdgeTX) |
| Irú Gimbal | Standard full size gimbal |
| Voltage | 6-8.4V |
| Gimbal Sensors | RDC90 / Hall optional |
| Batiri | 2pcs 21700 (not included) |
| Ijade agbara | O pọju 1W |
| Iwọn | 449g (batiri ko si) |
| Nọmba Awoṣe Nkan | LA0316 |
| Package Mefa | 8.7 x 7.91 x 3.78 inches |
| Ìwúwo Ohun kan (pẹ̀lú àwọn bátírì) | Isunmọ 10.6 iwon (300g) |
Atilẹyin ọja ati Support
For warranty information and technical support, please refer to the documentation provided with your purchase or visit the official ARRIS webojula. Jeki ẹri rira rẹ fun awọn iṣeduro atilẹyin ọja.
For further assistance with EdgeTX firmware, visit the official EdgeTX project website and community forums for comprehensive resources and community support.


