1. Ifihan
This manual provides detailed instructions for the safe and proper installation, operation, and maintenance of your USX Mount Long Arm Full Motion TV Wall Mount. Please read this manual thoroughly before installation and retain it for future reference. Incorrect installation may result in property damage, injury, or voiding of your warranty.
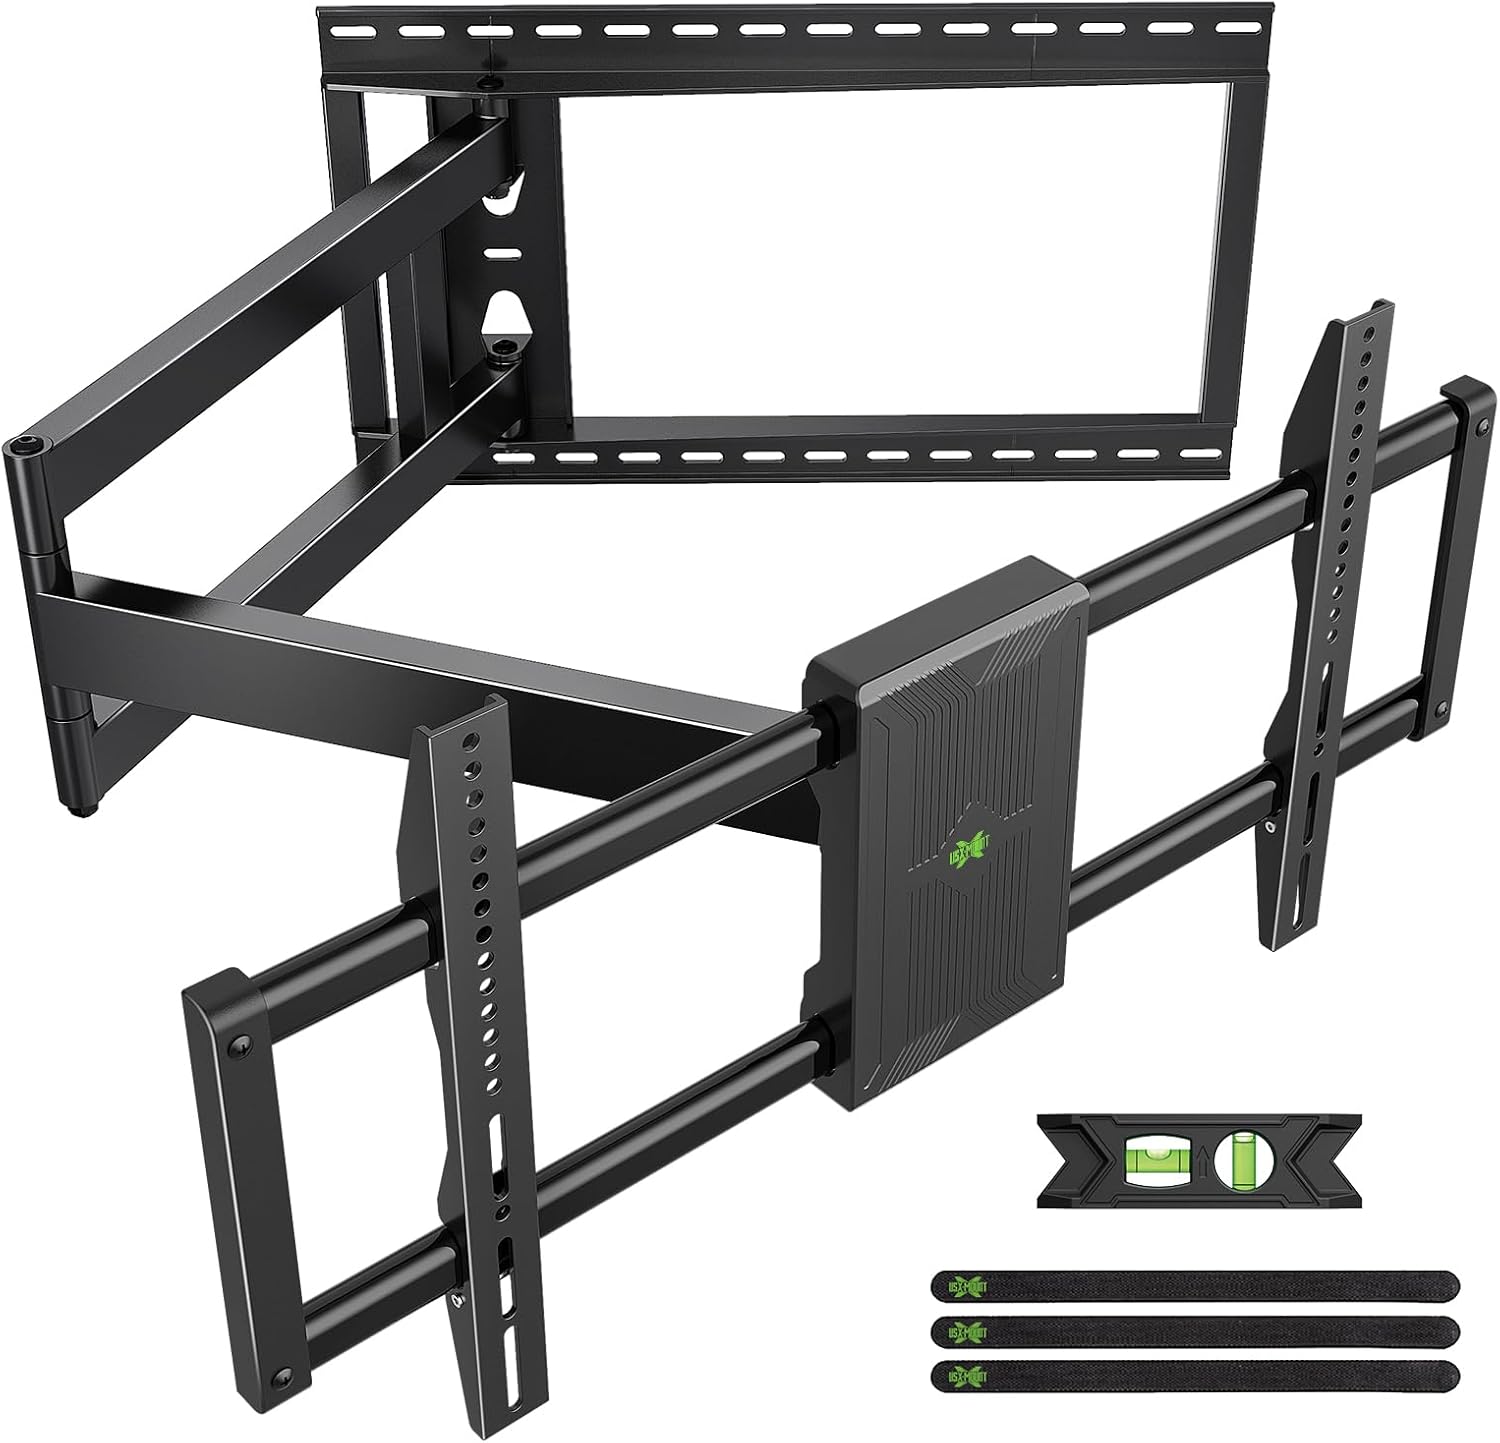
Aworan 1.1: Pariview of the USX Mount Long Arm Full Motion TV Wall Mount, showing the wall plate, articulating arms, and TV mounting brackets, along with included accessories like a level and cable ties.
2. Alaye Aabo
IKILO: Failure to read and follow all instructions may result in personal injury, property damage, or voiding of your warranty. Do not install into drywall alone. Always ensure the mounting surface can support the combined weight of the mount and your television.
- Rí i dájú pé gbogbo àwọn ẹ̀yà ara wà níbẹ̀ tí wọn kò sì bàjẹ́ kí wọ́n tó fi wọ́n sí ipò àkọ́kọ́. Má ṣe lo àwọn ẹ̀yà ara tí ó bàjẹ́.
- This product is designed for installation on wood studs (16", 18", 20", 24" spacing), solid concrete walls, or brick walls. ṢE ṢE fi sori ẹrọ sinu drywall nikan.
- The wall mount is designed to support TVs weighing up to 150 lbs (68 kg). Do not exceed this weight limit.
- Ensure the VESA pattern of your TV is compatible with the mount (200x100mm to 800x400mm).
- Lo ohun èlò ìwádìí láti rí àwọn igi tí ó wà ní ọ̀nà tí ó tọ́.
- Two people are recommended for installation to ensure safety.
- Wọ jia aabo ti o yẹ, pẹlu aabo oju, lakoko fifi sori ẹrọ.
3. Package Awọn akoonu
Verify that all parts are included in your package. If any parts are missing or damaged, contact customer service immediately.
- Wall Apejọ
- Awọn akọmọ TV (2)
- Ohun elo Ohun elo Iṣagbesori (awọn skru, awọn ìdákọró, awọn ifọṣọ, awọn alafo)
- Ipele Bubble
- Cable Ties (Velcro)
- Fifi sori Àdàkọ
- Ilana itọnisọna
4. Àwọn irinṣẹ́ tí a nílò (kò sí nínú rẹ̀)
- Ikọwe
- Phillips Head screwdriver
- Electric Drill
- Oluwari Stud (fun fifi sori okunrinlada igi)
- Masonry Drill Bit (for concrete/brick installation)
- Socket Wrench (13mm)
- Teepu Idiwon
5. Ayẹwo ibamu
Before proceeding with installation, ensure your TV and wall are compatible with this mount.
- Iwon TV: Fits most 42-95 inch televisions.
- Iwọn TV: Ṣe atilẹyin fun awọn TV ti o to 150 lbs (68 kg).
- Ilana VESA: Compatible with VESA patterns from 200x100mm to 800x400mm.
- Odi Iru: Suitable for 16", 18", 20", 24" wood stud walls, solid concrete walls, and brick walls. Not for drywall only installation.
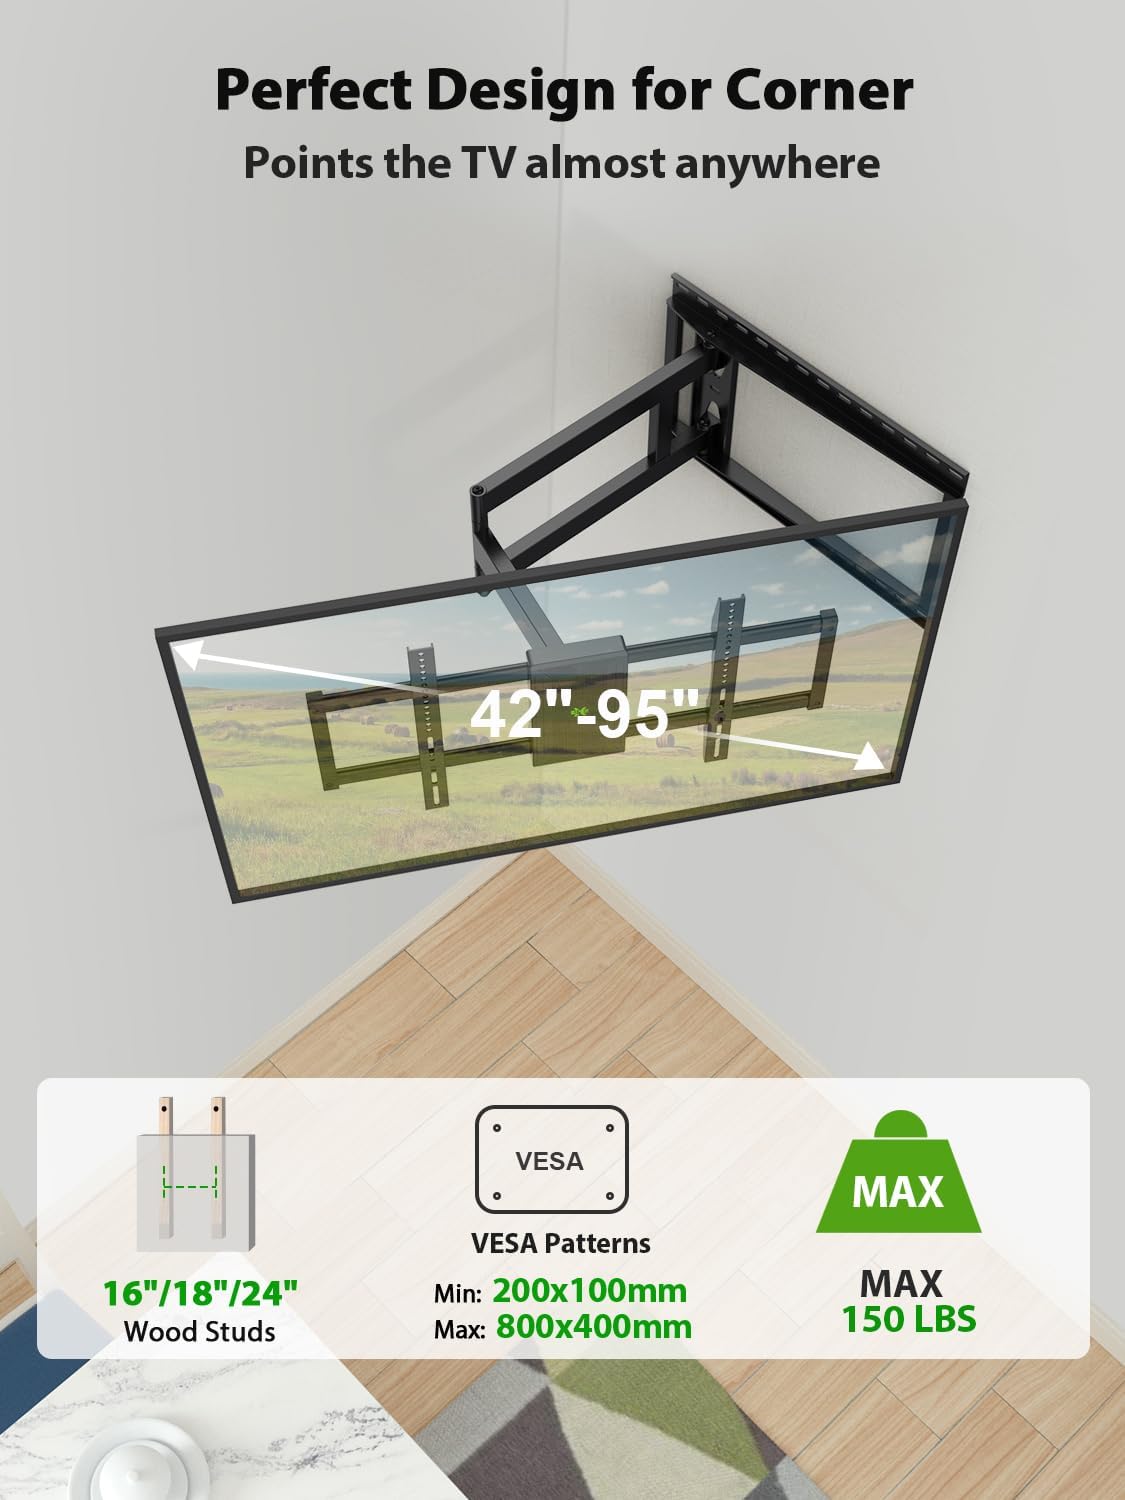
Image 5.1: Illustrates the compatibility of the mount with 16"/18"/20"/24" wood studs, VESA patterns from 200x100mm to 800x400mm, and a maximum weight capacity of 150 lbs. It also shows the mount installed in a corner, highlighting its suitability for such placements.

Image 5.2: Depicts the compatible wall types: concrete wall, wood wall (with studs), and brick wall. A warning indicates not to install on drywall alone.
6. Eto ati fifi sori
6.1. Attaching TV Brackets to Your TV
- Place your TV face down on a soft, clean surface to prevent scratches.
- Identify the correct diameter and length of screws for your TV's VESA mounting holes. Refer to your TV's manual if unsure.
- Attach the two TV brackets to the back of your TV using the selected screws and washers. If your TV has an uneven back, use spacers as needed to ensure the brackets are flush and secure. Do not overtighten.
6.2. Ṣíṣe Àwo Ògiri
- Pinnu Ibi Igbesoke: Decide on the desired height for your TV. Use the provided installation template to mark the drill holes on the wall.
- Fun fifi sori igi Stud:
- Use a stud finder to locate the center of the wood studs. Mark the drill holes.
- Drill pilot holes (e.g., 7/32" or 5.5mm) into the center of the marked studs to a depth of approximately 2.75 inches (70mm).
- Attach the wall plate to the wall using the lag bolts and washers. Tighten firmly but do not overtighten.
- For Solid Concrete or Brick Wall Installation:
- Samisi awọn iho lu.
- Drill pilot holes (e.g., 3/8" or 10mm) into the solid concrete or brick to a depth of approximately 3 inches (75mm).
- Insert concrete anchors into the pilot holes, ensuring they are flush with the wall surface.
- Attach the wall plate to the wall using the lag bolts and washers, screwing them into the anchors. Tighten firmly.
- Use the included bubble level to ensure the wall plate is perfectly horizontal before fully tightening all bolts.
6.3. Hanging the TV on the Wall Plate
- With assistance, carefully lift the TV (with brackets attached) and hook the TV brackets onto the wall plate.
- Ensure the TV is securely seated on the wall plate.
- Locate the safety screws or locking mechanisms on the TV brackets and secure them to prevent accidental dislodgement.
7. Awọn ilana Iṣiṣẹ
This full motion TV mount offers various adjustments for optimal viewing.
7.1. Extending and Retracting the Arm
Gently pull the TV away from the wall to extend the arm. Push the TV back towards the wall to retract it. The mount can extend up to 40 inches (101.6 cm) and retract to 3.02 inches (7.67 cm) from the wall.

Image 7.1: Illustrates the mount's ability to extend up to 40 inches from the wall and retract to 3 inches, providing flexibility for viewing awọn ipo.

Image 7.2: Shows the long arm extended and swiveled, demonstrating how it allows for optimal viewing positions from various angles in a room.
7.2. Àtúnṣe Yíyípo
The TV can swivel up to ±90° left or right, depending on the TV size and its distance from the wall. Gently push or pull the TV to the desired angle.

Image 7.3: Demonstrates the swivel capability of the TV mount, allowing the TV to be angled up to ±90 degrees for flexible viewing. The maximum swivel angle depends on the TV size.
7.3. Atunṣe Tẹ
The TV can be tilted +5° upwards and -12° downwards to reduce glare and achieve a comfortable viewing angle. Loosen the tilt adjustment knobs on the TV brackets, adjust to the desired angle, and then retighten the knobs.

Image 7.4: Illustrates the tilt adjustment feature, showing the TV can tilt +5 degrees up and -12 degrees down. A close-up highlights the friction gear mechanism for smooth adjustment.
7.4. Àtúnṣe Ìpele
After installation, if the TV is not perfectly level, you can adjust it by ±3°. Loosen the leveling screws on the TV brackets, adjust the TV to be level, and then retighten the screws.

Image 7.5: Shows the post-installation level adjustment feature, allowing the TV to be rotated ±3 degrees to ensure it is perfectly horizontal.
8. Itọju
- Lokọọkan ṣayẹwo gbogbo awọn skru ati awọn asopọ lati rii daju pe wọn wa ni wiwọ ati aabo.
- Nu oke naa pẹlu asọ ti o gbẹ. Yago fun abrasive ose tabi epo.
- Ensure cables are properly managed using the provided cable ties to prevent snagging or damage during adjustments.
9. Laasigbotitusita
| Isoro | Owun to le Fa | Ojutu |
|---|---|---|
| TV kii ṣe ipele lẹhin fifi sori ẹrọ. | Wall plate or TV brackets are slightly off-level. | Use the post-installation level adjustment feature (±3°). Loosen leveling screws, adjust, and retighten. |
| Mount náà dà bí ẹni pé ó rọ̀ tàbí kò dúró ṣinṣin. | Mounting bolts are not fully tightened; incorrect wall type used. | Ensure all wall plate and TV bracket bolts are securely tightened. Verify installation on a compatible wall type (wood stud, concrete, brick). Do not install on drywall alone. |
| Iṣoro lati ṣatunṣe tẹ/swivel. | Adjustment knobs/screws are too tight. | Loosen the relevant adjustment knobs/screws slightly, make the adjustment, then retighten to secure the position. |
| TV ko yẹ sori pẹpẹ naa. | Incompatible VESA pattern or TV weight/size. | Verify your TV's VESA pattern (200x100mm to 800x400mm) and weight (max 150 lbs) against the mount's specifications. |
10. Awọn pato
- Awoṣe: B0CZ42ZHCN
- Brand: USX MOUNT
- Iru fifi sori: Ògiri Ògiri
- Iru gbigbe: Yíyípo, Tẹ̀síwájú, Ṣíṣe àsopọ̀
- Ohun elo: Alloy Irin
- Àwọ̀: Dudu
- Awọn iwọn TV ibaramu: 42-95 inches
- Agbara iwuwo: Titi di 150 lbs (68 kg)
- Ibamu VESA: 200x100mm to 800x400mm
- Itẹsiwaju lati Odi: 3.02 inches (ti a fà sẹ́yìn) sí 40 inches (tí a fẹ̀ sí i)
- Igun Tẹ: +5° si -12°
- Igun Swivel: ±90° (o pọ julọ, da lori iwọn TV)
- Atunse Ipele: ±3° post-installation
- Compatible Stud Spacing: 16", 18", 20", 24"
- UPC: 797505421606
11. Atilẹyin ọja ati Onibara Support
USX MOUNT has been established for thirty years, offering rich experience and excellent product quality. We provide professional after-sales service. If you encounter any issues or have questions regarding your TV mount, please feel free to contact our professional customer service team. They can provide suitable advice before sale and assist you with any problems after sale.
For support, please refer to the contact information provided with your product packaging or visit the official USX MOUNT webojula.


