1. Ifihan
This manual provides essential instructions for the safe and efficient operation of your PowMr 80A PWM Solar Charge Controller. This controller is designed to manage the power flow from your solar panels to your battery bank, ensuring optimal charging and protecting your batteries from overcharge and over-discharge. It is compatible with 12V, 24V, 36V, and 48V systems and supports various battery types including AGM, Gel, Flooded, Lead-Acid, and Lithium batteries.
2. Alaye Aabo
Please read all instructions carefully before installation and operation. Failure to follow these instructions may result in serious injury, damage to the controller, or damage to other components in your solar system.
- Ensure all connections are tight and correct to avoid loose connections that can cause excessive heat.
- Nigbagbogbo so batiri pọ ni akọkọ, lẹhinna nronu oorun, ati nikẹhin fifuye naa. Ge asopọ ni ọna yiyipada.
- Má ṣe gbìyànjú láti tún olùdarí náà ṣe tàbí láti ṣe àtúnṣe fúnra rẹ. Pe àwọn òṣìṣẹ́ tó yẹ fún iṣẹ́ náà.
- Install the controller in a well-ventilated area, away from flammable materials and moisture.
- Use appropriate circuit breakers and fuses for all connections to protect against overcurrent.
- Wear protective eyewear and clothing when working with batteries and solar panels.
3. Awọn ẹya Ọja
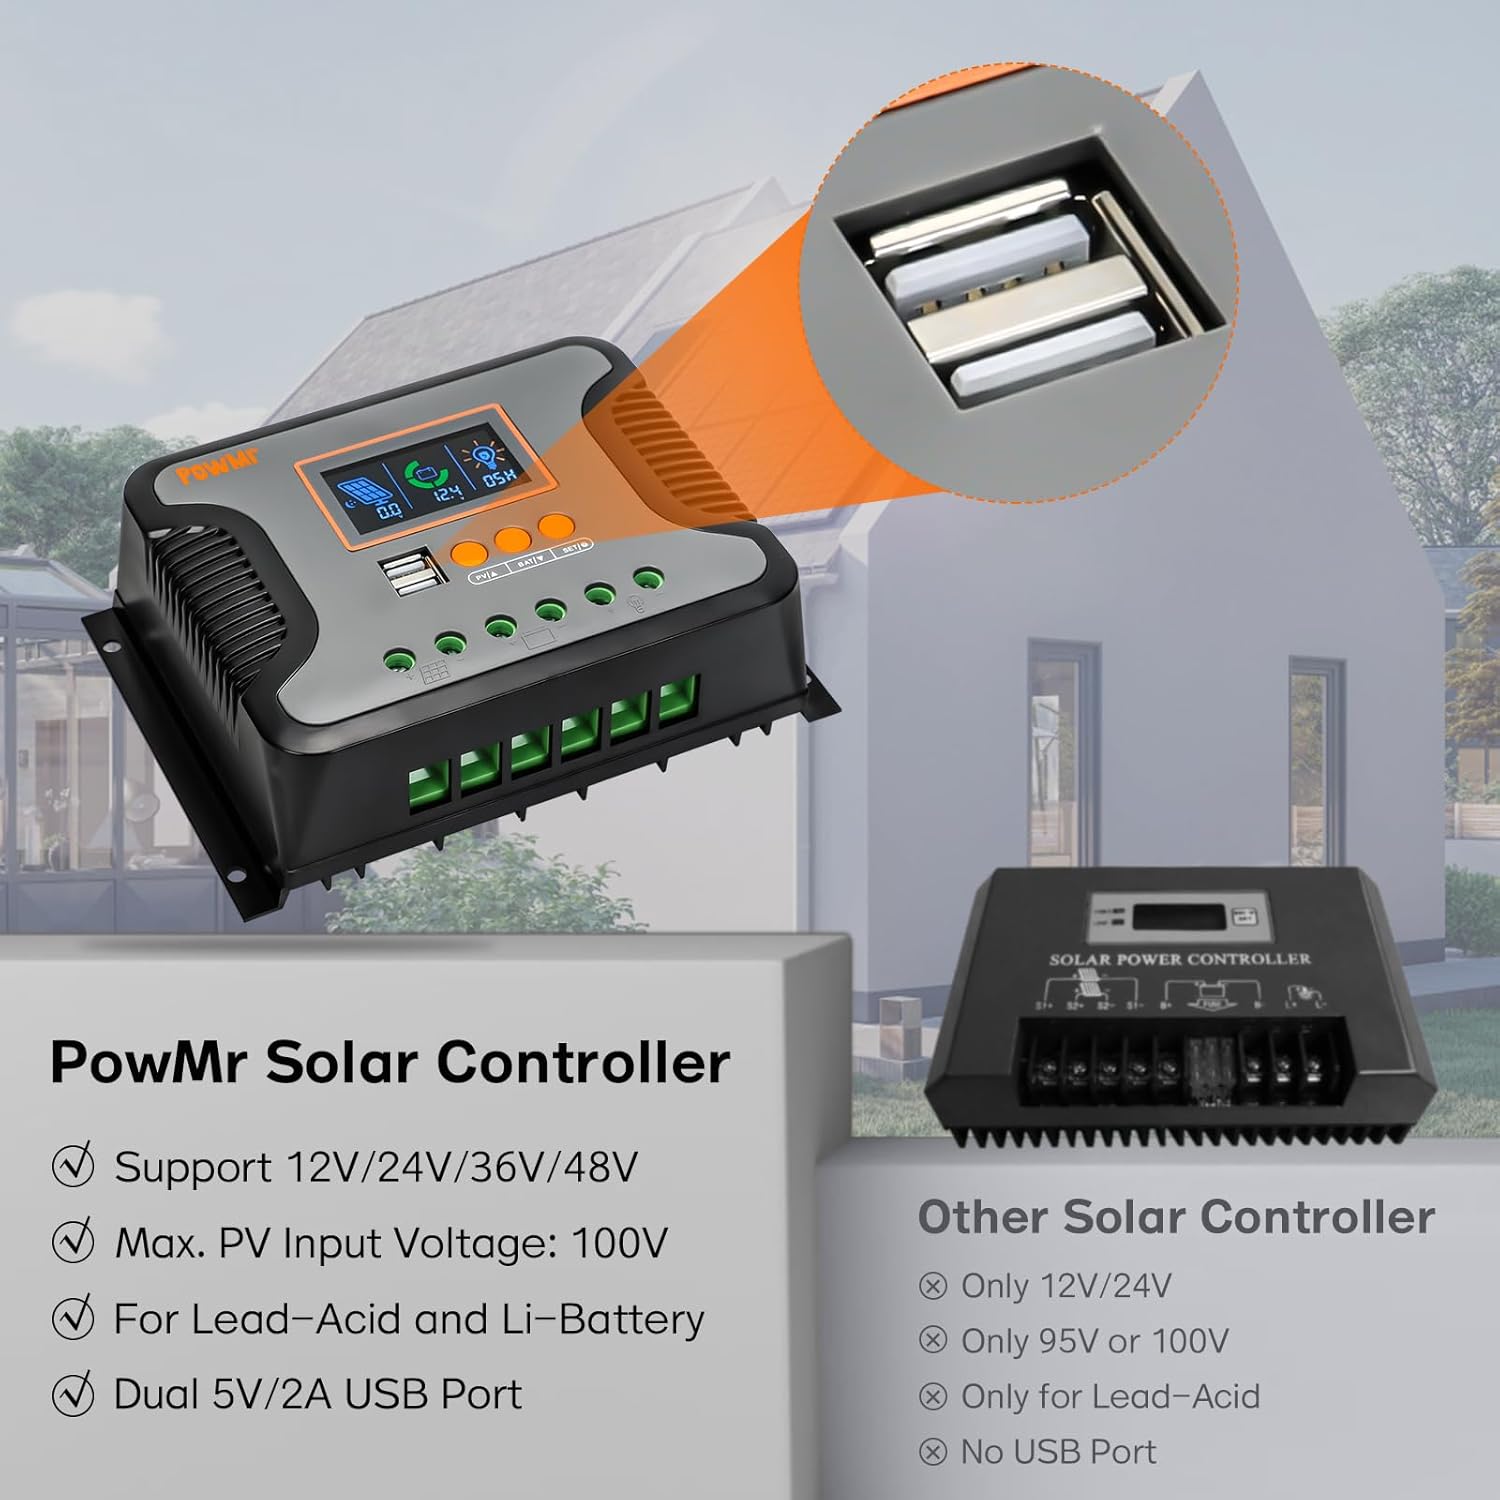
- Automatic System Voltage Iwari: Automatically detects 12V, 24V, 36V, or 48V battery systems.
- Gbigba agbara giga lọwọlọwọ: Rated charging current of 80A.
- Ìwọ̀n Ìṣíwọlé PV Gígatage: Iwọn titẹ sii PV ti o pọju voltage to 100V.
- Awọn abajade USB meji: Built-in 2 USB ports providing 5V and 2A output for charging devices.
- LCD Display & Keypad: User-friendly interface for real-time monitoring and parameter configuration.
- 3-StagGbigba agbara PWM e: Features Bulk charge, Boost charge, and Float charge modes for optimized battery performance and extended battery life.
- Ibamu Batiri gbooro: Adaptable to User, Flooded, AGM, GEL, LifePO4, Lithium, and other customized battery types.
- Awọn iṣẹ Idaabobo lọpọlọpọ: Includes overcharge, over-discharge, overload, short circuit, reverse polarity, and over-temperature protection.
4. Ọja Ipariview and Interface Description
The PowMr 80A PWM Solar Charge Controller features a clear LCD display and intuitive controls for easy monitoring and adjustment.

Figure 4.1: Controller Interface Description
This image shows the front panel of the PowMr solar charge controller, highlighting its USB ports, LCD display, function keys, mounting holes, PV input port, battery port, load port, and heat sink.
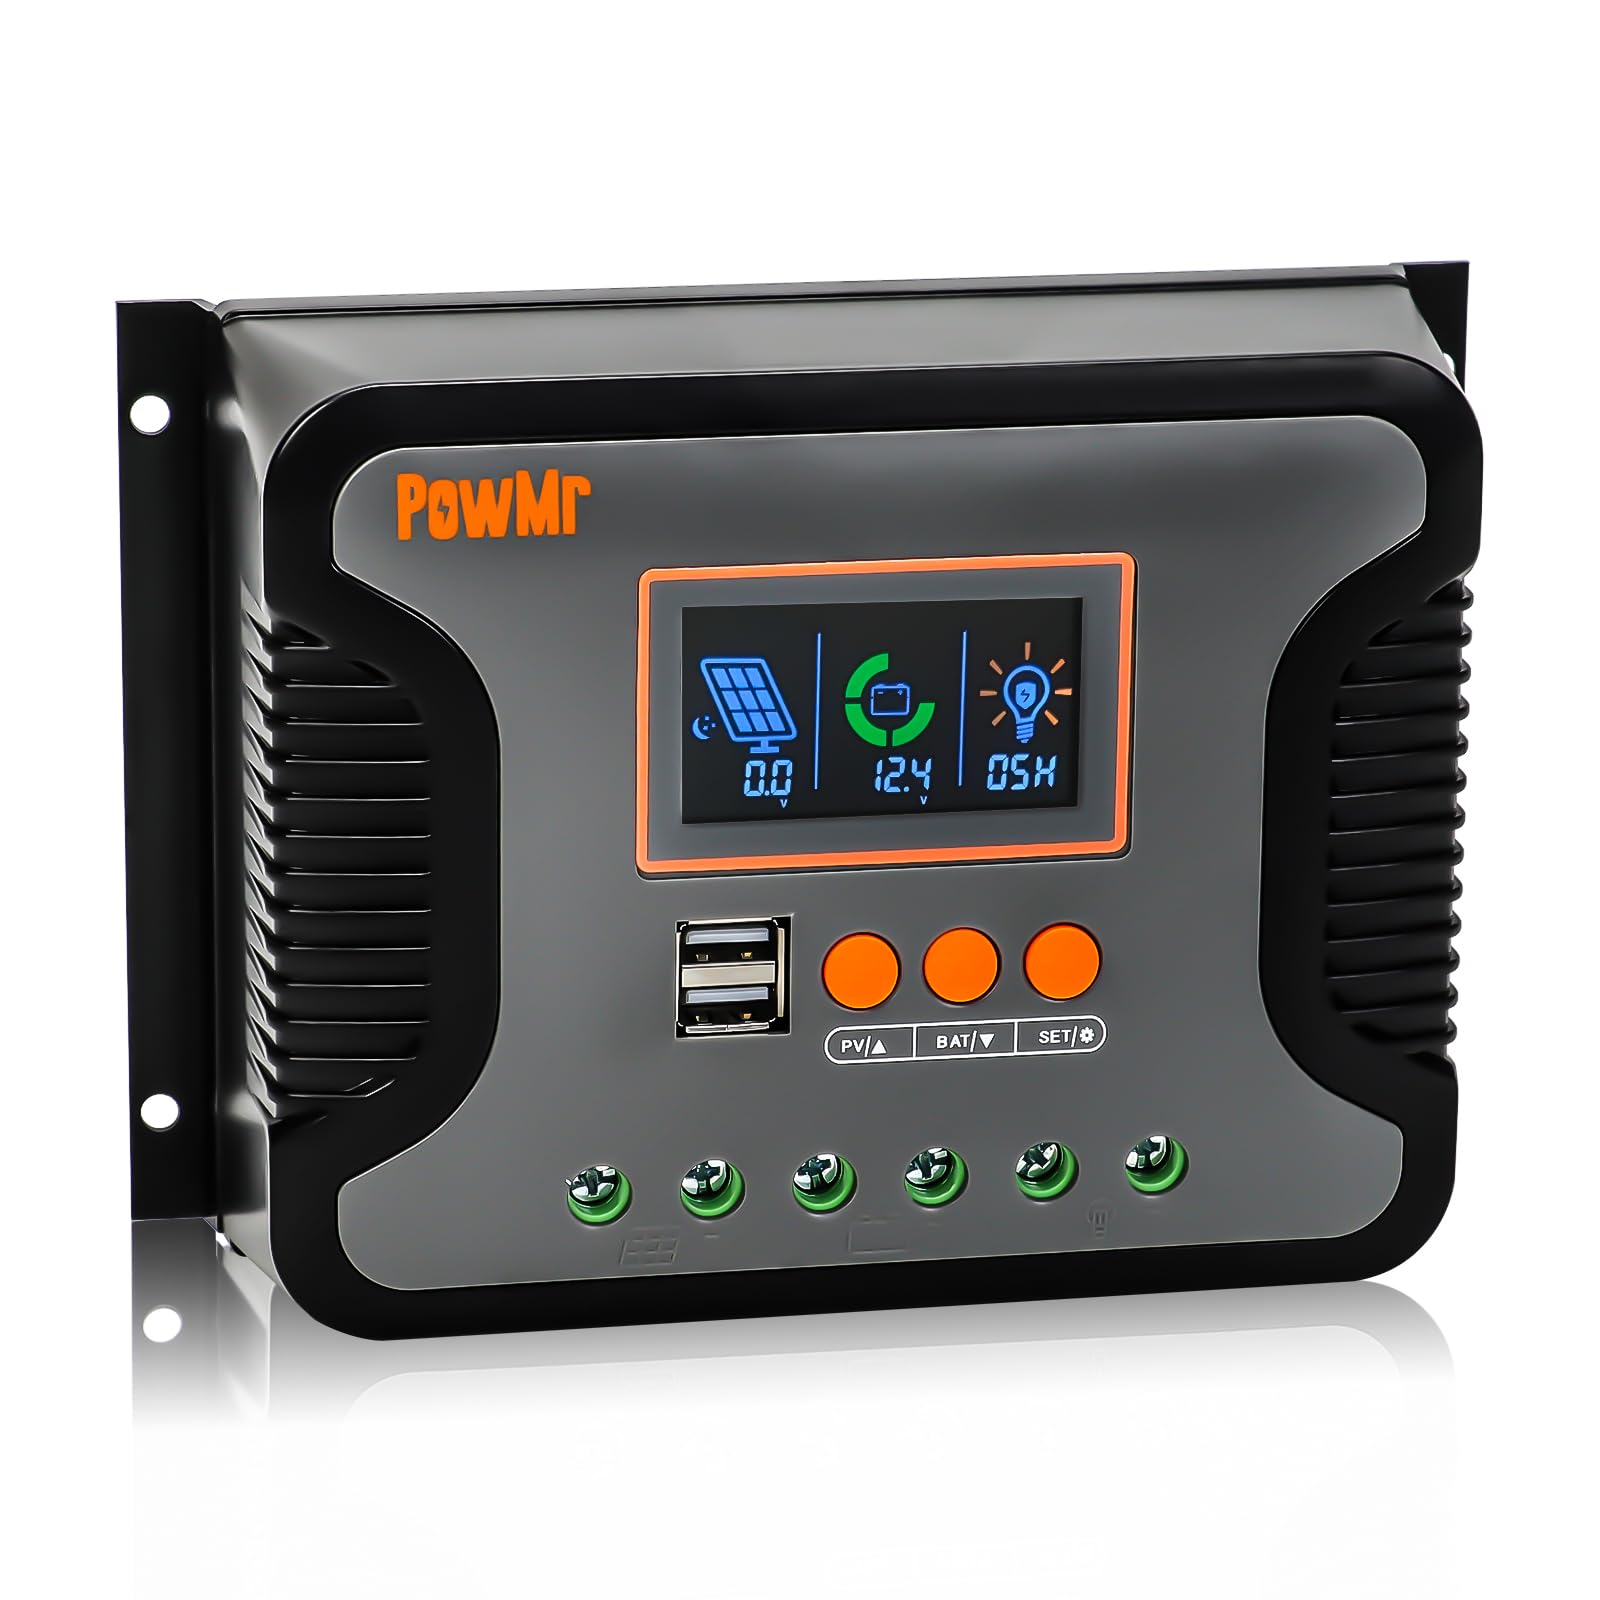
Figure 4.2: LCD Display Screen Details
This image details the backlit LCD screen, showing indicators for Day/Night State, PV Parameter, Battery Capacity, Battery Parameter, Normal/Fault State, and DC Parameter, each numbered for easy identification.
LCD Display Indicators:
- Day/Night State: Indicates whether it's day or night, affecting load output.
- PV Parameter: Displays solar panel voltage ati lọwọlọwọ.
- Battery Capacity: Shows the current battery charge level.
- Battery Parameter: Displays battery voltage ati ipo gbigba agbara.
- Normal/Fault State: Indicates normal operation or displays fault codes.
- DC Parameter: Shows load voltage ati lọwọlọwọ.
Awọn bọtini iṣẹ:
- PV/A: View PV parameters.
- BAT/V: View battery parameters.
- SET/O: Enter settings menu or confirm selection.
5. Eto ati fifi sori
Proper installation is crucial for the performance and longevity of your solar charge controller. Follow these steps carefully:
5.1 Iṣagbesori Adarí
Mount the controller vertically on a wall or a sturdy surface in a dry, well-ventilated area, away from direct sunlight and heat sources. Ensure there is adequate space around the controller for air circulation.
Video 5.1: PWM Solar Charge Controller Quick Installation Wiring Guide
This video demonstrates the physical installation and wiring process for the PWM solar charge controller, including securing it to a wall and connecting the battery, solar panels, and DC load.
5.2 Awọn isopọ onirin
Follow the connection order strictly to prevent damage to the controller or other components. Always connect the battery first, then the solar panels, and finally the DC load.
- So batiri pọ: Connect the battery cables to the battery terminals on the controller. Ensure correct polarity (+ to + and - to -).
- So awọn Pẹpẹ oorun pọ: Connect the solar panel cables to the PV input terminals on the controller. Verify correct polarity.
- So DC Load pọ: Connect your DC load to the load terminals on the controller. Ensure correct polarity.

Figure 5.1: Controller Connection Diagram
This diagram illustrates the correct wiring order for the solar charge controller: first the battery bank, then the PV array, and finally the DC load. It also shows an optional inverter for AC loads.
Pataki: Ensure all connections are secure and insulated. Incorrect wiring can cause damage and void warranty.
6. Awọn ilana Iṣiṣẹ
Once installed, the controller will automatically begin operating. Use the LCD display and function keys to monitor system status and configure parameters.
6.1 Ipò Ètò Àbójútó
Tẹ awọn PV/A button to cycle through solar panel parameters (voltage, current). Press the BAT/V bọtini lati view battery parameters (voltage, charge status). The SET/O button is used for entering and confirming settings.
6.2 Paramita iṣeto ni
To enter the parameter settings menu, press and hold the SET/O button for a few seconds. Use the PV/A ati BAT/V buttons to navigate through options and adjust values. Press SET/O again to confirm changes and exit the menu.
Key configurable parameters include:
- Iru Batiri: Select the appropriate battery type (Flooded, AGM, GEL, LifePO4, Lithium, User-defined).
- Ipo Iṣakoso fifuye: Configure how the DC load output operates (e.g., always on, dusk to dawn, timed).
- Gbigba agbara/Idasilẹ Voltage Awọn ifilelẹ: Adjust these values according to your battery manufacturer's recommendations for optimal battery health.
6.3 Supported Battery Types
The controller is highly versatile and supports a wide range of battery chemistries:
Àwòrán 6.1: Àwọn Irú Bátírì Tó Báramu
This image displays the various battery types compatible with the PowMr solar charge controller, including Sealed Lead-Acid (SEL), Gel Sealed Lead-Acid (GEL), Flooded Lead-Acid (FLD), LiFePO4 Battery (LI), Lithium-ion Battery (LN), and User-defined (USE).
6.4 3-Stage PWM Charging Technology
The controller utilizes a 3-stage Pulse Width Modulation (PWM) charging algorithm to efficiently and safely charge your batteries:
- Idiyele pupọ: Charges the battery at the maximum current until its voltage rises to the absorption level.
- Igbega agbara: Continues charging at a constant voltage lati rii daju pe batiri naa ti gba agbara ni kikun.
- Gbigba agbara leefofo: Maintains the battery at a fully charged state by providing a small, constant voltage.
7. Awọn iṣẹ Idaabobo
The PowMr 80A PWM Solar Charge Controller is equipped with multiple electronic protection features to ensure the safety and reliability of your solar system:

Figure 7.1: Multi-Protection Functions
This image highlights the various protection features of the PowMr solar charge controller, including short-circuit protection, over-load protection, over-current protection, over-discharge protection, reversed polarity protection, and over-temperature protection.
- Idaabobo Iyika kukuru: Protects against short circuits in the solar panel, battery, or load circuits.
- Idaabobo Akopọ-ju: Prevents damage from excessive current draw by the load.
- Idabobo ti o ti lọ lọwọlọwọ: Safeguards against currents exceeding the controller's rated capacity.
- Idaabobo Sisọjade Ju: Prevents batteries from being discharged below a safe voltage level, extending battery life.
- Reversed Polarity Protection: Protects the controller and system components from damage due to incorrect wiring of battery or solar panel polarity.
- Idaabobo Iwọn otutu: Shuts down the controller if internal temperatures exceed safe operating limits.
8. Awọn pato
| Ẹya ara ẹrọ | Sipesifikesonu |
|---|---|
| Won won Ngba agbara Lọwọlọwọ | 80A |
| Eto Voltage | 12V / 24V / 36V / 48V laifọwọyi |
| O pọju. PV Input Voltage | 100V |
| Max. Input Power (12V System) | 960W |
| Max. Input Power (24V System) | 1920W |
| Max. Input Power (36V System) | 2880W |
| Max. Input Power (48V System) | 3840W |
| Ijade USB | Dual 5V/2A |
| Ifihan Iru | LCD |
| Awọn iwọn otutu ti nṣiṣẹ | -20°C to 55°C (approximate, based on typical range) |
| Awọn iwọn | 8.19 x 5.67 x 2.95 inches |
| Iwọn Nkan | 1.57 iwon |
9. Laasigbotitusita
This section addresses common issues you might encounter with your solar charge controller. For more complex problems, please contact customer support.
| Isoro | Owun to le Fa | Ojutu |
|---|---|---|
| Alakoso ko ṣiṣẹ lori | Batiri ko sopọ mọ tabi kekere voltage; reversed battery polarity; loose connections. | Rí i dájú pé batiri náà so pọ̀ mọ́ra pẹ̀lú polarity tó tọ́. Ṣàyẹ̀wò ìwọ̀n batiri náà.tage ati gbogbo awọn asopọ. |
| Batiri ko ngba agbara | Solar panels not connected; insufficient sunlight; reversed PV polarity; faulty solar panel. | Check PV connections and polarity. Ensure adequate sunlight. Test solar panel output. |
| Fifuye ko ṣiṣẹ | Load not connected; load overcurrent; battery low voltage; load control settings. | Check load connections and current draw. Verify battery voltage. Adjust load control settings. |
| Aṣiṣe koodu on LCD | Specific system fault (e.g., overvoltage, iyipo kukuru). | Refer to the controller's specific error code definitions (if available in full manual) and address the indicated fault. |
10. Itọju
Regular maintenance ensures optimal performance and extends the lifespan of your solar charge controller.
- Ṣayẹwo awọn isopọ: Lokọọkan ṣayẹwo gbogbo awọn asopọ onirin fun wiwọ ati ipata.
- Nu Adarí: Jẹ́ kí olùdarí náà mọ́ tónítóní, kí ó sì wà láìsí eruku àti ìdọ̀tí. Lo aṣọ gbígbẹ fún fífọ nǹkan mọ́.
- Afẹfẹ: Rí i dájú pé afẹ́fẹ́ wà ní ibi tí a fi sori ẹrọ dáadáa láti dènà ìgbóná jù.
- Ayewo Batiri: Regularly inspect your batteries for any signs of damage, corrosion, or swelling.
11. Atilẹyin ọja ati Support
For warranty information and technical support, please refer to the documentation included with your purchase or contact PowMr customer service. Keep your purchase receipt as proof of purchase for warranty claims.
Ibi iwifunni: Please visit the official PowMr webAaye ayelujara tabi tọka si apoti ọja rẹ fun awọn alaye olubasọrọ tuntun julọ.


