1. Ifihan
Thank you for choosing the Driftalia Full Size Bed Frame. This bed frame is designed to provide both comfort and functionality, featuring an upholstered headboard with integrated LED lighting, a convenient charging station, and four spacious storage drawers. This manual provides detailed instructions for assembly, operation, maintenance, and troubleshooting to ensure a safe and enjoyable experience with your new bed frame.

Aworan 1.1: Pariview of the Driftalia Full Size Bed Frame with LED headboard, charging station, and storage drawers.
2. Alaye Aabo
- Ka gbogbo awọn ilana ni pẹkipẹki ṣaaju apejọ ati lo.
- Pa gbogbo awọn ẹya kekere ati awọn ohun elo apoti kuro lọdọ awọn ọmọde ati awọn ohun ọsin lati ṣe idiwọ awọn eewu gige.
- Ensure all connections are securely fastened before use. Periodically check and retighten fasteners.
- Maṣe kọja agbara iwuwo ti o pọju ti 1000 lbs (453 kg).
- Lo awọn eroja ti a pese nikan. Maṣe fi awọn ẹya miiran rọpo.
- Fi férémù ibùsùn sí orí ilẹ̀ tí ó tẹ́jú.
- Avoid exposing the electrical components (LED lights, charging station) to moisture.
- Yọ férémù ibùsùn kúrò nínú ihò agbára kí o tó sọ ọ́ di mímọ́ tàbí kí o ṣe àtúnṣe èyíkéyìí.
Pataki: Always follow assembly instructions for safe and stable use.
3. Package Awọn akoonu
Ṣaaju ki o to bẹrẹ apejọ, rii daju pe gbogbo awọn paati ti a ṣe akojọ si isalẹ wa ati ti ko bajẹ. Ti eyikeyi awọn ẹya ba sonu tabi bajẹ, jọwọ kan si atilẹyin alabara.
| Apakan | Apejuwe | Opoiye |
|---|---|---|
| A | Upholstered Headboard with LED & Charging Station | 1 |
| B | Side Rails (Left & Right) | 2 |
| C | Atẹlẹsẹ ẹsẹ | 1 |
| D | Metal Slat Frame | 1 set (12 slats, 3 thickened beams) |
| E | Ibi ipamọ Drawers | 4 |
| F | Awọn ẹsẹ atilẹyin | 10 |
| G | Hardware Pack (bolts, screws, Allen wrench, etc.) | 1 |
| H | LED jijin Iṣakoso | 1 |
4. Eto ati Apejọ Awọn ilana
Assembly typically requires two people and takes approximately 50 minutes. All parts are labeled for easy identification. Please follow these steps carefully.
Step 4.1: Prepare the Headboard and Side Rails
- Yọọ gbogbo awọn paati ki o si gbe wọn si ori mimọ, dada rirọ lati ṣe idiwọ awọn itọ.
- Attach the side rails (B) to the upholstered headboard (A) using the provided bolts and Allen wrench. Ensure connections are firm.

Image 4.1: Detail of slat connection mechanism.
Step 4.2: Attach the Footboard
- Connect the footboard (C) to the assembled side rails (B), securing it with the appropriate hardware.
Step 4.3: Install Support Legs and Slat Frame
- Attach the 10 support legs (F) to the designated points on the metal slat frame (D).
- Place the metal slat frame (D) inside the bed frame structure. Secure the slats to the side rails using the provided screws. Ensure all slats are evenly spaced and firmly attached.

Image 4.2: Detail of leg connection to the frame.

Image 4.3: Detail of securing slats with screws.
Step 4.4: Assemble and Insert Storage Drawers
- Assemble the four storage drawers (E) according to the separate instructions provided in the hardware pack.
- Once assembled, slide the drawers into their designated spaces under the bed frame.

Aworan 4.4: View of the four storage drawers in place under the bed frame.
Step 4.5: Connect Power for LED and Charging Station
- Locate the power cord for the LED lights and charging station on the headboard.
- Pulọọgi okun agbara sinu kan boṣewa iṣan iṣan.
After completing all steps, ensure the bed frame is stable and all connections are secure before placing your mattress on it.
5. Awọn ilana Iṣiṣẹ
Iṣẹ́ 5.1 Àwọn Ìmọ́lẹ̀ LED
The integrated LED lights in the headboard can be controlled using the included remote control (H).
- Titan/Apapa: Tẹ bọtini agbara lori latọna jijin.
- Aṣayan awọ: Choose from 25 available colors using the color palette on the remote.
- Atunse Imọlẹ: Select from 3 brightness modes to suit your preference.
- Awọn ọna Imọlẹ: Access 10 different flashing modes for dynamic lighting effects.
- Amuṣiṣẹpọ orin: The lights can synchronize with music, creating an immersive atmosphere. Refer to the remote control's specific instructions for music sync activation.

Image 5.1: Headboard LED lights in operation, showing remote control for various settings.
5.2 Gbigba agbara Station Lilo
The headboard features a built-in charging station for your electronic devices.
- Awọn ibudo USB: Two USB ports are available, including one USB-A (5V/3A) and one USB-C (5V/3A). These provide up to 5V/4A max for efficient charging.
- Awọn iṣan AC: Two standard 110V/12A AC outlets are provided for powering other devices.
- Ensure the bed frame's power cord is plugged into a live wall outlet for the charging station to function.

Image 5.2: Detail of the charging station with USB-A, USB-C, and AC outlets.
5.3 Ibi ipamọ Drawers
The four storage drawers (E) are designed for easy access and organization.
- Each drawer measures 29.3"L x 15.4"W x 4.7"H, suitable for blankets, clothing, or other personal items.
- The drawers are on wheels for smooth operation.
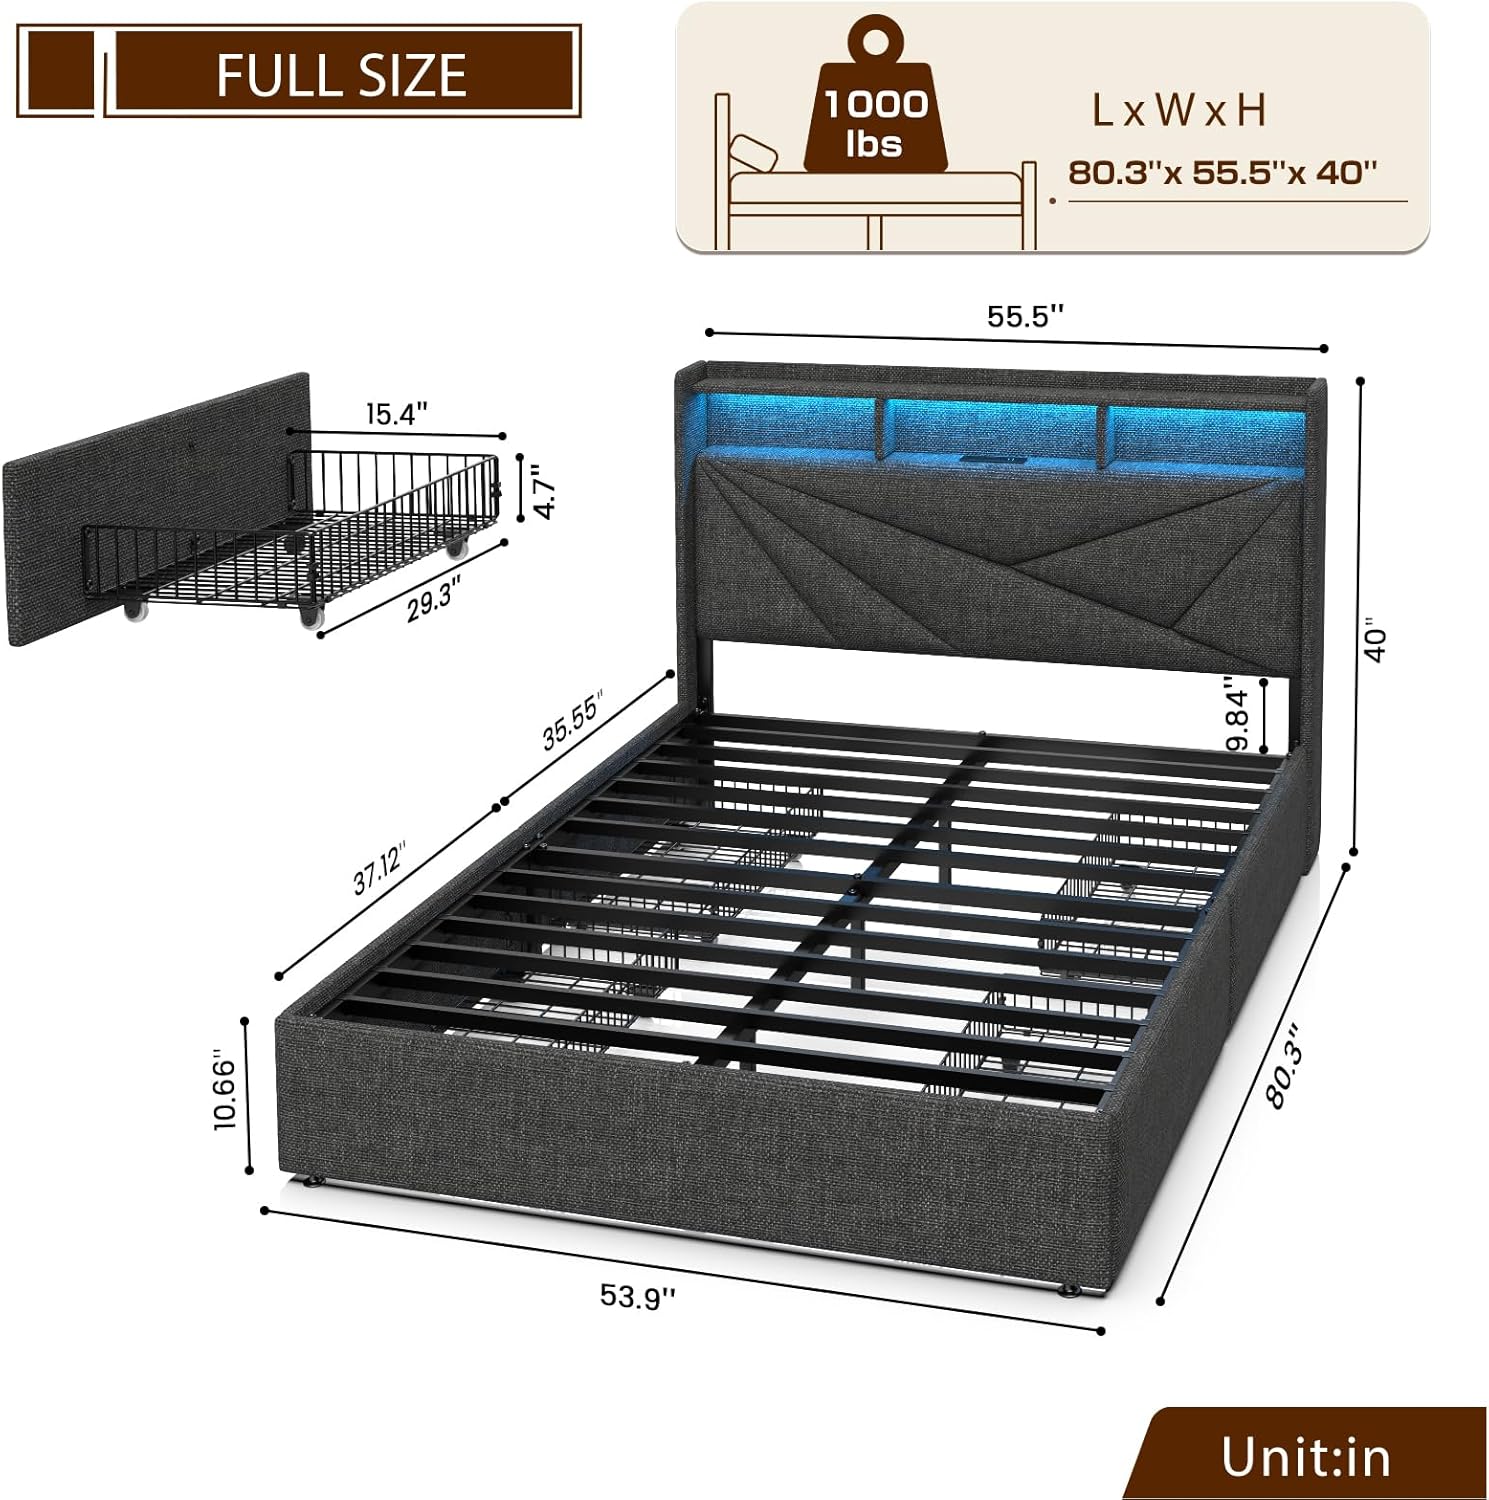
Aworan 5.3: Onisẹpo view of the bed frame, including drawer measurements.
6. Itọju
- Ninu: Fun awọn ẹya ti a gbe soke, lo asọ, damp cloth and mild soap. Avoid harsh chemicals. For metal parts, wipe with a dry cloth.
- Awọn ohun elo itanna: Keep the LED lights and charging station free from dust. Do not spray liquids directly onto electrical parts.
- Awọn ohun mimu: Máa ṣàyẹ̀wò gbogbo àwọn ṣẹ́kẹ́ẹ̀tì àti ìkọ́kọ́ láti rí i dájú pé wọ́n wà ní ìdúróṣinṣin. Mú kí ó le bí ó ṣe yẹ kí ó rí láti jẹ́ kí ó dúró ṣinṣin kí ó sì dènà kíké.
- Awọn ayaworan: Keep the drawer wheels clean to ensure smooth operation.
7. Laasigbotitusita
| Isoro | Owun to le Fa | Ojutu |
|---|---|---|
| Awọn imọlẹ LED ko ṣiṣẹ | Power cord unplugged; remote control battery low; LED strip damaged. | Ensure power cord is securely plugged in. Replace remote control battery. Contact customer support if LED strip is damaged. |
| Ibudo gbigba agbara ko ṣiṣẹ | Power cord unplugged; wall outlet not functioning. | Verify power cord connection. Test wall outlet with another device. |
| Ibusun fireemu squeaks | Àwọn boluti tàbí àwọn ìsopọ̀ tí ó bàjẹ́. | Check and tighten all assembly bolts and screws, especially those connecting the slats and frame components. |
| Drawers ni o wa soro lati ṣii / pa | Obstruction; dirty wheels; misaligned. | Check for items blocking the drawers. Clean drawer wheels. Ensure drawers are correctly aligned in their tracks. |
8. Awọn pato
- Awoṣe: JIF240007
- Iwọn: Ni kikun
- Àwọ̀: Grẹy Dudu
- Awọn iwọn Ọja (L x W x H): 80.31" x 55.51" x 45.28"
- Agbara iwuwo: 1000 lbs
- Ìwọ̀n Nkan: 85 iwon
- Ohun elo: Upholstered fabric, metal frame
- Ibudo gbigba agbara: 2 USB Ports (1 Type-C, 1 Type-A, 5V/4A max), 2 AC Outlets (110V/12A), 6.5-foot power cord
- Awọn imọlẹ LED: 25 colors, 3 brightness modes, 10 flashing modes, music sync function
- Awọn apoti ipamọ: 4 drawers, each 29.3"L x 15.4"W x 4.7"H
- Apejọ ti a beere: Bẹẹni
9. Atilẹyin ọja ati Support
Driftalia products are designed for quality and durability. This product is covered by a standard 30-day return policy from the date of purchase. For specific warranty details, please refer to the terms and conditions provided at the time of purchase or contact your retailer.
For technical assistance, missing parts, or any other inquiries, please contact Driftalia customer support through the retailer's platform or visit the official Driftalia store page: Driftalia Store.
