1. Ifihan
This manual provides comprehensive instructions for the installation, operation, and maintenance of the DIHOOL Electric Linear Actuator Controller (Model: IPS-S2). This device is designed to control various DC motors, including electric linear actuators, DC brushless motors, DC lifting platforms, and electric lifting columns. It features multiple control methods, current limit protection, and obstacle rebound protection to ensure safe and efficient operation. Please read this manual thoroughly before use to ensure proper functionality and to prevent damage.

Figure 1.1: DIHOOL Electric Linear Actuator Controller (Model: IPS-S2)
This image displays the main unit of the DIHOOL Electric Linear Actuator Controller, showing its compact design, control buttons, and various connection terminals for power input, motor output, and external controls. The display shows "8.8.8." and indicators for WiFi and iOS/Android compatibility.
2. Awọn ẹya Ọja
- Supports multiple control methods: WIFI control, remote control, button control, photoelectric control, and handle switch control.
- Compatible with most electric linear actuators, DC brushless motors, DC lifting platforms, and electric lifting columns.
- Integrated current regulation function to protect the motor from damage.
- Can be combined with buttons and photoelectric switches for automatic control.
- Maximum operating current: 10 Amp.
- O pọju ṣiṣẹ voltage: 30V DC. Warning: Do not connect to AC 240/120V. Excessive voltage can damage the controller.
3. Awọn pato

Figure 3.1: Product Dimensions and Parameters
This image provides a detailed diagram of the controller's dimensions (121mm x 96.5mm x 37mm for the controller, 110mm x 37mm for the remote) and a table of its technical specifications.
| Paramita | Iye |
|---|---|
| Awoṣe | IPS-S2 |
| Iṣagbewọle Voltage | DC 6V-30V |
| O wujade Voltage | 20-93% Input Voltage Adijositabulu |
| Current Monitoring Accuracy | ± 0.3A |
| O pọju Lọwọlọwọ | 10A |
| Agbara agbara | <3W |
| Akoko Iduro | 5 Minute (Adjustable) |
| Igbohunsafẹfẹ RF | RF433MHz/2.4GHz |
| WiFi Ilana | IEEE802.11 b/g/n |
| Latọna Iṣakoso Batiri | 23A 12V (Not included) |
| Awọn iwọn otutu ṣiṣẹ | -20°C ~ +70°C |
| Ibi ipamọ otutu | -20°C ~ +90°C |
| Ọriniinitutu ṣiṣẹ | <80% |
| Iwọn Nkan | 7.9 iwon (225 Giramu) |
| Ọja Mefa | 4.76 x 3.58 x 1.5 inches |
| Ohun elo | Ṣiṣu |
| Àwọ̀ | Funfun |
4. Eto ati fifi sori
4.1 Awọn itọnisọna Wiring
Proper wiring is crucial for the safe and correct operation of the controller. Refer to the diagram below for motor forward and reverse control connections.

Olusin 4.1: Wiring Diagram
This diagram illustrates how to connect the linear actuator to the DIHOOL controller. It shows the motor connected to the M+ and M- terminals, and the power supply connected to the VCC and GND terminals. The diagram also indicates the "UP" and "DOWN" buttons on the controller for manual operation.
To control motor forward and reverse:
- Press the "▲" button for upward movement.
- Press the "▼" button for downward movement.
- If the motor direction is incorrect, switch the motor cables connected to the M+ and M- terminals.
4.2 Applicable Actuators
The controller is designed to work with various types of electric linear actuators and lifting mechanisms.

Figure 4.2: Applicable Actuators
This image displays various types of electric linear actuators and an electric lifting column, demonstrating the versatility of the DIHOOL controller in different applications.
5. Awọn ilana Iṣiṣẹ
5.1 Function Introduction and Settings
The controller features several programmable functions accessible via the F1, F2, and F3 buttons.

Figure 5.1: Controller Function Overview
This image labels the components of the controller, including the WiFi indicator light, WiFi pairing button, current display, and the F1, F2, F3 function buttons. It also provides tables detailing the parameters for Motor Protection Settings (F1), Signal Operation Settings (F2), and Automatic Operation Settings (F3), along with instructions on how to access and adjust them.
To access and adjust settings: Press and hold the respective function key (F1, F2, or F3) for 3 seconds to enter the sub-function settings. Use the "▲" and "▼" buttons to adjust values.
- F1: Motor Protection Settings: Adjust parameters like current limit for up/down working, current limit for rebound, and voltage reduction for up/down.
- F2: Signal Operation Settings: Configure up/down working time, operation mode, and motor not working behavior.
- F3: Automatic Operation Settings: Set up/down pause time, motor working time, and the number of cycles for automatic operation.
5.2 Àwọn Ọ̀nà Ìṣàkóso Púpọ̀
The DIHOOL controller offers versatile control options to suit various applications.

Figure 5.2: Available Control Methods
This image illustrates the various ways to control the DIHOOL linear actuator controller: WiFi Control, Photoelectric Induction Control, Hand Controller Control, Button Control, Infrared Receiver Control, and Foot Switch Controller Control. It notes that accessories for these methods need to be purchased separately, except for the remote control (without battery) which is a default accessory.
- Iṣakoso WiFi: Control via the eWeLink APP on your smartphone.
- Isakoṣo latọna jijin: Use the included remote control (battery not included).
- Iṣakoso bọtini: Direct control using the buttons on the controller unit.
- Photoelectric Induction Control: Requires separate photoelectric switch accessory.
- Iṣakoso Iṣakoso Ọwọ: Requires separate hand controller accessory.
- Infrared Receiver Control: Requires separate infrared receiver accessory.
- Foot Switch Controller Control: Requires separate foot switch accessory.
5.3 2.4G WiFi Control Setup
To enable WiFi control, follow these steps:
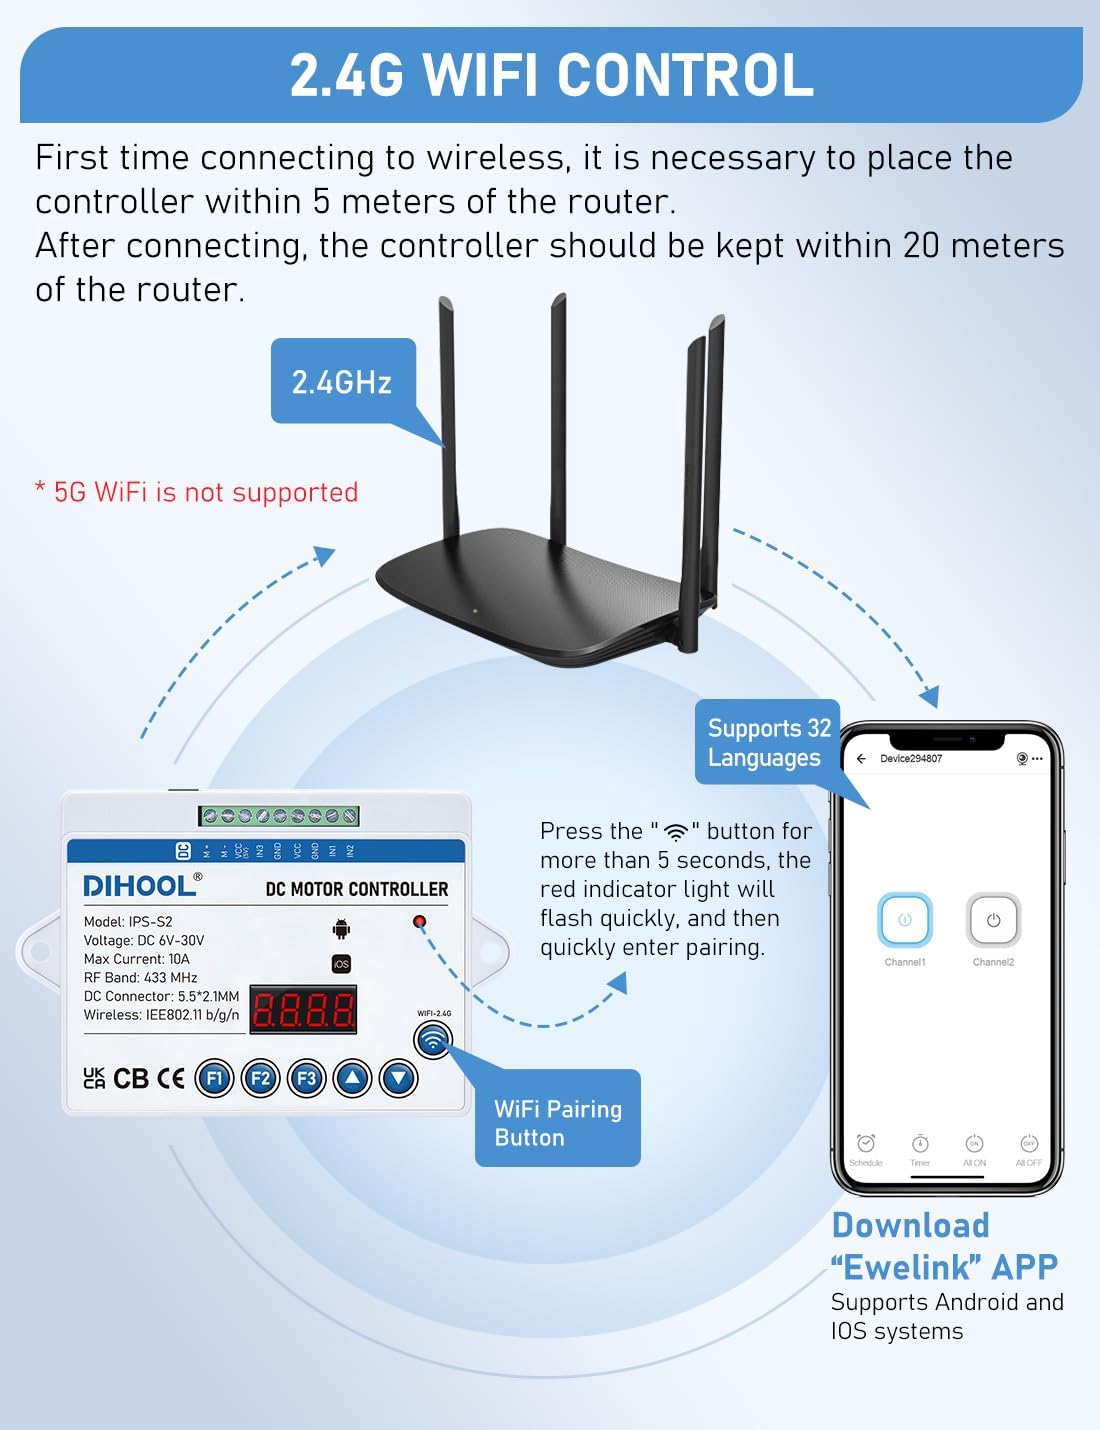
Figure 5.3: WiFi Control Setup
This image illustrates the process of setting up WiFi control. It shows the controller, a 2.4GHz WiFi router, and a smartphone displaying the eWeLink app. Instructions indicate placing the controller within 5 meters of the router for initial connection, pressing the WiFi pairing button for 5 seconds until the red indicator light flashes, and downloading the eWeLink app which supports Android and iOS systems.
- For initial connection, place the controller within 5 meters of your 2.4GHz WiFi router. (Note: 5G WiFi is not supported).
- Press the WiFi pairing button (indicated by the WiFi icon) for more than 5 seconds. The red indicator light will flash quickly.
- Download the "eWeLink" APP from your smartphone's app store (supports Android and iOS systems).
- Follow the in-app instructions to quickly enter pairing mode and connect the controller to your WiFi network.
- After successful connection, the controller can be kept within 20 meters of the router for stable operation.
5.4 Sisopọ Iṣakoso latọna jijin
To pair a new remote control or re-pair an existing one, follow these steps:

Figure 5.4: Remote Control Pairing
This image shows the remote control and the main controller unit, along with a close-up of the internal circuit board of the remote control. It provides instructions for pairing the remote: remove the lid of the remote, locate the white matching button on the circuit board, click it, then press any key on the remote to match. To clear the code, click the matching button 8 times until the indicator light flashes, then wait 8-10 seconds for unbinding.
- Remove the lid of the remote control to access the small circuit board (see Figure 5.4, Figure 1).
- Locate and click the white remote control matching button on the circuit board. The indicator light will illuminate.
- While the indicator light is on, click any key on the remote control to match it automatically.
- Press the up and down keys of the remote control to test the pairing.
To clear the remote control code (unbinding):
- Click the remote control matching button 8 times.
- The indicator light will flash, then wait for 8-10 seconds until the indicator light flashes again, indicating successful unbinding.
6. Itọju
The DIHOOL Electric Linear Actuator Controller is designed for durability and requires minimal maintenance.
- Ninu: Periodically wipe the controller with a dry, soft cloth to remove dust and debris. Do not use liquid cleaners or solvents.
- Ayewo: Regularly check all wiring connections to ensure they are secure and free from damage. Inspect the controller for any signs of physical damage or overheating.
- Ayika: Ensure the controller is operated within the specified working temperature and humidity ranges to prolong its lifespan. Avoid exposure to direct sunlight, excessive moisture, or corrosive environments.
7. Laasigbotitusita
If you encounter issues with your DIHOOL Electric Linear Actuator Controller, refer to the following common troubleshooting steps:
| Isoro | Owun to le Fa | Ojutu |
|---|---|---|
| Alakoso ko ṣiṣẹ lori. | Kò sí ìpèsè agbára; ìdìpọ̀ tí kò tọ́tage; loose connections. | Verify power input (DC 6V-30V). Check all power connections are secure. Ensure power source is active. |
| Motor not moving. | Incorrect motor wiring; motor overload; controller settings. | Check motor wiring (M+ and M-). Ensure motor is not jammed or overloaded. Review F1 (Motor Protection) settings. |
| Motor moves in wrong direction. | Motor polarity reversed. | Switch the motor cables connected to the M+ and M- terminals. |
| Isakoṣo latọna jijin ko ṣiṣẹ. | Battery low/missing; not paired; interference. | Install a new 23A 12V battery. Re-pair the remote control following Section 5.4. Ensure no strong RF interference. |
| WiFi asopọ oran. | Incorrect WiFi band; too far from router; pairing error. | Ensure router is 2.4GHz (5G not supported). Move controller closer to router. Re-attempt WiFi pairing as per Section 5.3. Check eWeLink app for error messages. |
| Controller overheating. | Overload; insufficient ventilation. | Reduce load on the motor. Ensure adequate airflow around the controller. Check for short circuits. |
If the problem persists after attempting these solutions, please contact DIHOOL customer support for further assistance.
8. Atilẹyin ọja ati Support
8.1 atilẹyin ọja Alaye
Specific warranty details for the DIHOOL Electric Linear Actuator Controller are not provided within this manual. For information regarding warranty coverage, terms, and conditions, please refer to the product packaging, the seller's website, or contact DIHOOL customer service directly. Keep your purchase receipt as proof of purchase.
8.2 Onibara Support
For technical assistance, troubleshooting, or any inquiries regarding your DIHOOL product, please contact the manufacturer or the seller.
- Olupese: DIHOOL Electric
- Ile itaja ori ayelujara: Ṣabẹwo si osise naa DIHOOL Store on Amazon fun alaye siwaju sii nipa awọn ọja ati atilẹyin.


