Ọrọ Iṣaaju
This manual provides detailed instructions for the VEKOOTO AHD 10.36-inch BSD Side View Vertical Monitor and Right Car Camera System. This system is designed to enhance vehicle safety by offering a clear, wide-angle view of the right side of your truck or bus, featuring a touch screen display, loop recording capabilities, and a Blind Spot Detection (BSD) voice alarm. Please read this manual thoroughly before installation and operation to ensure proper use and optimal performance.

Image: The VEKOOTO 10.36-inch vertical monitor and the right side camera unit, illustrating the primary components of the system.
Ohun ti o wa ninu Apoti
Jẹrisi pe gbogbo awọn paati wa ati ni ipo ti o dara nigbati ṣiṣi package naa:
- 10.36-inch Touch Screen Monitor
- Integrated dual camera (for right side view)
- Okun agbara
- Kamẹra Kamẹra
- akọmọ
Key Awọn ẹya ara ẹrọ
- Ifihan: 10.36-inch IPS touch screen with 2-channel split screen display capability.
- Atilẹyin kamẹra: Compatible with AHD720P cameras, offering enhanced image clarity, advanced bright color separation, signal filtering, and 3D noise reduction technology.
- Blind Spot Detection (BSD): Features a voice alarm system. The alarm area, volume, and sensitivity are adjustable.
- Iṣakoso aworan: Supports camera image screen mirroring function for flexible viewing.
- Ṣe afihan Isọdi-ara: Allows adjustment of display time, date, brightness, and screen color.
- Ibamu Agbara: Atilẹyin kan jakejado voltage ibiti o ti 9V-36V.
- Atilẹyin ọpọlọpọ ede: Available in English, Korean, Japanese, and Chinese.
- Fifi sori: Designed for installation on the right side rearview digi ti awọn ọkọ.

Image: The monitor interface highlighting features such as image adjustment, BSD voice alarm, and customizable detection areas, shown with various driving scenarios including night, rain, and blind spots.
Eto ati fifi sori
Proper installation is crucial for the system's performance. It is recommended to have this system installed by a qualified professional.
1. Ìgbékalẹ̀ Àwọn Ẹ̀yà Ara
- Mount the 10.36-inch vertical monitor securely inside the vehicle, ensuring it does not obstruct the driver's view.
- Install the integrated dual camera unit on the right side rearview mirror of your vehicle. Ensure the camera has a clear, unobstructed view.

Image: The vertical monitor installed inside a vehicle, providing a clear view of the right side, simulating a truck's perspective.
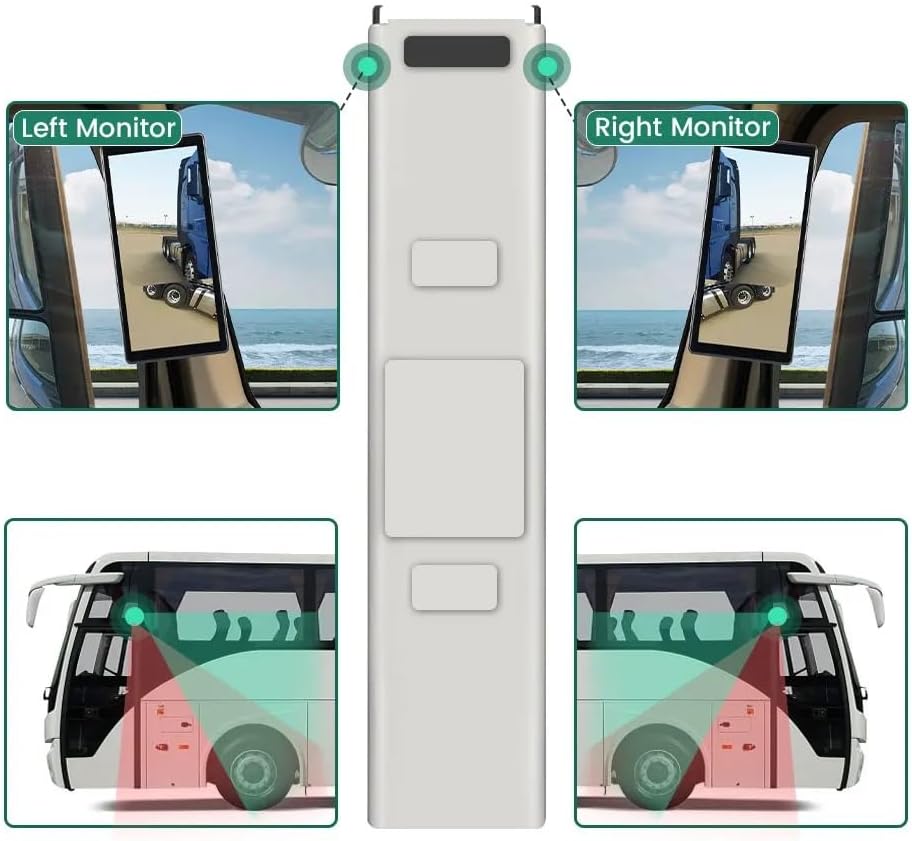
Image: A diagram illustrating the recommended placement of the right monitor and the camera's field of view for comprehensive side coverage on a bus.
2. Wiring Awọn isopọ
Refer to the wiring diagram below for correct connections. The system supports 9V-36V wide voltage igbewọle.

Image: Detailed wiring diagram showing connections for the monitor, integrated dual camera, ACC power supply (+), Ground (-), and Battery Power (+3A). Channel 1 (CH1) and Channel 2 (CH2) inputs are indicated for the camera cables.
- Sopọ awọn ACC Power Supply (+) wire (red) to a switched ignition source.
- Sopọ awọn Ilẹ (-) wire (black) to a suitable chassis ground point.
- Sopọ awọn Battery Power (+) (3A) wire (yellow) to a constant 12V/24V power source.
- Connect the camera cable(s) to the corresponding CH1 and CH2 inputs on the monitor.
- Rii daju pe gbogbo awọn asopọ wa ni aabo ati ni idayatọ daradara lati ṣe idiwọ awọn iyika kukuru.
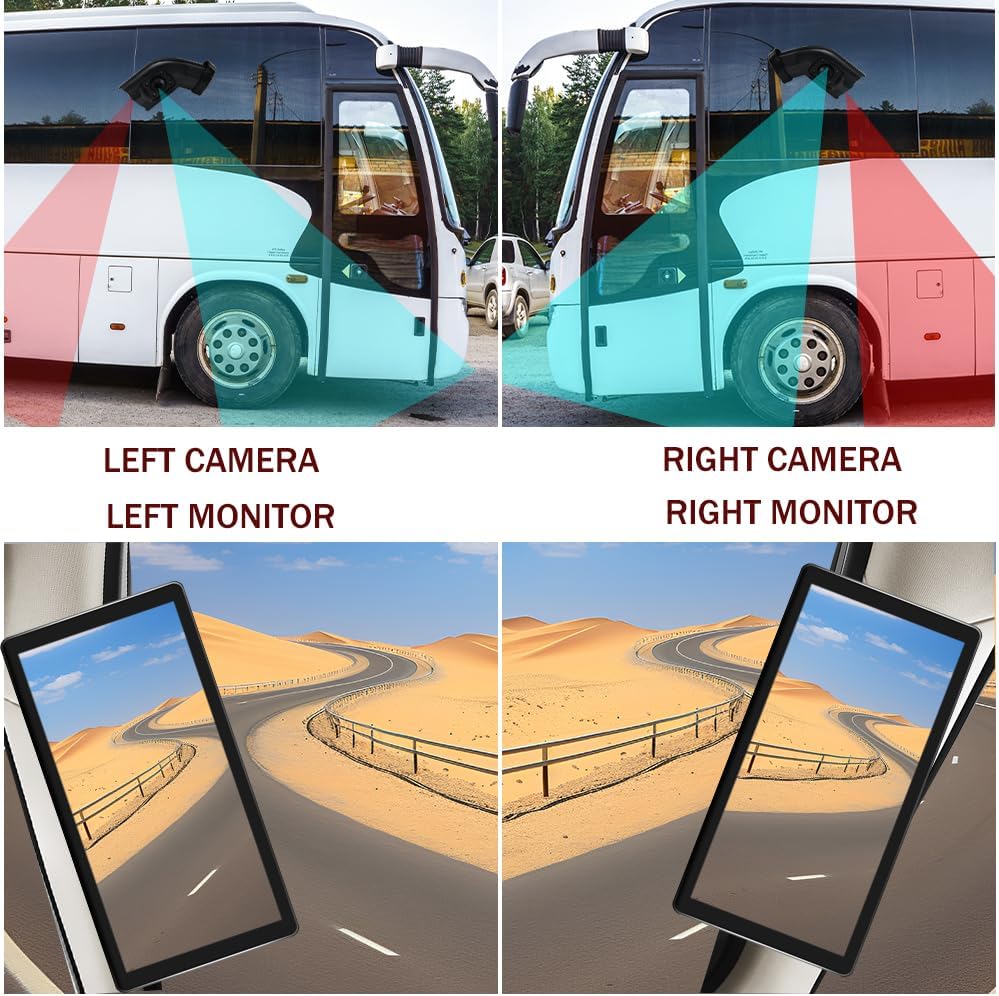
Image: A visual comparison demonstrating the coverage areas for left and right camera installations, along with the corresponding monitor views. This system is for the Right Camera/Monitor.
Awọn ilana Iṣiṣẹ
1. Agbara Tan / Paa
The monitor will power on automatically when the vehicle's ignition is turned on (if connected to ACC power) and power off when the ignition is turned off.
2. Lilọ kiri Iboju Ifọwọkan
Navigate through the monitor's menus and settings using the touch screen interface. Tap icons or options to select them.
3. Split Screen Display
The monitor supports a 2-channel split screen display. Access the display settings to configure how the camera feeds are shown on the screen.
4. BSD Voice Alarm
- Access the BSD settings menu on the touch screen.
- Adjust Alarm Area: Define the specific zones where the BSD system will detect objects and trigger an alarm.
- Control Alarm Volume: Set the desired volume level for the voice alerts.
- Set Sensitivity: Adjust the sensitivity of the detection system to suit your driving conditions and preferences.
5. Image Mirroring
If needed, enable the camera image mirroring function through the display settings to flip the camera view petele.
6. Ifihan Eto
Customize the display by adjusting brightness, screen color, and setting the current time and date through the monitor's settings menu.
7. Loop Gbigbasilẹ
The system supports loop recording. Ensure a compatible memory card is inserted (if required, check product specifications for card type and capacity). The system will continuously record video, overwriting the oldest files nigbati kaadi iranti ba ti kun.

Image: The monitor screen showing a video playback interface, indicating support for video recording with a timeline illustrating different recording times throughout the day.
Itoju
- Ninu Atẹle naa: Use a soft, dry cloth to clean the monitor screen. For stubborn smudges, lightly dampen awọn asọ pẹlu omi tabi a iboju-ailewu regede. Yago fun awọn kẹmika lile.
- Ninu Kamẹra: Periodically check and clean the camera lens to ensure a clear view. Use a soft cloth and lens cleaner if necessary.
- Ṣiṣayẹwo awọn isopọ: Regularly inspect all wiring connections to ensure they are secure and free from corrosion or damage.
- Awọn imudojuiwọn sọfitiwia: Ṣayẹwo awọn olupese ká webaaye fun eyikeyi famuwia ti o wa tabi awọn imudojuiwọn sọfitiwia fun eto rẹ.
Laasigbotitusita
| Isoro | Owun to le Fa | Ojutu |
|---|---|---|
| Ko si aworan lori atẹle |
|
|
| Distorted or unclear image |
|
|
| BSD alarm not working |
|
|
| Loop recording not functioning |
|
|
Awọn pato
| Ẹya ara ẹrọ | Ẹ̀kúnrẹ́rẹ́ |
|---|---|
| Ọja Mefa | 10.3"L x 2"W x 8"H (Monitor) |
| Iwọn Nkan | 4.4 iwon |
| Nọmba awoṣe | Ọtun |
| Ifihan ọna ẹrọ | LCD |
| Miiran Ifihan Awọn ẹya ara ẹrọ | Ailokun |
| Olupese | VEKOOTO |
| Brand | VEKOOTO |
| Iwon iboju | 10.36 inches |
| Awọn ẹrọ ibaramu | Atẹle |
| Iru fifi sori ẹrọ | Oke Oke |
| Voltage | 9-36 Volts (Wide Voltage Support) |
| Opitika sensọ Technology | CMOS |
| Lẹnsi Iru | Igun gbooro |
| Asopọmọra Iru | Ailokun |
| Ìwọ̀n Sensọ Opitika | 1/3 inch |

Image: Diagram illustrating the physical dimensions of the 10.36-inch vertical monitor (27cm/10.63inch height, 13cm/5.12inch width) and the camera unit (14.6cm/5.75inch height, 7.8cm/3.07inch width, 6.4cm/2.52inch depth).
Atilẹyin ọja ati Support
For warranty information, please refer to the documentation included with your purchase or contact VEKOOTO customer support directly. Support contact details can typically be found on the manufacturer's official webojula tabi nipasẹ rẹ ojuami ti o ra.
Always ensure you are using genuine VEKOOTO parts and accessories for optimal performance and to maintain warranty validity.


