1. Ifihan
The M5Stack ATOM Lite is a compact and versatile ESP32 IoT development board designed for embedded smart home devices and smart toy creation. Measuring only 24x24mm, it offers extensive GPIOs for customization. Powered by the ESP32-PICO chip, it integrates Wi-Fi technology and includes 4MB SPI flash memory for seamless connectivity and sufficient storage. The board features an Infra-Red LED, RGB LED, built-in buttons, and a HY2.0 interface, providing diverse interaction and connectivity options. Its 6 GPIOs allow easy connection to external sensors and actuators, expanding project capabilities. The on-board Type-C USB interface facilitates fast program upload and execution, streamlining the development process.

olusin 1: Iwaju view of the M5Stack ATOM Lite development kit.
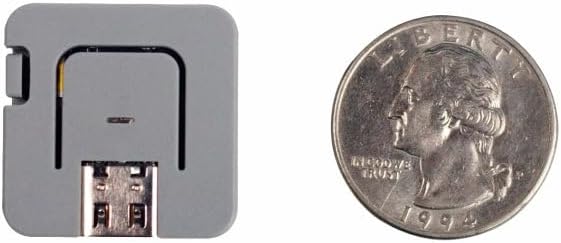
Figure 2: Size comparison of the ATOM Lite with a US quarter, illustrating its compact design.
2. Package Awọn akoonu
The M5Stack ATOM Lite package includes the following items:
- 1 x ATOM Lite ESP32 IoT Development Kit

Figure 3: The M5Stack ATOM Lite development kit as packaged for retail.
3. Hardware Loriview
The ATOM Lite features several integrated components and interfaces for diverse applications.

Figure 4: Diagram illustrating the key components and interfaces of the ATOM Lite, including the IR-LED, RGB LED, internal button (G39), Reset button, external pins, USB-C port, and HY2.0-4P connector.
Awọn eroja pataki:
- ESP32-PICO Microcontroller: Integrates Wi-Fi and Bluetooth capabilities.
- Ibudo USB-C: For power supply and data communication (programming).
- HY2.0-4P Connector: A 4-pin connector for external modules and sensors.
- Awọn Pinni GPIO: Six general-purpose input/output pins for connecting peripherals.
- RGB LED (G27): A programmable full-color LED.
- Infra-Red (IR) LED: For infrared communication.
- Built-in Button (G39): A user-programmable button.
- Bọtini atunto: To restart the device.
- M2 Screw Hole: Fun awọn idi iṣagbesori.
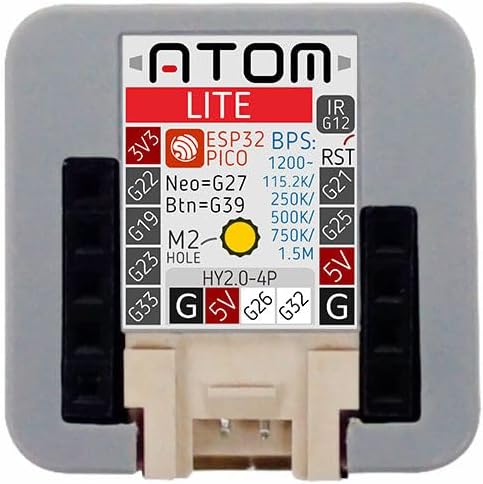
olusin 5: Top view of the ATOM Lite, detailing the pinout for the HY2.0-4P connector and external GPIOs, including voltage (3V3, 5V) and ground (G) connections.
4. Bibẹrẹ (Eto)
To begin using your M5Stack ATOM Lite, follow these steps:
4.1. Agbára àti Ìsopọ̀ Àkọ́kọ́
- Connect the ATOM Lite to your computer using a USB-C cable. The device will power on automatically.
- Upon connection, the RGB LED may illuminate, indicating power.
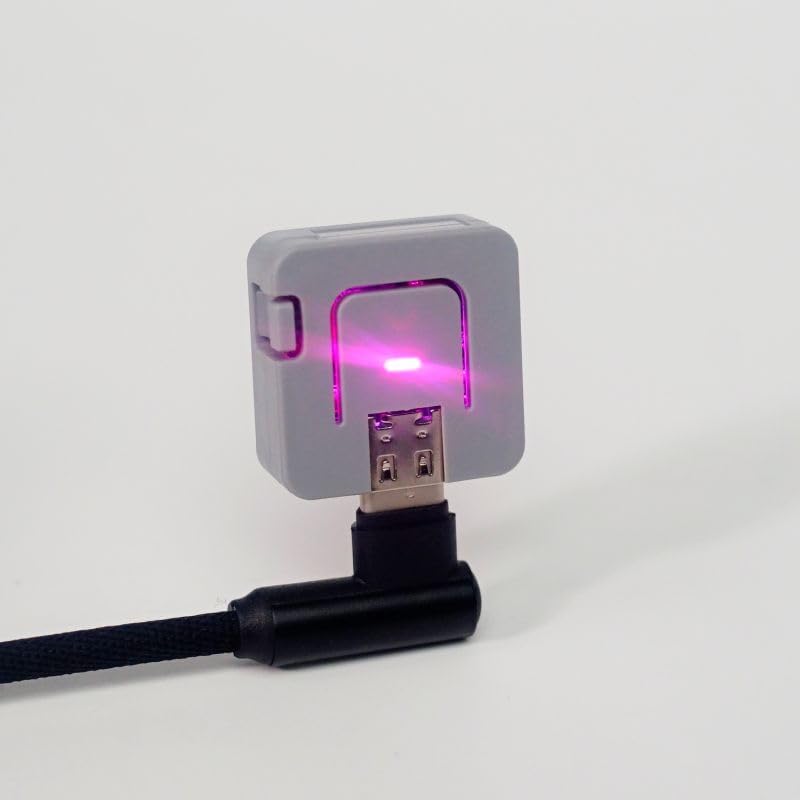
Figure 6: The ATOM Lite connected to a power source via a USB-C cable, with its RGB LED active.
4.2. Fifi sori awakọ
The ATOM Lite uses a standard USB-to-Serial chip (typically CP2104 or CH9102F). Most modern operating systems will automatically install the necessary drivers. If the device is not recognized, you may need to manually install drivers:
- For Windows/macOS/Linux, search for 'CP2104 driver' or 'CH9102F driver' online and download from the official Silicon Labs or WCH webojula.
4.3. Eto Ayika Idagbasoke
The ATOM Lite supports various development platforms:
- Arduino IDE: Install the ESP32 board package in the Arduino IDE. Refer to the official ESP32 Arduino documentation for detailed instructions.
- MicroPython: Flash MicroPython firmware onto the device. Tools like `esptool.py` can be used for this.
- UI-FLOW: M5Stack's block-based programming platform. Download the UI-FLOW desktop IDE or use the web ti ikede.
- ESPHome: For Home Assistant integration, visit esphome.io for pre-built projects and flashing instructions.
5. Ipilẹ isẹ
5.1. Using the Built-in Button
The ATOM Lite includes a programmable button (GPIO39). This button can be used for various user inputs, such as triggering events, changing modes, or confirming actions within your programmed application.
5.2. Controlling the RGB LED
The integrated RGB LED (connected to GPIO27) is a versatile indicator. It can be programmed to display different colors and patterns to convey status, alerts, or other visual feedback.
5.3. Infra-Red (IR) Communication
The IR LED allows the ATOM Lite to send infrared signals, enabling control of IR-compatible devices such as televisions, air conditioners, or other consumer electronics. Programming libraries are available for encoding and decoding IR protocols.
6. Asopọmọra Agbeegbe
6.1. HY2.0-4P Interface
The HY2.0-4P connector provides a convenient interface for connecting M5Stack's Grove-compatible modules and other peripherals. This connector typically includes power (5V), ground, and two data lines (e.g., I2C, UART, or digital I/O).
6.2. External GPIOs
The ATOM Lite exposes additional GPIO pins (G19, G22, G23, G26, G32, G33) for direct connection to custom circuits, sensors, and actuators. Refer to the pinout diagram (Figure 5) for specific pin assignments and capabilities.
7. Itọju ati Itọju
- Jeki ẹrọ naa gbẹ ki o si kuro ninu ọrinrin.
- Yago fun ṣiṣafihan ẹrọ naa si awọn iwọn otutu to gaju.
- Handle with care to prevent physical damage to the board and connectors.
- Clean the device with a soft, dry cloth if necessary. Do not use liquid cleaners.
8. Laasigbotitusita
- Ẹrọ ko ṣe idanimọ nipasẹ kọnputa: Ensure USB-C cable is functional. Install appropriate USB-to-Serial drivers (CP2104/CH9102F) if not automatically detected.
- Program upload failure: Verify correct board and port selection in your IDE. Ensure drivers are installed. Try pressing the Reset button before uploading.
- Awọn oran Asopọmọra Wi-Fi: Check Wi-Fi credentials in your code. Ensure the device is within range of the Wi-Fi network.
- Ìwà tí a kò retí: Review your code for logical errors. Ensure all external connections are correct and secure.
9. Awọn pato
| Ẹya ara ẹrọ | Sipesifikesonu |
|---|
| Orukọ awoṣe | ATOM Lite |
| Nọmba Awoṣe Nkan | C008 |
| isise | ESP32-PICO |
| Flash Memory | 4 MB SPI Flash |
| Alailowaya Iru | 802.11bgn (Wi-Fi) |
| Àgbo | SRAM |
| Eto isesise | FreeRTOS (default, supports others) |
| Asopọmọra Technology | USB Iru-C |
| Iwọn Nkan | 0.423 iwon |
| Awọn iwọn Ọja (LxWxH) | 0.94 x 0.94 x 0.94 inches |
| Àwọ̀ | Grẹy |
| Awọn irinše to wa | 1 x ATOM Lite ESP32 IoT Development Kit |

olusin 7: Isalẹ view of the ATOM Lite, showing regulatory markings including the FCC ID.
10. atilẹyin ọja Information
For detailed warranty information, please refer to the official M5Stack website or contact their customer support directly. Warranty terms and conditions may vary based on region and point of purchase.
11. Support ati Resources
For further assistance, technical documentation, and community support, please visit the official M5Stack website. You can find tutorials, examples, and forums to help with your development projects.
- Official M5Stack Webojula: https://m5stack.com/
- M5Stack Documentation: Refer to the product-specific documentation available on the M5Stack webojula.


