1. Ifihan
This manual provides essential information for the safe and efficient installation, operation, and maintenance of the Solax Power X1-Boost-3.0-G3 grid-tied solar inverter. This device is designed to convert direct current (DC) electricity generated by solar panels into alternating current (AC) electricity for household consumption or export to the electrical grid. Please read this manual thoroughly before installation and retain it for future reference.
Key features of the X1-Boost-3.0-G3 include:
- Ṣíṣe Àtúnṣe Agbára: Equipped with 2 Maximum Power Point Trackers (MPPTs) to manage multiple solar panel orientations and optimize energy production.
- Igbẹkẹle giga: Engineered for durability and stable operation, incorporating integrated protections for safe and continuous performance.
- Abojuto latọna jijin: Connectivity options enable convenient monitoring and management of the solar system from various locations.
2. Alaye Aabo
Strict adherence to all safety instructions is mandatory to prevent electric shock, fire, injury, or damage to the inverter. Only qualified and authorized personnel should perform installation and maintenance procedures.
IJAMBA!
- Iwọn gigatages are present within the inverter. All work must be carried out by a qualified electrician.
- This appliance is not intended for use by children or persons with reduced physical, sensory, or mental capabilities, or lack of experience and knowledge, unless they have been given supervision or instruction.
- Awọn ọmọde yẹ ki o wa ni abojuto lati rii daju pe wọn ko ṣere pẹlu ohun elo naa.
Ṣọra!
- Risk of burn injuries due to hot enclosure parts. During operation, the upper lid and body of the enclosure may become hot. Only touch the lower enclosure lid during operation.
- Possible damage to health as a result of radiation effects. Do not stay closer than 20 cm to the inverter for any length of time.
IKILO!
- Do not operate the inverter when the device is running abnormally.
- Ewu ti ina-mọnamọna!
- Ewu ewutage will be present for up to 5 minutes after disconnection from the power supply.
- Rii daju input DC voltage is below the maximum DC voltage specified. Overvoltage can cause permanent damage to the inverter and other losses, which are not covered by warranty.
- Authorized service personnel must disconnect both AC and DC power from the X1 series inverter before attempting any maintenance, cleaning, or work on connected circuits.
AKIYESI!
- Grounding the PV generator is essential. Comply with local requirements for grounding PV modules and the PV generator. Solax recommends connecting the generator frame and other electrically conductive surfaces to ensure continuous conduction and proper grounding for optimal system and personal protection.
Awọn Itọsọna Aabo Gbogbogbo:
- Read this entire manual carefully before installation and operation. Keep it for future reference.
- Use only attachments recommended or sold by Solax. Using unapproved attachments may result in fire, electric shock, or injury.
- Ensure existing wiring is in good condition and appropriately sized.
- Do not disassemble any parts of the inverter not mentioned in the installation guide. It contains no user-serviceable parts. Attempting to service the inverter yourself will void the warranty and may result in electric shock or fire.
- Keep the inverter away from flammable or explosive materials.
- The installation location should be free from humidity and corrosive substances.
- Oṣiṣẹ iṣẹ ti a fun ni aṣẹ gbọdọ lo awọn irinṣẹ idayatọ nigba fifi sori ẹrọ tabi ṣiṣẹ pẹlu ohun elo yii.
- PV modules must have an IEC 61730 Class A rating.
- Never touch both the positive and negative poles of the PV connecting device simultaneously.
- Ẹyọ naa ni awọn agbara agbara ti o wa ni idiyele si agbara apaniyan voltage even after the MAINS and PV supply have been disconnected. Always wait 5 minutes after switching off PV and Mains before unplugging DC and MAINS couplers.
- When accessing the internal circuit, wait 5 minutes for capacitors to discharge. Measure the voltage between UDC+ and UDC- terminals with a multi-meter (impedance at least 1Mohm) to confirm total discharge.

Image: Detailed safety warnings and precautions for the Solax Power X1-Boost-3.0-G3 inverter, emphasizing high voltage risks, qualified personnel requirements, and proper handling procedures.
3. Ọja Ipariview
The Solax Power X1-Boost-3.0-G3 inverter features a compact and robust design, optimized for residential solar installations. Its intuitive interface allows for easy monitoring and control.
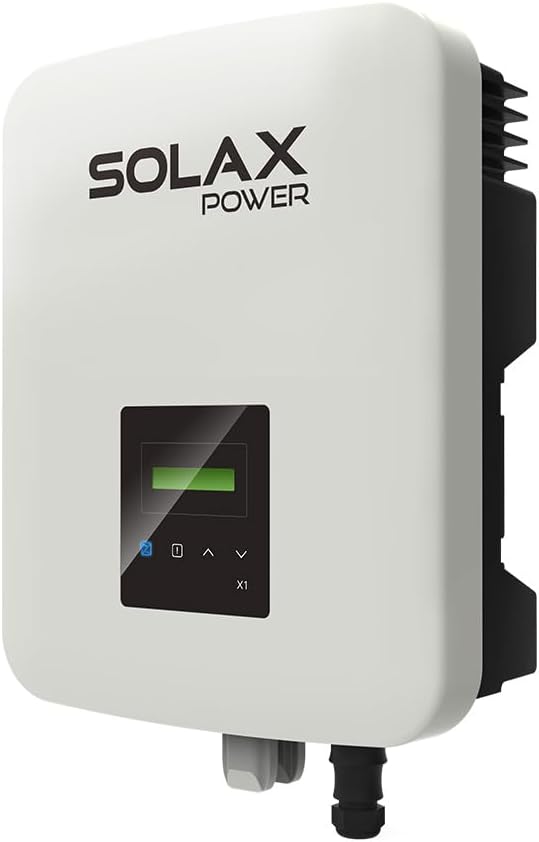
Aworan: Iwaju view of the Solax Power X1-Boost-3.0-G3 solar inverter, showcasing its white casing and digital display.

Image: The Solax Power X1-Boost-3.0-G3 inverter with callouts for 3.0kW power, 2 MPPTs, and 14A input current.
3.1 Key Awọn ẹya ara ẹrọ
- Iṣe Didara: Features 150% oversizing and 110% overload capacity, with a 14A DC input per string.
- Onirọrun aṣamulo: Offers optional 24-hour monitoring and maintenance, designed for easy installation and configuration.
- Guaranteed Reliability and Security: Includes optional integrated Type III AC/DC Surge Protection Device (SPD), overheating protection, and an integrated export control function.

Image: Visual representation of the Solax Power X1-Boost-3.0-G3 inverter's key features, including superior performance, user-friendliness, and guaranteed reliability.
4. Fifi sori ẹrọ ati Oṣo
Installation of the Solax Power X1-Boost-3.0-G3 inverter must be performed by a qualified electrician in accordance with all local and national electrical codes and regulations.
4.1 Iṣagbesori
Select a suitable mounting location that is:
- Protected from direct sunlight, rain, and extreme temperatures.
- Well-ventilated to ensure proper heat dissipation.
- Accessible for maintenance but secure from unauthorized access.
- Away from flammable or explosive materials.
4.2 Electrical Awọn isopọ
The inverter requires connections for:
- Input DC: From the solar PV array. Ensure correct polarity and voltage awọn ipele.
- Ijade AC: To the electrical grid or household load.
- Ilẹ: Proper grounding of the inverter and PV array is critical for safety.
Refer to the detailed wiring diagrams provided in the full installation guide for specific connection instructions.
4.3 Connectivity and Monitoring
The inverter supports remote monitoring capabilities. This typically involves connecting the inverter to a local network (e.g., Wi-Fi or Ethernet) to transmit performance data to a dedicated online portal or mobile application. This allows for 24-hour monitoring of energy production and system status.

Aworan: Pariview of advanced features for the Solax Power X1-Boost-3.0-G3, including remote updates, high oversizing/overload, built-in safety, and comprehensive monitoring.
5. Isẹ
Once installed and connected, the Solax Power X1-Boost-3.0-G3 inverter will automatically begin operation when sufficient solar power is available and grid conditions are met. The integrated display provides real-time information on system performance.
5.1 Bibẹrẹ oluyipada
- Ensure all DC and AC connections are secure and correctly wired.
- Switch on the DC isolator switch (if present) for the PV array.
- Switch on the AC circuit breaker for the inverter.
- The inverter will perform a self-test and then begin converting solar energy.
5.2 Àbójútó Iṣẹ́ Àgbékalẹ̀
The inverter's front panel display shows operational data such as current power output, daily energy yield, and system status. For more detailed monitoring, utilize the remote monitoring platform accessible via web tabi ohun elo alagbeka.
6. Itọju
Regular maintenance ensures the longevity and optimal performance of your Solax Power X1-Boost-3.0-G3 inverter. Always disconnect both AC and DC power supplies and wait 5 minutes before performing any maintenance.
6.1 Awọn sọwedowo baraku
- Ayewo wiwo: Periodically check the inverter for any visible damage, corrosion, or loose connections.
- Ninu: Keep the inverter's ventilation openings clear of dust and debris to ensure proper cooling. Use a soft, dry cloth for cleaning the exterior. Do not use liquids or abrasive cleaners.
- Iduroṣinṣin USB: Inspect all cables for signs of wear, damage, or degradation.
6.2 Ọjọgbọn Itọju
It is recommended to have the inverter inspected by a qualified technician at least once every few years to ensure all components are functioning correctly and to perform any necessary firmware updates.
7. Laasigbotitusita
This section provides basic troubleshooting steps for common issues. For complex problems, contact qualified service personnel.
7.1 Wọpọ Oran ati Solusan
- Inverter Not Producing Power:
- Check if the DC isolator and AC circuit breaker are switched ON.
- Rí i dájú pé àwọn páànẹ́lì oòrùn ń gba oòrùn tó tó.
- Check for any error messages on the inverter display or monitoring platform.
- Ifiranṣẹ aṣiṣe ti a fihan:
- Note down the error code. Refer to the full user manual or contact technical support with the code for specific guidance.
- Attempt a system restart by switching off AC and DC power, waiting 5 minutes, then switching them back on.
- Ijade Agbara Kekere:
- Ensure solar panels are clean and free from shading.
- Check for any loose or damaged DC connections.
- Verify that the inverter's ventilation is not obstructed.
If the issue persists after attempting these steps, contact Solax Power technical support or your installer.
8. Awọn pato
The following table outlines the technical specifications for the Solax Power X1-Boost-3.0-G3 solar inverter.

Image: Technical specifications for the Solax Power X1-Boost-3.0-G3 inverter, detailing electrical parameters and operating conditions.
| Iwa | Iye |
|---|---|
| Brand | Solax Power (Distributed by Solitia) |
| Orukọ awoṣe | X1-Boost-3.0-G3 |
| Model Number (Article) | GRI0034 |
| Agbara | 3 KW |
| Voltage | 230 Volts |
| Iṣagbewọle Voltage (AC) | 230 Volts |
| O pọju. PV Input Voltage | 600V |
| O pọju. PV Input Lọwọlọwọ | 14A/14A |
| Nọmba ti MPPT Awọn olutọpa | 2 |
| Strings per MPPT Tracker | 1 |
| Nṣiṣẹ Ibaramu Ibi iwọn otutu | -25°C si +60°C |
| Àwọ̀ | Funfun |
| Awọn iwọn (L x W x H) | 43.9 cm x 51.4 cm x 23.3 cm (17.3 ni x 20.2 ni x 9.2 in) |
| Iwọn | 13.5 kg (29.7 lbs) |
| Iṣeduro Lilo | Ile |
| Orisun agbara | Agbara oorun |
| Total Number of Power Outlets | 1 |
| Apoju Awọn ẹya ara wiwa | ọdun meji 3 |
| Software imudojuiwọn Titi | Alaye ko si |
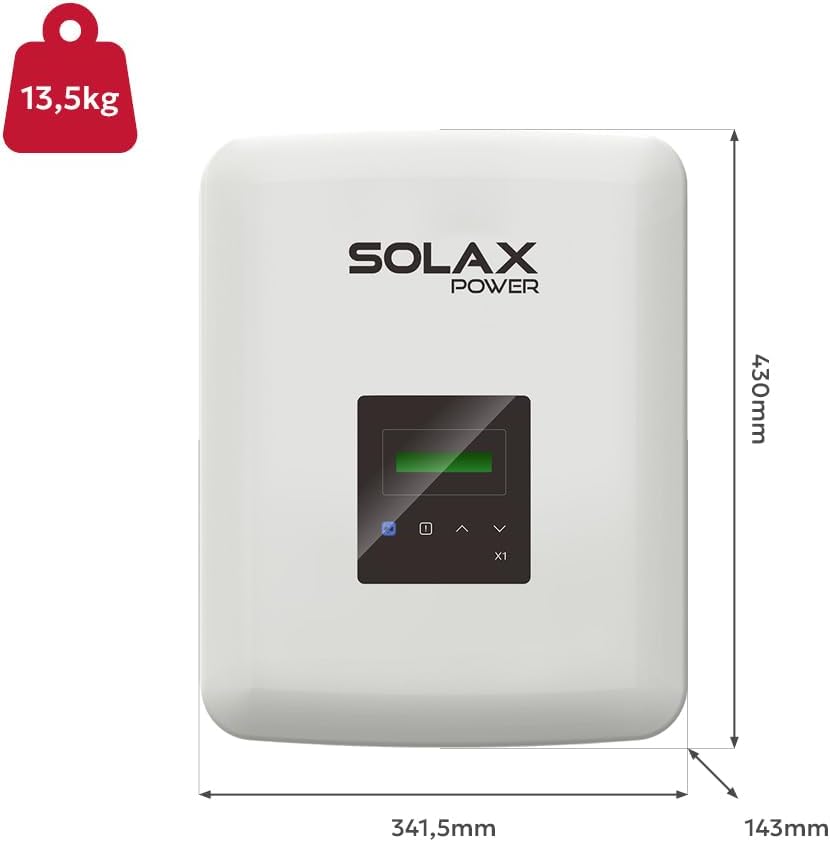
Image: Physical dimensions and weight of the Solax Power X1-Boost-3.0-G3 inverter, indicating its compact size.
9. Atilẹyin ọja ati Support
The Solax Power X1-Boost-3.0-G3 inverter is designed for reliability and comes with a commitment to quality. Spare parts are available for a period of 3 years from the date of purchase.
For detailed warranty terms and conditions, please refer to the official warranty document provided with your product or visit the Solax Power webojula. Atilẹyin ọja ni igbagbogbo bo awọn abawọn ninu awọn ohun elo ati iṣẹ ṣiṣe labẹ lilo deede.
For technical support, service requests, or further inquiries, please contact your authorized Solax Power distributor or installer. Ensure you have your product model number (X1-Boost-3.0-G3) and serial number ready when contacting support.


