1. Ifihan
This manual provides instructions for the installation, operation, and maintenance of your SOUNDKITS Single Din Touchscreen Radio. This device integrates modern infotainment features such as Apple CarPlay, Android Auto, Bluetooth connectivity, and a 6.5-inch IPS display into a standard single DIN form factor, suitable for upgrading classic vehicles.

Image: The SOUNDKITS Single Din Touchscreen Radio unit, featuring a 6.5-inch IPS display showing the Apple CarPlay interface, accompanied by its infrared remote control.
2. Alaye Aabo
Read all instructions carefully before installation and operation. Failure to follow these instructions may result in injury or damage to the device or vehicle.
- A ṣe iṣeduro fifi sori Ọjọgbọn: Due to the complexity of car audio systems, professional installation is advised.
- Orisun Agbara: So ẹrọ pọ nikan si ipese agbara 12V DC pẹlu ilẹ odi.
- Asopọmọra: Ensure all wiring is correctly connected to prevent short circuits and damage. Insulate all exposed wires.
- Aabo awakọ: Ma ṣe ṣiṣẹ ẹyọ naa ni ọna ti o ṣe idiwọ fun ọ lati wakọ. Nigbagbogbo ni ayo aabo opopona.
- Iwọn otutu: Yago fun ṣiṣafihan ẹyọkan si awọn iwọn otutu to gaju tabi oorun taara fun awọn akoko gigun.
- Ọrinrin: Keep the unit dry. Exposure to moisture can cause malfunction or electric shock.
3. Package Awọn akoonu
Jẹrisi pe gbogbo awọn ohun kan wa ninu package:
- Single Din CarPlay Stereo Unit
- Ikun iṣan
- Awọn ohun elo iṣagbesori
- IR Isakoṣo latọna jijin
- User Instruction Manual (this document)
4. Ọja Ipariview
4.1 Àwọn Ìṣàkóso àti Àwọn Ìbùdó Ìwájú Pánẹ́lì
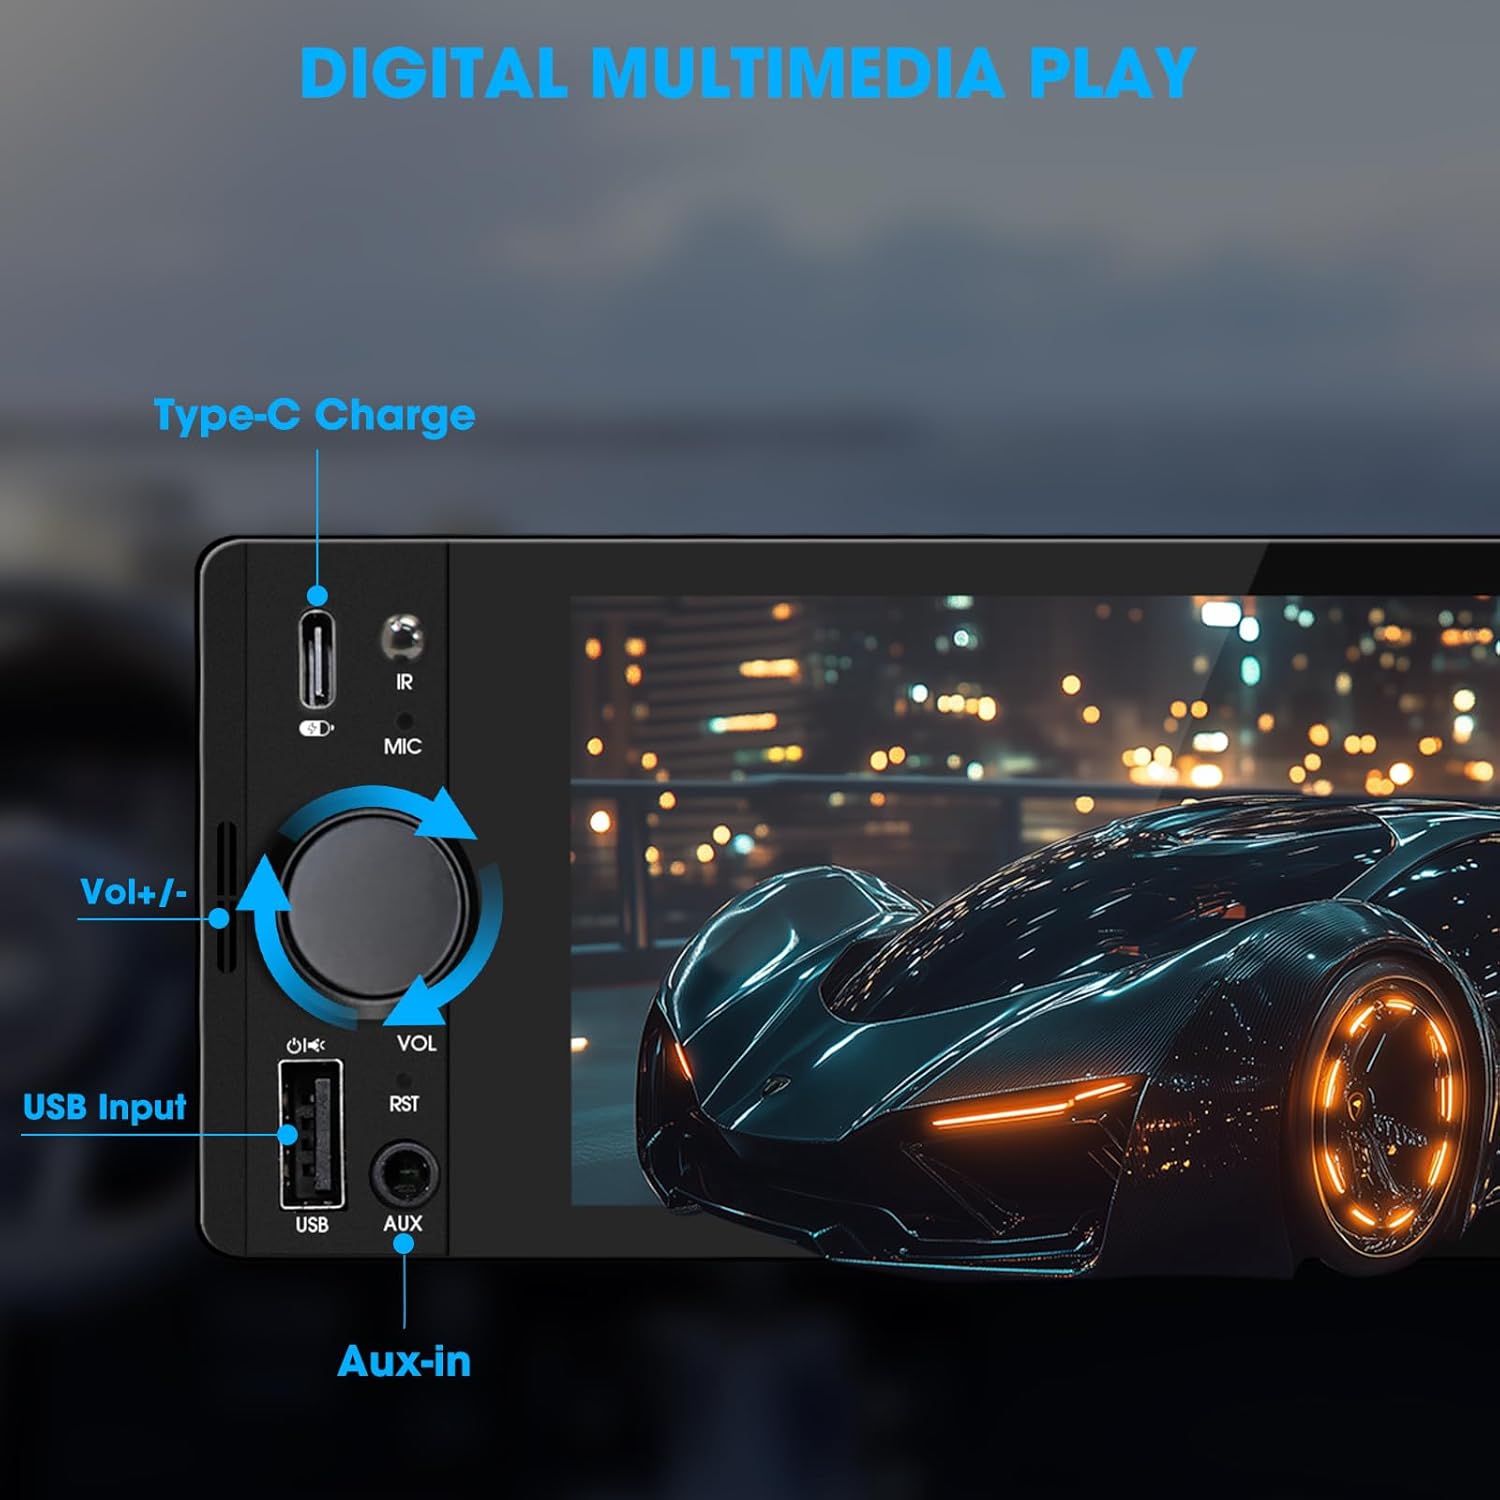
Image: Close-up of the radio's front panel, highlighting the Type-C charging port, IR receiver, microphone, volume knob, USB input, and AUX-in port.
- 6.5-inch IPS Touchscreen: Main display for all functions and interfaces.
- Kọ́nì ìró ohùn (ÌWỌN): Yípo láti ṣàtúnṣe ìró ohùn. Tẹ̀ láti dákẹ́/dákẹ́.
- Input USB: For media playback, CarPlay/Android Auto connection, and phone mirroring.
- AX-in: 3.5mm audio input for external audio devices.
- Ibudo agbara Iru-C: Provides 2.1A quick charging for compatible devices.
- Gbohungbohun (MIC): Gbohungbohun ti a ṣe sinu fun awọn ipe laisi ọwọ ati awọn pipaṣẹ ohun.
- Olugba IR: Fun iṣiṣẹ iṣakoso latọna jijin.
- Reset Button (RST): Small button to reset the unit (requires a thin object like a paperclip).
4.2 Ru Panel Awọn isopọ

Image: Diagram showing the rear connections of the radio, including the main wiring harness, RCA outputs, external microphone jack, and radio antenna input.
- Main Wiring Harness Connector: Connects to the vehicle's power, speaker, and control wires.
- RCA Audio Outputs (L-OUT, R-OUT): Fun sisopọ ita ampalifiers.
- RCA Video Outputs (V-OUT1, V-OUT2): For connecting external monitors (e.g., headrest monitors).
- Ẹyìnview Ìtẹ̀síwájú Kámẹ́rà (CAMIN): Ìfilọ́lẹ̀ RCA fún ẹ̀yìnview kamẹra.
- Jack gbohungbohun ita: For connecting an optional external microphone.
- Iṣawọle Antenna Redio: Connects to the vehicle's AM/FM antenna.
5. Eto & Fifi sori
This section outlines the general steps for installing the SOUNDKITS Single Din Touchscreen Radio. Professional installation is recommended.
5.1 Akojọ aṣyn fifi sori ẹrọ tẹlẹ
- Rii daju pe batiri ọkọ ti ge asopọ ṣaaju ki o to bẹrẹ fifi sori ẹrọ.
- Confirm the vehicle has a standard single DIN slot.
- Gather necessary tools (wire strippers, crimpers, electrical tape, screwdriver).

Image: A visual comparison showing older car radios replaced by the modern SOUNDKITS Single Din Touchscreen Radio, demonstrating the aesthetic upgrade.
5.2 Awọn isopọ onirin
Refer to the provided wiring harness diagram for specific connections. The harness uses universal ISO interface and wire color coding.
| Waya Awọ | Išẹ |
|---|---|
| Yellow | Ibakan 12V (Batiri) |
| Pupa | Ẹ̀rọ 12V (Ìnáná) |
| Dudu | Ilẹ (GND) |
| Buluu | Eriali/Amplifier Remote Tan-On |
| ọsan | Illumination/Dimmer |
| Brown | Iṣakoso Kẹ̀kẹ́ Ìdarí (SWC) |
| Alawọ ewe/funfun | Agbọrọsọ osi osi (+) |
| Alawọ ewe/dudu | Agbọrọsọ Osi Tẹhin (-) |
| Eleyii/Funfun | Agbọrọsọ Ọtun Tẹhin (+) |
| eleyi ti/dudu | Agbọrọsọ Ọtun Tẹhin (-) |
| Funfun / Funfun | Agbọrọsọ osi iwaju (+) |
| Funfun/dudu | Agbọrọsọ osi iwaju (-) |
| Grẹy/funfun | Agbọrọsọ Ọtun Iwaju (+) |
| Grẹy/dudu | Agbọrọsọ Ọtun Iwaju (-) |
| Reverse (often Pink/Brown) | Reverse Gear Signal (for rearview kamẹra) |
Akiyesi: Always cross-reference with your vehicle's specific wiring diagram and the diagram provided with the product's harness. Incorrect wiring can cause damage.
5.3 Iṣagbesori Unit
- Secure the mounting sleeve into the vehicle's single DIN dash opening.
- Connect all necessary wiring harnesses, antenna, and any external accessories (e.g., rearview camera, external microphone).
- Carefully slide the head unit into the mounting sleeve until it locks into place.
- Tun batiri ọkọ pọ.
- Ṣe ìdánwò gbogbo iṣẹ́ kí o tó tún so àwọn ohun èlò ìdábùú náà pọ̀.
6. Awọn ilana Iṣiṣẹ
6.1 Ipilẹ isẹ
- Titan/Apapa: The unit powers on with the vehicle's ignition. Press and hold the volume knob to turn off/on the display.
- Iṣakoso iwọn didun: Rotate the volume knob clockwise to increase volume, counter-clockwise to decrease. Press the knob to mute/unmute.
- Àwòrán ojú iboju Fọwọkan: Navigate menus and select options by tapping or swiping on the 6.5-inch IPS touchscreen.
6.2 Bluetooth Asopọmọra

Image: The radio's display showing a successful Bluetooth 5.3 connection to a smartphone, with music playback information visible.
- Lati akojọ aṣayan akọkọ, yan awọn Bluetooth aami.
- On your smartphone, search for available Bluetooth devices and select "SOUNDKITS" (or similar device name).
- Jẹrisi koodu sisopọ lori awọn ẹrọ mejeeji ti o ba ṣetan.
- Once connected, you can make hands-free calls and stream audio.
6.3 Apple CarPlay & Android Auto
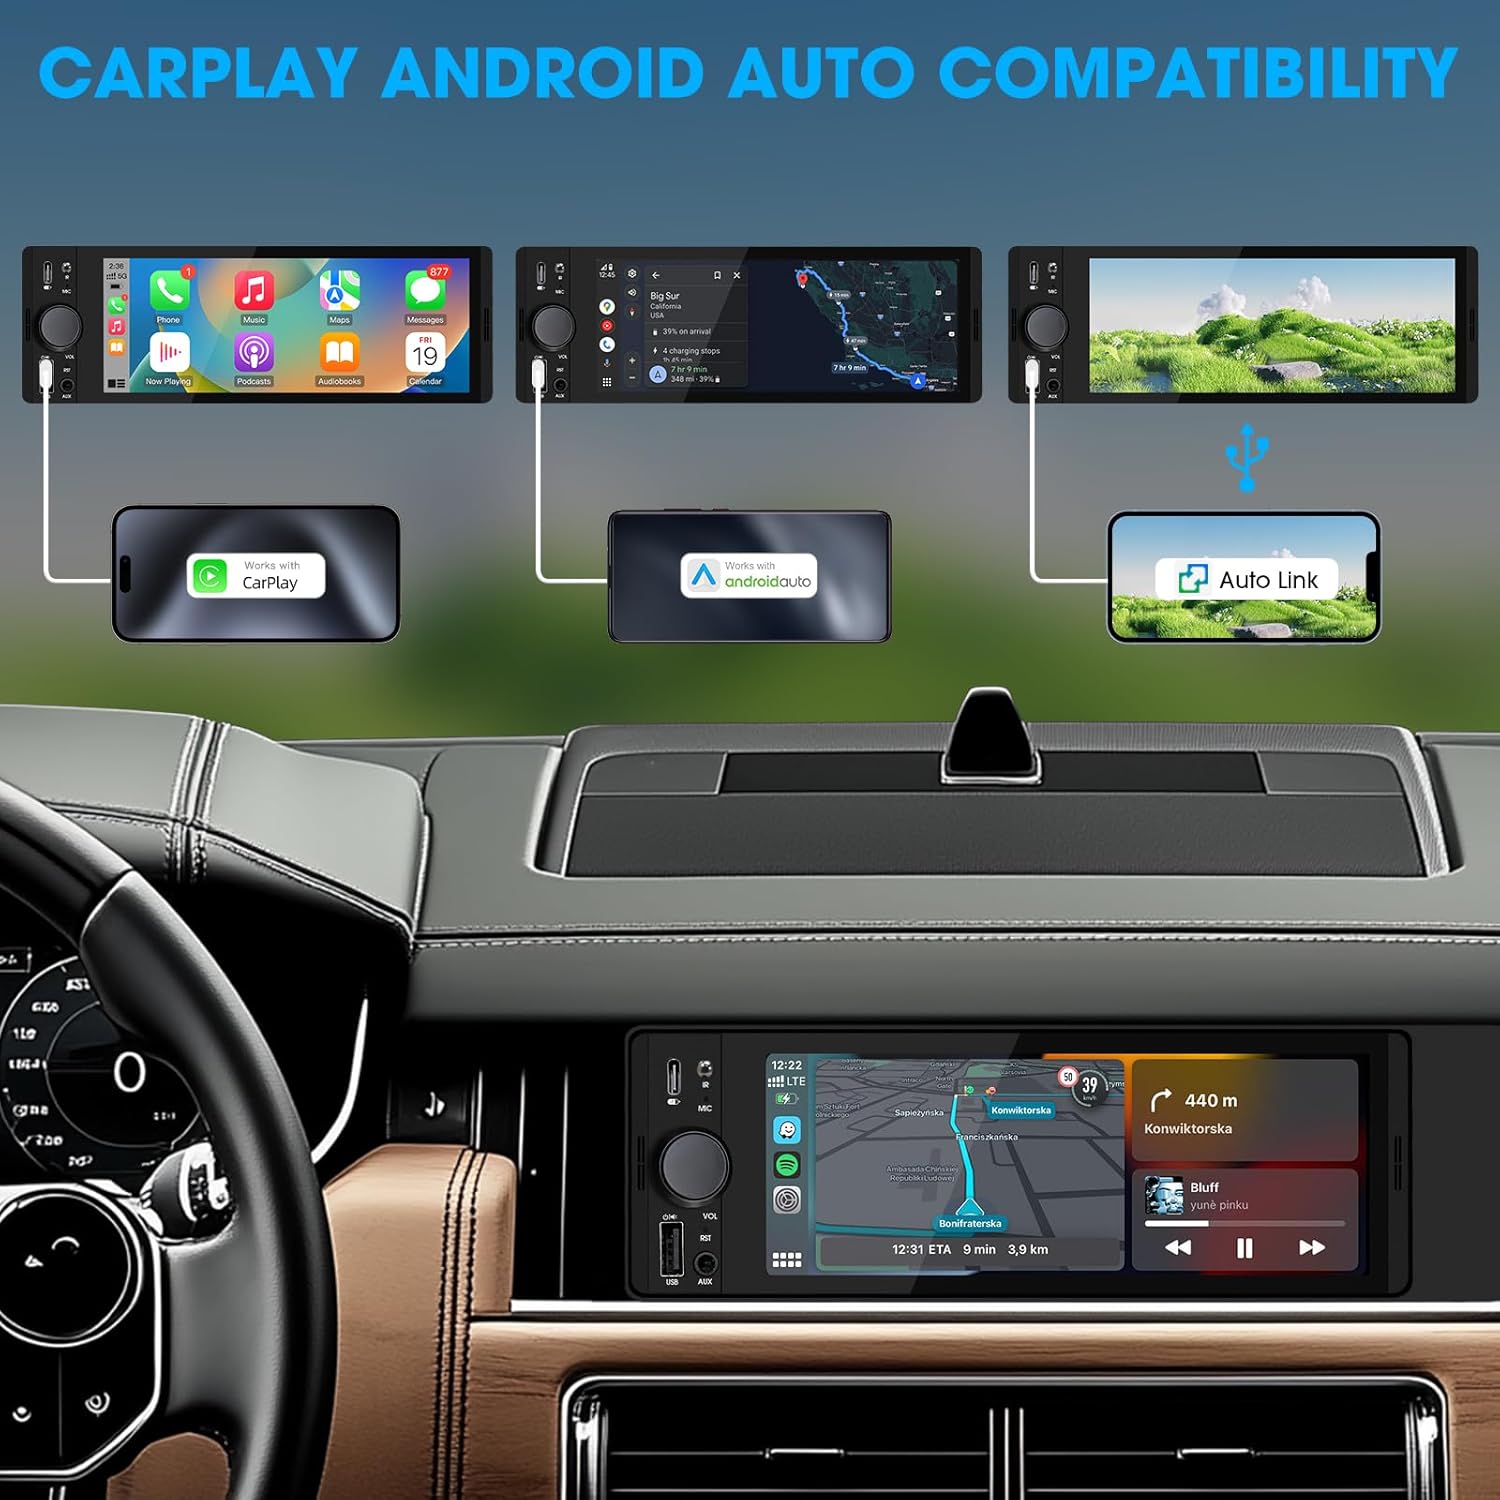
Image: An illustration demonstrating how to connect smartphones via USB for Apple CarPlay, Android Auto, and Auto Link functionality on the car stereo.
- Connect your iPhone (for CarPlay) or Android phone (for Android Auto) to the unit's USB port using a certified USB cable.
- The unit will automatically detect the connection and launch the respective interface.
- Follow any on-screen prompts on your phone or the unit to complete the setup.
- Access navigation, music, calls, and other compatible apps directly from the touchscreen.
6.4 USB Phone Mirroring
This feature allows you to display your smartphone's screen directly on the unit's display.
- Connect your smartphone to the unit's USB port.
- Select the "Phonelink" or "Mirrorlink" option from the main menu.
- Follow the on-screen instructions to establish the connection. This may require installing a specific app on your phone.
Rédíò 6.5 (AM/FM)

Image: The radio interface displaying AM and FM frequency ranges and signal strength, indicating available stations.
- Lati akojọ aṣayan akọkọ, yan awọn Redio aami.
- Fọwọ ba AM or FM to switch bands.
- Lo awọn Wa awọn bọtini lati wa awọn ibudo laifọwọyi.
- Tap and hold a preset number to save the current station.
6.6 Media Playback (USB, AUX)
- USB: Insert a USB drive into the USB port. The unit will automatically detect and play compatible audio/video files. Lilọ kiri files using the on-screen interface.
- AUX: Connect an external audio device to the 3.5mm AUX-in port using an audio cable. Select the AUX source from the main menu.
6.7 Iṣakoso ohun

Image: A driver interacting with the car stereo using voice commands for Siri and Google Assistant, demonstrating hands-free operation.
When connected via CarPlay or Android Auto, you can activate your phone's voice assistant (Siri or Google Assistant) by pressing the voice control button on the unit (if available) or by using the voice command phrase (e.g., "Hey Siri" or "Ok Google").
6.8 Iṣakoso kẹkẹ idari (SWC)
Image: The steering wheel control configuration screen on the radio, showing options to program various buttons for functions like volume, track skip, and mode.
If your vehicle supports steering wheel controls, connect the SWC wire during installation. Access the Iṣakoso kẹkẹ idari settings in the unit's menu to program the buttons to control various functions (e.g., volume, track skip, mode).
6.9 Ètò Ìṣètò Ìṣètò

Image: The audio equalizer settings interface, showing adjustable frequency bands and preset options, alongside a diagram of RCA audio and video outputs.
Wọle si Eto Ohun or EQ menu to adjust audio parameters. The unit features a 10-band equalizer with preset options (e.g., Pop, Rock, Jazz) and custom settings to tailor the sound output to your preference.
6.10 Ẹyìnview Iṣagbewọle kamẹra
Sopọ ẹhinview camera to the KAMIN RCA input. When the vehicle is shifted into reverse, the unit will automatically display the camera feed, enhancing parking safety.
7. Awọn pato
| Ẹya ara ẹrọ | Ẹ̀kúnrẹ́rẹ́ |
|---|---|
| Nọmba awoṣe | Single Din Touchscreen Radio |
| Ifihan | 6.5 Inch HD IPS Touch Screen (1024x600 resolution) |
| Asopọmọra | Bluetooth 5.3, USB, Auxiliary, Type-C (charging) |
| Foonuiyara Integration | Apple CarPlay (Wired), Android Auto (Wired), Screen Mirroring |
| Ijade ohun | 300W Peak Power, 4-CH RCA Out, 10-band EQ |
| Redio Tuner | AM (530-1710KHz), FM (87.5-107.9MHz) |
| Sisisẹsẹhin fidio | 1080p Video Playback, H.264, H.265/HEVC encoding |
| Awọn ọna Iṣakoso | Touchscreen, IR Remote Control, Steering Wheel Control, Voice Control |
| Awọn iwọn | 4.5 x 7.36 x 2.4 inches (Ọja) |
| Iwọn | 2.03 iwon |
| Ibi ti ina elekitiriki ti nwa | 12V DC (Ilẹ odi) |
8. Laasigbotitusita
Tọkasi apakan yii fun awọn ọran ti o wọpọ ati awọn ojutu wọn.
8.1 Ko si Agbara
- Ṣayẹwo Wiring: Ensure the yellow (constant 12V), red (accessory 12V), and black (ground) wires are correctly connected and have proper voltage.
- Fiusi: Check the fuse on the unit's wiring harness and the vehicle's fuse box. Replace if blown.
- Batiri: Ensure the vehicle's battery is charged and connected.
8.2 Ko si Ohun
- Ipele Iwọn: Increase the volume. Check if the unit is muted.
- Gbigbe Agbọrọsọ: Verify all speaker wires are correctly connected and not short-circuited.
- Aṣayan Orisun: Ensure the correct audio source (e.g., Radio, USB, Bluetooth, AUX) is selected.
- Ampolutọpa: Ti ita amplifier is used, ensure it is powered on and correctly wired.
8.3 CarPlay/Android Auto Not Connecting
- Okun USB: Use a high-quality, certified USB data cable. Faulty cables can prevent connection.
- Ibudo USB: Ensure the phone is connected to the correct USB port on the unit.
- Eto foonu: Check your phone's settings to ensure CarPlay/Android Auto is enabled and allowed to connect to the unit.
- Imudojuiwọn Software: Ensure your phone's operating system and any relevant apps (e.g., Android Auto app) are up to date.
8.4 Iboju ifọwọkan ko dahun
- Reset Unit: Use a thin object to press the RST button on the front panel to perform a soft reset.
- Yiyipo Agbara: Turn off the vehicle's ignition, wait a few minutes, then restart.
9. Itọju
- Ninu iboju: Use a soft, lint-free cloth to gently wipe the touchscreen. For stubborn marks, slightly dampen awọn asọ pẹlu omi tabi a iboju-ailewu regede. Yago fun awọn kẹmika lile.
- Isọsọ gbogboogbo: Use a dry, soft cloth to wipe the unit's body. Do not use abrasive cleaners or solvents.
- Awọn imudojuiwọn famuwia: Lorekore ṣayẹwo olupese ká webaaye fun eyikeyi awọn imudojuiwọn famuwia ti o wa lati rii daju iṣẹ ti o dara julọ ati ibamu.
10. Atilẹyin ọja & Atilẹyin
SOUNDKITS provides the following support and warranty information:
- Atilẹyin ọja: The product comes with a 12-month responsibility for all products.
- Free Replacement/Refund: A 90-day free replacement or refund policy is available.
- Technical Guidance & Support: Lifetime technical guidance and support are provided.
- Iṣẹ onibara: Fast response within 24 hours for inquiries.
For further assistance, please contact SOUNDKITS customer support through the platform where the product was purchased or visit the official SOUNDKITS store page.
You can typically find contact information by navigating to the seller's profile on the purchase platform and selecting "Ask a question."

Image: A graphic detailing SOUNDKITS' customer service commitments: 24-hour fast response, 90-day free replacement or refund, 12-month product responsibility, and lifetime technical guidance & support.


